Mini Grilled Cheese Hawaiian Rolls-Ultimate Recipe
Mini Grilled Cheese Hawaiian Rolls: An Incredible Ultimate Recipe. Get ready to elevate your comfort food game because we’re diving headfirst into a truly remarkable creation. Who doesn’t adore a perfectly gooey, cheesy grilled cheese sandwich? It’s a universal declaration of deliciousness. But what if we could make that beloved classic even more delightful? That’s precisely what these mini grilled cheese Hawaiian rolls achieve. The subtle sweetness and incredibly soft texture of the Hawaiian rolls provide an irresistible foundation, creating a flavor and textural experience that’s simply out of this world. We’re talking about a bite-sized marvel that’s perfect for parties, a fun family snack, or even a surprisingly satisfying solo indulgence. This isn’t just any grilled cheese; it’s an experience, a nostalgic hug in food form, elevated to new heights with the sweet embrace of Hawaiian rolls.
Mini Grilled Cheese Hawaiian Rolls: An Incredible Ultimate Recipe
Get ready to elevate your snack game to a whole new level with these Mini Grilled Cheese Hawaiian Rolls! If you’ve ever craved that perfect blend of sweet, savory, and cheesy goodness, you’re in for a treat. These little flavor bombs take the beloved comfort food of grilled cheese and transform it into an irresistible bite-sized sensation, all thanks to the magic of Hawaiian rolls. Their inherent sweetness and soft texture are the ideal canvas for a melty, gooey cheese filling, and the touch of garlic and herbs takes them from delicious to absolutely divine.
These are perfect for parties, game nights, or simply as a special treat to brighten your day. They’re incredibly easy to make, making them a fantastic option for begin extractners in the kitchen, but their sophisticated flavor profile will impress even the most seasoned home cooks. Prepare to be amazed by how something so simple can deliver such a powerful punch of flavor and satisfaction. Let’s dive into creating these miniature masterpieces!
Ingredients:
Preparing the Rolls and Cheese
The first step to creating these delightful mini grilled cheeses is to get your ingredients prepped and ready to go. This makes the assembly process smooth and efficient.
Start by taking your 12 Hawaiian rolls. The beauty of these rolls is their inherent sweetness and soft, fluffy texture, which are key to the overall flavor profile of our mini grilled cheeses. You’ll want to slice each roll in half horizontally, just like you would a regular sandwich roll. A serrated knife works best for this, as it will prevent you from squishing the delicate rolls. Be gentle as you slice, aiming for an even cut so that your cheese filling will be well-distributed. Set the top halves aside for now.
Next, in a medium bowl, combine your shredded cheddar cheese and shredded mozzarella cheese. I like to use a blend of cheeses for optimal flavor and meltability. Cheddar provides that classic sharp, tangy taste, while mozzarella brings the gooey, stretchy factor we all love in a grilled cheese. You can absolutely experiment with other cheeses if you prefer, like Monterey Jack, Gruyere, or even a touch of Pepper Jack for a hint of spice.
Now, for the optional but highly recommended flavor enhancers. To the cheese mixture, add your softened butter. Make sure the butter is truly softened to room temperature – this will make it easier to incorporate into the cheese and create a delicious spreadable mixture. If you’re using the garlic powder and dried herbs, add them now to the butter and cheese. I find that a little garlic powder really kicks up the savory notes, and a pinch of dried oregano or basil adds a wonderful aromatic complexity. Stir everything together thoroughly until the butter is well distributed throughout the cheese mixture. You want a consistency that is easy to spread but not overly greasy.
Assembling the Mini Grilled Cheeses
With your rolls sliced and your cheesy butter mixture prepared, it’s time for the fun part: assembly! This is where the magic truly begin extracts to happen, transforming simple ingredients into something truly special.
Take the bottom halves of your Hawaiian rolls. Using a spoon or a small offset spatula, generously spread the cheese and butter mixture onto the cut side of each bottom roll half. Don’t be shy with the filling! You want a good amount of cheesy goodness to peek out once they’re grilled. Ensure you spread it as evenly as possible, reaching close to the edges. This will help guarantee a beautifully melty interior in every bite.
Once you’ve filled all the bottom halves, carefully place the top halves of the Hawaiian rolls back on top, completing your mini sandwiches. Gently press down to ensure they are senon-alcoholic aled and that the filling is held in place. You should now have 12 perfectly formed mini grilled cheese sandwiches, ready for their transformation on the grill or in a skillet.
Grilling to Golden Perfection
This is the crucial step where the alchemy of heat and cheese creates pure bliss. You can use a grill pan on your stovetop, a regular skillet, or even an outdoor grill for this.
Step 1: Preheat your cooking surface. Whether you’re using a grill pan or a skillet, heat it over medium heat. It’s important not to have the heat too high, as this can burn the outsides of the rolls before the cheese has a chance to melt properly. A medium heat allows for even browning and thorough melting.
Step 2: Butter the outsides of the rolls. While the pan is preheating, take your softened butter (you might need a little extra here, or you can use the remaining butter from the initial softening). Lightly spread a thin layer of butter on the top and bottom of each assembled mini grilled cheese. This butter is essential for achieving that coveted golden-brown, crispy exterior that’s a hallmark of perfectly grilled cheese.
Step 3: Cook the first side. Carefully place the mini grilled cheese sandwiches onto the preheated pan or grill. You’ll likely need to cook them in batches to avoid overcrowding the pan, which can lead to uneven cooking and steaming rather than grilling. Cook for 3-5 minutes on the first side, or until the bottom is beautifully golden brown and the cheese is starting to melt around the edges.
Step 4: Flip and cook the second side. Using a spatula, carefully flip each mini grilled cheese. Cook for another 3-5 minutes on the second side, or until that side is also golden brown and the cheese is fully melted and gooey. You should see the cheese starting to ooze out enticingly. If the rolls are browning too quickly before the cheese melts, reduce the heat slightly.
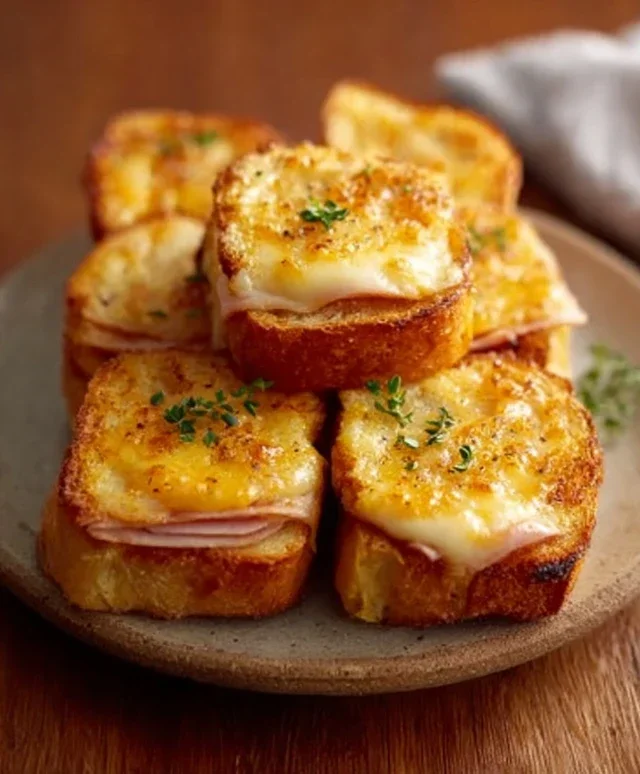
Step 5: Serve immediately and enjoy! Once they’re perfectly golden and melty, remove them from the pan. These mini grilled cheese Hawaiian rolls are best enjoyed immediately, while they are warm and the cheese is at its most irresistible. The contrast between the slightly sweet, soft roll and the savory, cheesy interior is simply divine. They make a fantastic appetizer, a fun side dish, or even a light meal. Prepare yourself for a chorus of happy sighs and requests for seconds!

Conclusion:
There you have it – the recipe for Mini Grilled Cheese Hawaiian Rolls that’s truly an incredible ultimate recipe! What makes these little delights so special? It’s the perfect marriage of sweet, fluffy Hawaiian rolls with the savory, melty goodness of cheese, all kissed by the smoky char of the grill. These mini wonders are incredibly versatile, making them the star of any gathering or a delightful quick snack. They’re quick to assemble, satisfyingly delicious, and always disappear in a flash!
For serving, I love presenting them as appetizers at parties, alongside a hearty soup for a comforting lunch, or even as a fun side dish for a summer barbecue. The possibilities are endless! Don’t be afraid to get creative with variations. Consider adding a thin slice of beef ham or turkey for a mini club sandwich vibe, a sprinkle of herbs like chives or parsley to the cheese, or even a touch of spicy jam for a sweet and savory kick.
I genuinely encourage you to give this Mini Grilled Cheese Hawaiian Rolls recipe a try. I’m confident you’ll fall in love with their irresistible charm and flavor. They’re a guaranteed crowd-pleaser and a testament to how simple ingredients can create something truly spectacular.
Frequently Asked Questions:
Can I make these ahead of time?
While they are best enjoyed fresh off the grill for ultimate cheesiness, you can assemble them ahead of time and grill them just before serving. For the absolute best texture and flavor, grilling them right before you plan to eat is recommended.
What kind of cheese works best?
A good melting cheese is key! I find a blend of sharp cheddar and Monterey Jack offers a fantastic flavor profile and excellent meltability. Gruyere, provolone, or even a mild Swiss would also be delicious additions or alternatives.
Are these suitable for kids?
Absolutely! Kids adore these mini grilled cheese Hawaiian rolls. The sweetness of the roll combined with the familiar comfort of grilled cheese makes them a guaranteed hit with younger palates. You can even cut them in half diagonally for easier handling.
Mini Grilled Cheese Hawaiian Rolls: An Incredible Ultimate Recipe
A quick and delicious recipe for mini grilled cheese sandwiches using sweet Hawaiian rolls, perfect for parties or a fun snack.
Ingredients
-
12 Hawaiian rolls
-
1 cup shredded cheddar cheese
-
1 cup shredded mozzarella cheese
-
1/2 cup butter, softened
-
1 teaspoon garlic powder (optional)
-
1 teaspoon dried herbs (oregano or basil, optional)
Instructions
-
Step 1
Slice each Hawaiian roll in half horizontally, being careful not to cut all the way through if you prefer a hinge. -
Step 2
In a small bowl, combine the shredded cheddar cheese and shredded mozzarella cheese. If using, stir in the garlic powder and dried herbs. -
Step 3
Spread a generous amount of the cheese mixture onto the bottom half of each Hawaiian roll. -
Step 4
Place the top half of each roll back over the cheese to close the sandwich. -
Step 5
Butter the outside of the top and bottom of each mini sandwich. Alternatively, spread softened butter evenly on one side of each roll before assembling. -
Step 6
Heat a non-stick skillet or griddle over medium heat. Grill the mini sandwiches for 3-5 minutes per side, or until golden brown and the cheese is melted and gooey. -
Step 7
Serve immediately and enjoy!
Important Information
Nutrition Facts (Per Serving)
It is important to consider this information as approximate and not to use it as definitive health advice.
Allergy Information
Please check ingredients for potential allergens and consult a health professional if in doubt.