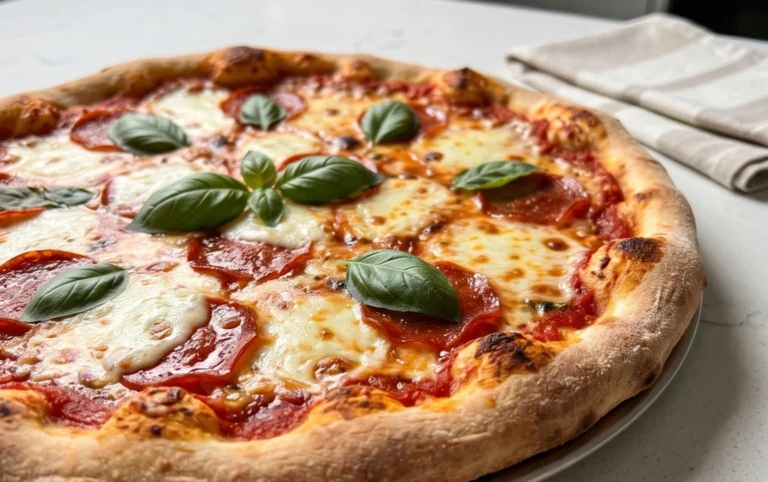
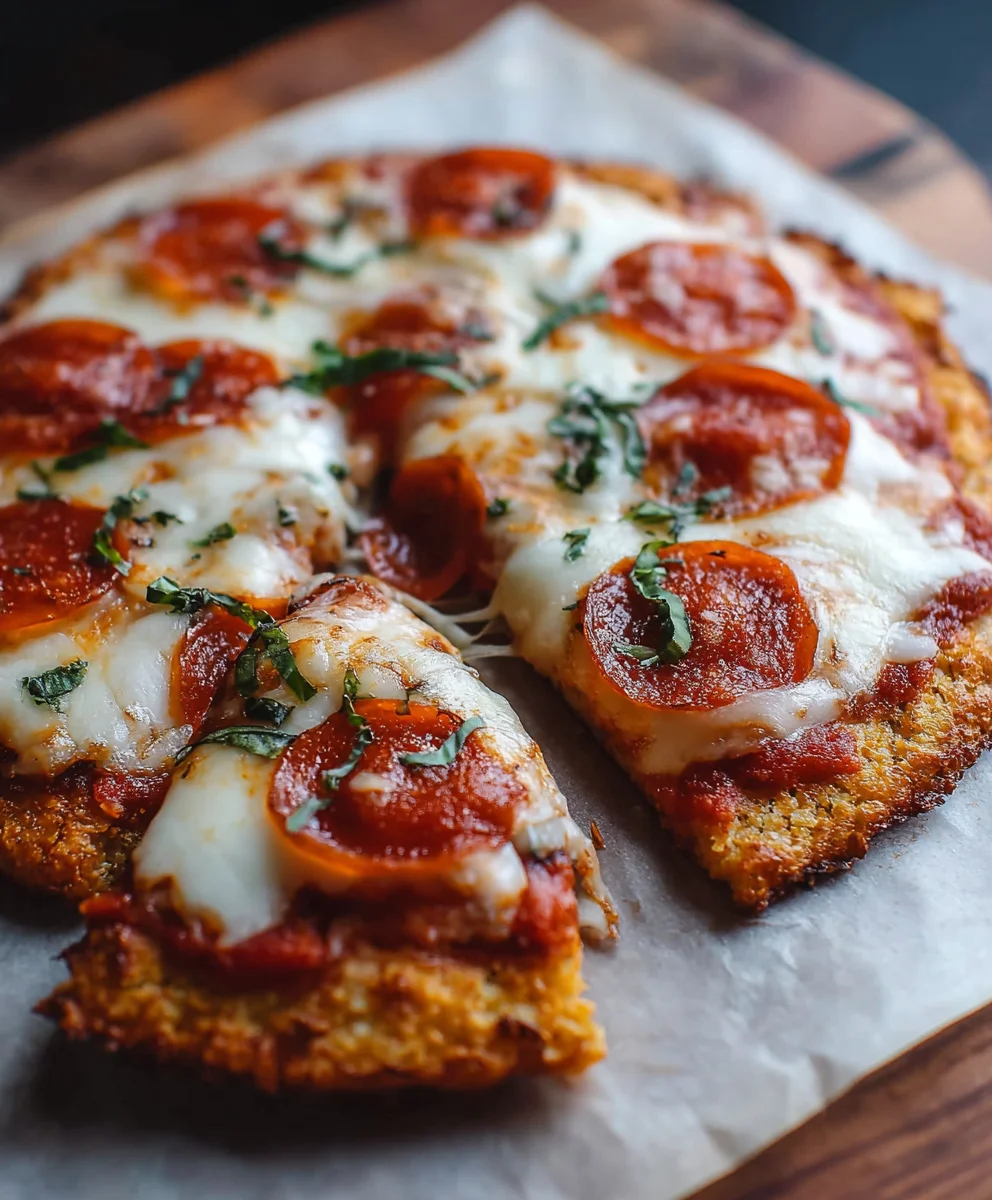
Keto Chicken Crust Pizza – Delicious Low Carb Recipe
Keto Pizza Chicken Crust is more than just a meal; it’s a culinary revelation for anyone craving pizza without the carb-heavy baggage. Imagin extracte sinking your teeth into a perfectly baked crust, satisfyingly chewy and delightfully savory, all while knowing you’re sticking to your ketogenic lifestyle. This isn’t your average diet food; it’s a genuinely delicious and guilt-free indulgence that has captured the hearts (and stomachs!) of keto enthusiasts worldwide. What makes the Keto Pizza Chicken Crust so beloved? It’s the incredible versatility, the ease of customization, and the sheer satisfaction of transforming lean chicken into a pizza base that rivals traditional dough in flavor and texture. It’s the perfect canvas for your favorite low-carb toppings, turning a weekend treat into a healthy habit. Get ready to discover how simple, yet utterly rewarding, making your own delicious Keto Pizza Chicken Crust can be!
Ingredients:
- 1 can (about 6 ounces) canned chicken, drained very well
- 2 large eggs
- ½ cup grated Parmesan cheese
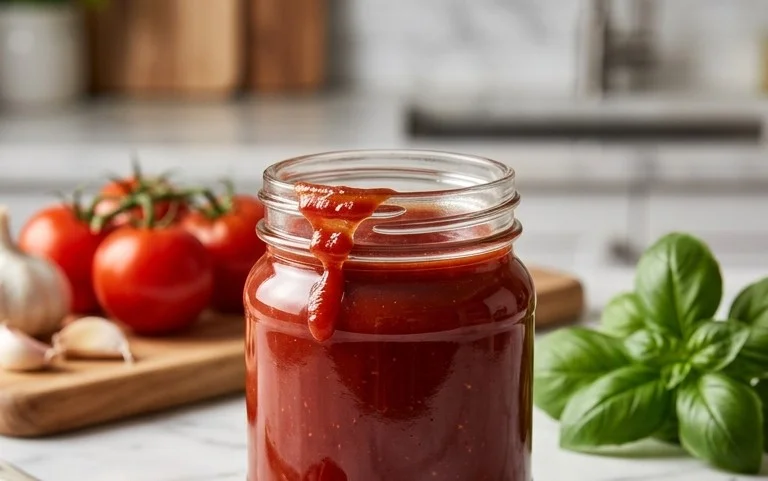
- 1 cup sugar-free marinara sauce
- 2 cups shredded mozzarella cheese
- 1 package (about 3 ounces) beef beef pepperoni slices
Preparing the Keto Pizza Chicken Crust
Step 1: Preparing the Chicken “Dough”
The first and most crucial step to achieving a successful Keto Pizza Chicken Crust is to prepare your chicken base. You’ll start with that 1 can of drained canned chicken. It’s absolutely vital that you get as much moisture out of the chicken as possible. I like to press it against the side of the can with a fork or even spread it out on a paper towel-lined plate and gently pat it dry. The less water content in the chicken, the firmer and more “dough-like” your crust will be. Once it’s thoroughly drained and dried, transfer the chicken to a medium-sized mixing bowl. Add the 2 large eggs to the bowl with the chicken. These eggs will act as the binder, holding everything together. Then, add the ½ cup of grated Parmesan cheese. The Parmesan not only contributes to the flavor profile but also helps to absorb any residual moisture and adds a delightful savory depth. Now, using a fork or your hands (clean hands are best!), thoroughly mix all these ingredients together until they are well combined and form a consistent, somewhat paste-like mixture. Don’t be afraid to really get in there and break up any clumps of chicken. You want a uniform base.
Step 2: Shaping and Pre-Baking the Crust
Once your chicken mixture is ready, it’s time to shape it into our pizza crust. Preheat your oven to 400 degrees Fahrenheit (200 degrees Celsius). This higher temperature is essential for getting a good crisp on the crust. Line a baking sheet with parchment paper or a silicone baking mat. This prevents sticking and makes for easy cleanup. Take the chicken mixture and spread it evenly onto the prepared baking sheet. You can aim for a round pizza shape, or even a rectangular one if you prefer. Use the back of a spoon or your fingers to press the mixture into a relatively thin, even layer, about ¼ to ½ inch thick. The thinner you spread it, the crispier the crust will become. Now, this is where the pre-baking comes in. Pop the baking sheet into your preheated oven and bake for 15-20 minutes. You’re looking for the crust to be firm to the touch and lightly golden brown around the edges. This step is critical because it cooks the chicken and eggs, setting the base before you add your toppings, preventing a soggy bottom.
Step 3: Adding the Sauce and Cheese
After your chicken crust has had its initial bake, carefully remove it from the oven. Be cautious as it will be hot. You’ll notice it’s firmed up considerably. Now, it’s time to add the delicious pizza toppings! Evenly spread 1 cup of sugar-free marinara sauce over the pre-baked chicken crust. Make sure to leave a small border around the edge, just like you would on a traditional pizza, to prevent the sauce from running off. Don’t overload the sauce, as too much moisture can still make the crust less crisp. Next, sprinkle the 2 cups of shredded mozzarella cheese generously over the marinara sauce. Distribute it evenly across the surface, ensuring good coverage. The mozzarella will melt and create that classic cheesy pizza experience we all love.
Step 4: AddingBeef Pepperonieroni and Final Bake
With the sauce and mozzarella in place, it’s time for the finalbeef pepperoni pepperoni! Arrange the 1 pbeef pepperoni beef pepperoni slices over the mozzarella cheese. You can overlap them slightly or place them in a decorative pattern, depending on your preference. This is the moment when your Keto Pizza Chicken Crust starts to look like a real pizza! Return the baking sheet to the oven, which should still be at 400 degrees Fahrenheit (200 degrees Celsius). Bake for another 8-12 minutes, or until the mozzarella cheese is melted, bubbly, and has developed some lovely goldbeef pepperonispots. The pepperoni should also be slightly crisped around the edges. Keep a close eye on it during this stage to prevent any burning.
Step 5: Resting and Serving
Once your Keto Pizza Chicken Crust has achieved that perfect golden-brown, bubbly finish, carefully remove it from the oven. Allow it to rest on the baking sheet for about 5 minutes before attempting to slice and serve. This resting period is important because it allows the cheese to set slightly, making it easier to cut clean slices and preventing all the toppings from sliding off. You can use a pizza cutter or a sharp knife to slice your pizza. This Keto Pizza Chicken Crust is best enjoyed immediately while warm and the cheese is still wonderfully gooey. Enjoy this guilt-free, low-carb alternative to traditional pizza!

Conclusion:
There you have it – a delicious and satisfying Keto Pizza Chicken Crust that’s not only incredibly low in carbs but also packed with flavor! We’ve walked through the simple steps to create this fantastic alternative to traditional pizza, proving that you don’t need to sacrifice taste for your ketogenic lifestyle. This dish is surprisingly versatile and perfect for a weeknight meal or even for entertaining. Remember, the key is to get your chicken breast mixture just right for the perfect crust consistency.
For serving suggestions, this Keto Pizza Chicken Crust is wonderful on its own, but you can also pair it with a fresh green salad for a complete and balanced meal. Feel free to experiment with your favorite pizza toppings – just be mindful of carb counts if you’re strictly adhering to keto. I encourage you to give this recipe a try and adapt it to your personal taste preferences. Don’t be afraid to get creative!
Frequently Asked Questions about Keto Pizza Chicken Crust:
Q1: How can I ensure my Keto Pizza Chicken Crust doesn’t get soggy?
To prevent soggin extractess, make sure to press the chicken mixture down firmly and evenly to form the crust. Baking it thoroughly until it’s golden brown and firm before adding toppings is also crucial. Allowing excess moisture from the chicken to evaporate during the initial baking phase will help create a crispier base.
Q2: Can I make the Keto Pizza Chicken Crust ahead of time?
Yes, you can prepare the chicken crust ahead of time. You can bake it completely, let it cool, and then store it in the refrigerator for a day or two. When you’re ready to serve, simply add your toppings and reheat it in the oven until the cheese is melted and bubbly.
Keto Chicken Crust Pizza
A delicious and easy low-carb pizza recipe featuring a crispy chicken crust, sugar-free marinara sauce, melted mozzarella, and beef pepperoni.
Ingredients
-
1 can canned chicken, drained very well
-
2 large eggs
-
½ cup grated Parmesan cheese
-
1 cup sugar-free marinara sauce
-
2 cups shredded mozzarella cheese
-
1 package beef pepperoni slices
Instructions
-
Step 1
Prepare the chicken ‘dough’ by thoroughly draining canned chicken. Mix with eggs and grated Parmesan cheese until well combined. -
Step 2
Preheat oven to 400°F (200°C). Line a baking sheet with parchment paper. Spread the chicken mixture evenly onto the sheet, about ¼ to ½ inch thick. Bake for 15-20 minutes until firm and lightly golden. -
Step 3
Remove the crust from the oven. Spread sugar-free marinara sauce evenly over the crust, leaving a small border. Sprinkle shredded mozzarella cheese over the sauce. -
Step 4
Arrange beef pepperoni slices over the mozzarella cheese. Return the pizza to the oven and bake for another 8-12 minutes, or until the cheese is melted and bubbly with golden spots. -
Step 5
Carefully remove the pizza from the oven. Let it rest for 5 minutes before slicing and serving hot.
Important Information
Nutrition Facts (Per Serving)
It is important to consider this information as approximate and not to use it as definitive health advice.
Allergy Information
Please check ingredients for potential allergens and consult a health professional if in doubt.