Keto Crunchwraps- Guilt-Free Indulgent & Delicious
Delicious Keto Crunchwraps are about to revolutionize your snack game, offering a satisfyingly crunchy, deeply flavorful experience that’s completely guilt-free. Have you ever craved that iconic fast-food wrap but shuddered at the carb count? I know I have! That’s precisely why I’m so thrilled to share this recipe for Delicious Keto Crunchwraps with you today. These aren’t just a keto substitute; they’re a culinary triumph in their own right, delivering that perfect textural contrast and savory explosion that makes a crunchwrap so utterly irresistible. We’re talking about a crispy exterior giving way to a warm, gooey, and richly seasoned filling – all without derailing your low-carb lifestyle. Get ready to indulge your cravings and discover your new favorite go-to meal or snack. This is your ticket to enjoying a beloved comfort food reimagin extracted for mindful eating.
What Makes These Crunchwraps So Special?
They’re the ultimate in keto comfort food!
Delicious Keto Crunchwraps Recipe for Guilt-Free Indulgence
Are you craving that satisfying crunch and cheesy, savory goodness of a crunchwrap, but trying to stick to your ketogenic lifestyle? Well, get ready to have your taste buds sing! I’ve perfected this Keto Crunchwrap recipe, and it’s a game-changer for guilt-free indulgence. It delivers all the flavor and textural satisfaction of the origin extractal, without the carb overload. Whether you’re looking for a quick and easy weeknight dinner, a portable lunch option, or just a delicious way to satisfy those comfort food cravings, this recipe has you covered. The magic lies in the combination of a creamy, cheesy filling, seasoned ground beef, and that irresistible crispy exterior achieved through clever folding and pan-frying. Let’s dive into how we’re going to create these fantastic keto crunchwraps!
Ingredients:
Cooking Instructions
Now, let’s get down to business and assemble these flavor-packed keto crunchwraps. This recipe is broken down into a few manageable phases to ensure perfection.
Phase 1: Crafting the Creamy Cheese Sauce
Our first step is to create the luscious, cheesy sauce that forms the binder and adds incredible flavor to the inside of our crunchwraps. In a medium saucepan, melt the 2 tablespoons of unsalted butter over medium-low heat. Once the butter has melted, add the 4 ounces of cream cheese. Stir continuously until the cream cheese is completely smooth and incorporated into the butter. This is where the magic starts to happen! Next, gradually whisk in the 1/4 cup of heavy whipping cream. Continue to stir until the mixture is smooth and slightly thickened. Don’t worry if it seems a little thin at this stage; it will thicken further as we add the cheese. Now, it’s time for the star of this phase: the 1 cup of shredded cheddar cheese. Add the shredded cheese to the saucepan, a little at a time, stirring constantly until it’s fully melted and the sauce is smooth and creamy. Season with a pinch of salt and pepper if you like, though the taco seasoning will add plenty of flavor later. Remove the sauce from the heat and set it aside. This glorious cheese sauce is going to coat all our delicious fillings.
Phase 2: Searing the Savory Filling
While our cheese sauce cools slightly, let’s get our protein filling ready. Heat the 1 tablespoon of olive oil in a large skillet over medium-high heat. Add the 1 pound of ground beef to the hot skillet. Break up the ground beef with a spoon and cook until it’s browned all the way through, draining off any excess grease. Once the beef is cooked, stir in the 2 tablespoons of taco seasoning. Make sure the seasoning is evenly distributed, coating every piece of the ground beef. Cook for another minute or two, allowing the flavors to meld and the taco seasoning to become fragrant. This step is crucial for building that deep, savory flavor profile that makes these crunchwraps so satisfying. If you’re using ground chicken or turkey, ensure they are fully cooked through.
Phase 3: Assembling the Crunchwraps
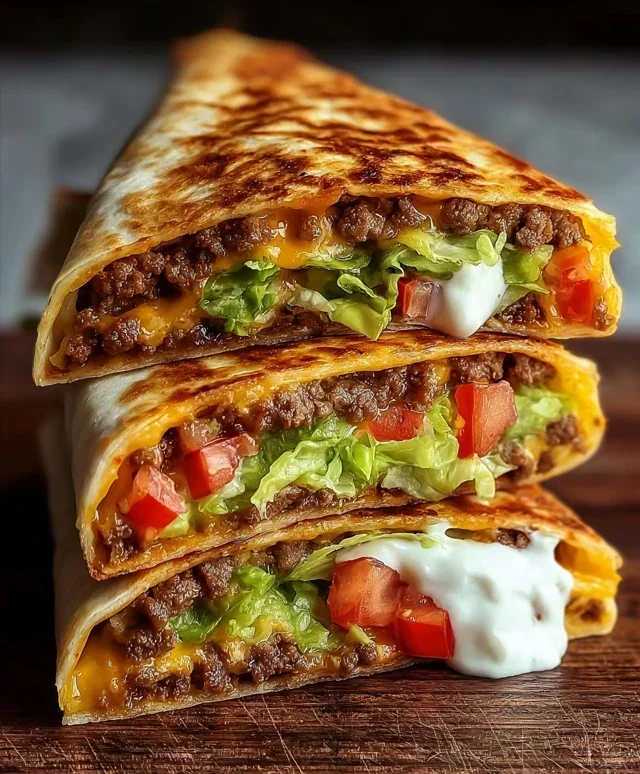
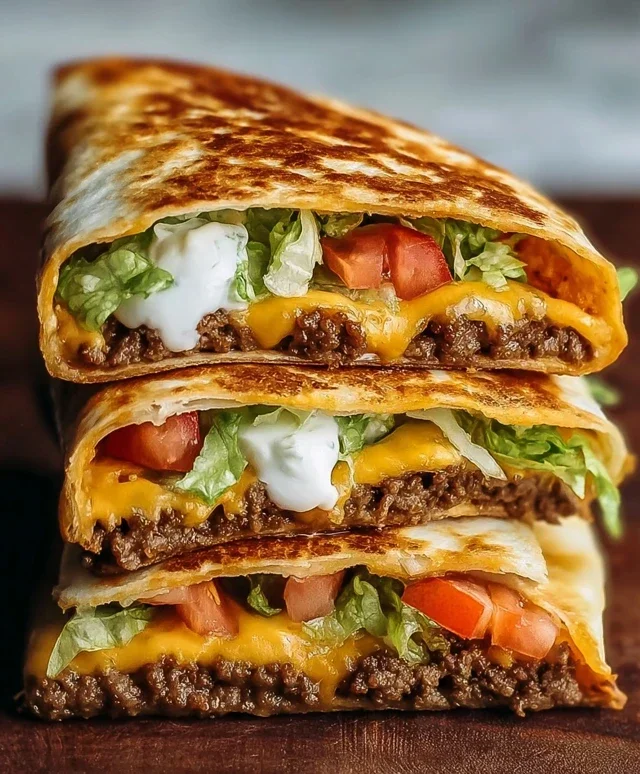
Now for the exciting part: assembling our keto crunchwraps! Lay out your 4 low-carb tortillas on a clean surface. We’re going to layer these with all the delicious components. On each tortilla, spread a generous amount of the creamy cheese sauce we made earlier. Don’t be shy; this is key to binding everything together and adding that rich, cheesy goodness. Next, spoon a portion of the seasoned ground beef mixture onto the center of each tortilla, over the cheese sauce. Top the ground beef with about 1/4 cup of shredded lettuce. Then, add some diced tomato (or your bell pepper substitute). For an extra layer of flavor and texture, sprinkle a good amount of the extra cheddar cheese over the toppings. If you’re adding them, now is the time for the jalapeño slices. Finally, sprinkle some fresh cilantro over the fillings.
Phase 4: The Art of the Fold
This is where the “crunchwrap” magic truly happens! We need to fold these tortillas into a neat packet that will crisp up beautifully. Take one side of the tortilla and fold it towards the center, creating a half-moon shape. Then, fold the opposite side over the first fold, creating a more enclosed shape. Continue folding the sides in a way that creates a somewhat senon-alcoholic aled pocket, leaving a small opening at the top where the fillings are exposed. This folding technique is what creates the iconic crunchwrap shape and allows for even cooking. It might take a little practice to get it just right, but don’t worry about perfection; the goal is to create a secure package for our fillings.
Phase 5: Achieving the Perfect Crispy Sear
The final step is to get these beauties perfectly golden and crispy. Heat a large, non-stick skillet or griddle over medium heat. You can add a tiny bit more butter or oil to the skillet if needed, but the cheese sauce and fillings often have enough fat. Carefully place the folded crunchwraps, seam-side down, into the hot skillet. Cook for about 3-5 minutes per side, or until the tortillas are golden brown and crispy. You want to achieve a nice, toasty exterior that provides that satisfying crunch. Gently press down on the crunchwraps with a spatula as they cook to ensure even browning and to help them seal. Once both sides are golden and crispy, carefully remove them from the skillet.
Serve your delicious Keto Crunchwraps immediately! They are best enjoyed hot, with a dollop of sour cream or Greek yogurt on the side for dipping, and perhaps some extra fresh cilantro for garnish. Enjoy your guilt-free, indulgent creation!
Conclusion:
You’ve just discovered how to create a truly satisfying and Delicious Keto Crunchwrap Recipe that delivers on flavor and texture without the carb guilt. This recipe is a game-changer for anyone following a ketogenic lifestyle, offering a delightful crunch and a burst of savory goodness in every bite. The beauty of this crunchwrap lies in its versatility and the ability to customize it to your heart’s content. Whether you’re looking for a quick lunch, a portable snack, or a fun weeknight dinner, this keto-friendly take on a classic is sure to become a staple in your kitchen.
For serving suggestions, imagin extracte pairing your crunchwraps with a fresh green salad drizzled with a creamy avocado dressing, a side of seasoned cauliflower rice, or even some crispy baked jicama fries. The possibilities are endless! Feel free to experiment with different protein fillings like seasoned ground turkey, shredded chicken with buffalo sauce, or even spicy Italian sausage. Don’t be afraid to play with your cheese choices too – pepper jack adds a nice kick, while a blend of mozzarella and cheddar offers classic gooeyness. I wholeheartedly encourage you to give this recipe a try; I’m confident you’ll be amazed at how delicious guilt-free indulgence can be!
Frequently Asked Questions:
What are the best low-carb tortillas for this recipe?
For optimal results, look for tortillas specifically labeled as “keto” or “low-carb.” These are typically made with ingredients like almond flour, coconut flour, or psyllium husk, keeping the net carb count significantly lower than traditional tortillas. Brands vary, so checking the nutrition label is always a good idea to ensure they fit your macros.
Can I make these crunchwraps ahead of time?
While the crunchwraps are best enjoyed fresh for maximum crunch, you can prepare the filling ingredients in advance. This will significantly speed up the assembly process when you’re ready to cook them. Store the filling in an airtight container in the refrigerator for up to 3 days.
What can I use if I don’t have tostada shells?
No tostada shells? No problem! You can achieve a similar crunch by using a very thin layer of cheese on the inside of the tortilla and pan-frying it until crispy, or by incorporating some finely crushed beef rinds into your filling for added texture. Another option is to bake a few extra cheese crisps to break and add inside.
Delicious Keto Crunchwraps Recipe for Guilt-Free Indulgence
Enjoy these incredibly satisfying keto crunchwraps, a perfect guilt-free indulgence. Packed with savory ground beef and creamy cheese, all wrapped in low-carb tortillas for a delightful crunch.
Ingredients
-
1 tablespoon Olive Oil
-
1 pound Ground Beef
-
2 tablespoons Taco Seasoning
-
2 tablespoons Butter
-
4 ounces Cream Cheese
-
1/4 cup Heavy Whipping Cream
-
1 cup Shredded Cheddar Cheese
-
4 pieces Low-Carb Tortillas
-
1 cup Sour Cream
-
1 cup Shredded Lettuce
-
1 medium Tomato
-
1 cup Extra Cheddar Cheese
-
1/4 cup Cilantro
-
1/2 cup Jalapeño Slices
Instructions
-
Step 1
Heat olive oil in a skillet over medium-high heat. Add ground beef and cook until browned, breaking it apart. Drain excess grease. -
Step 2
Stir in taco seasoning and cook for another minute until fragrant. Set aside. -
Step 3
In a separate saucepan, melt butter over medium heat. Add cream cheese and stir until smooth. Gradually whisk in heavy whipping cream until combined. Stir in 1 cup shredded cheddar cheese until melted and creamy. -
Step 4
Lay out one low-carb tortilla. Spread a layer of the cheese sauce, then top with seasoned ground beef. Add sour cream, lettuce, tomato, extra cheddar cheese, cilantro, and jalapeño slices (if using). -
Step 5
Fold the tortilla in half, then fold in the sides to create a rectangular package. Repeat for remaining crunchwraps. -
Step 6
Heat a clean skillet or griddle over medium heat. Place the crunchwraps seam-side down and cook for 3-5 minutes per side, until golden brown and crispy.
Important Information
Nutrition Facts (Per Serving)
It is important to consider this information as approximate and not to use it as definitive health advice.
Allergy Information
Please check ingredients for potential allergens and consult a health professional if in doubt.