Sugar Free Fudge – Deliciously Guilt-Free Treat
Sugar free fudge might sound like a contradiction in terms to some, but trust me, it’s a delicious reality that will have your taste buds singin extractg! For years, I’ve been on a quest for that perfectly rich, melt-in-your-mouth fudge experience, and I’ve finally cracked the code. We all love fudge for its decadent chocolatey goodness and satisfyingly dense texture, but the sugar content can often be a dealbreaker. That’s where this incredible sugar free fudge comes in. It delivers all the nostalgic comfort and indulgence you crave, without any of the guilt. What makes this recipe truly special is its ability to recreate that classic fudge magic using clever, natural sweeteners that don’t compromise on flavor or texture. Get ready to discover your new favorite guilt-free treat!
Sugar Free Fudge
There are some cravings that just can’t be ignored, and for many of us, chocolate is at the very top of that list. But what if you’re trying to cut back on sugar? Does that mean you have to bid farewell to the rich, decadent joy of fudge? Absolutely not! Today, I’m going to share with you a recipe for sugar-free fudge that is so incredibly simple and so delightfully delicious, you’ll wonder why you didn’t try it sooner. This fudge is perfect for those moments when you need a little sweet treat without the sugar rush, and it’s a fantastic option for anyone following a ketogenic or low-carbohydrate lifestyle. We’re keeping it incredibly straightforward with just a few pantry staples, meaning you can whip up a batch of this guilt-free indulgence with minimal fuss. Get ready to satisfy your chocolate desires in a whole new way!
Ingredients:
Getting Started: Preparing Your Pan
Before we even think about melting chocolate, it’s crucial to have your pan ready. This step ensures that when your fudge is perfectly set, you can easily lift it out in one piece. I like to use an 8×8 inch square baking pan. Line it thoroughly with parchment paper, making sure there’s some overhang on the sides. This overhang acts as handles, allowing you to lift the entire slab of fudge out of the pan once it has cooled and firmed up. Press the parchment paper down firmly into the corners and along the bottom of the pan so it lies flat and doesn’t create wrinkles in your fudge. If you don’t have parchment paper, you can lightly grease your pan with a neutral oil or butter, but parchment paper is definitely the easiest and cleanest method for removal.
Melting the Chocolate Base
The foundation of our sugar-free fudge is, of course, chocolate. We’ll be using sugar-free chocolate chips for this recipe. The best way to melt chocolate without scorching it is to use a double boiler method or a microwave on a very low power setting. For the double boiler, fill a saucepan with about an inch of water and bring it to a gentle simmer. Place a heatproof bowl (that fits snugly over the saucepan without touching the water) on top. Add your sugar-free chocolate chips to the bowl. Stir them frequently as they begin extract to melt. The gentle, indirect heat from the steam will melt the chocolate smoothly and evenly. If you opt for the microwave, place the chocolate chips in a microwave-safe bowl and heat on 50% power in 30-second intervals, stirring well after each interval. Be patient! It’s better to melt it slowly and carefully than to rush and burn it. Once the chocolate chips are mostly melted, remove the bowl from the heat (or microwave) and continue stirring until they are completely smooth and glossy.
Incorporating the Nut Butter and Vanilla
Now for the creamy, luscious texture that makes fudge so irresistible! Once your sugar-free chocolate is beautifully melted and smooth, it’s time to add the almond butter. Using a smooth almond butter is key here. If your almond butter is oily, you might want to give it a good stir before measuring to ensure it’s well combined. Add the cup of almond butter directly into the melted chocolate. At first, it might look like the nut butter isn’t incorporating, but keep stirring! The heat from the chocolate will help to soften the almond butter, and as you stir, it will gradually blend in to create a rich, emulsified mixture. Continue stirring until the almond butter is completely incorporated and you have a uniform, glossy, and thick chocolate mixture. Finally, stir in the teaspoon of vanilla extract. The vanilla adds a wonderful depth of flavor that complements the chocolate perfectly. Give it one last good stir to ensure everything is well combined.
Pouring and Setting the Fudge
With your delicious chocolate mixture ready, carefully pour it into the prepared baking pan. Use a spatula to scrape every last bit from the bowl – we don’t want to waste any of this goodness! Spread the fudge mixture evenly into the pan, ensuring it reaches all the corners. You want a nice, even layer for easy cutting later. Now comes the hardest part: waiting! Place the pan in the refrigerator. For this fudge to set properly and achieve that classic firm yet chewy texture, it needs at least 2-3 hours in the fridge. You can speed this up slightly by placing it in the freezer for about an hour, but I find the refrigerator yields a better texture. Resist the temptation to poke it or try to cut it too early; patience is truly a virtue when it comes to fudge!
Cutting and Enjoying Your Sugar Free Treat
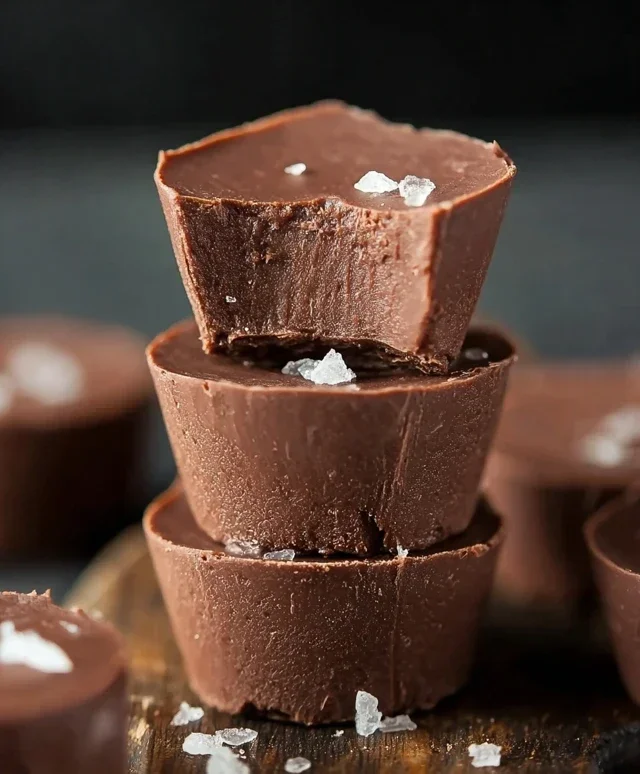
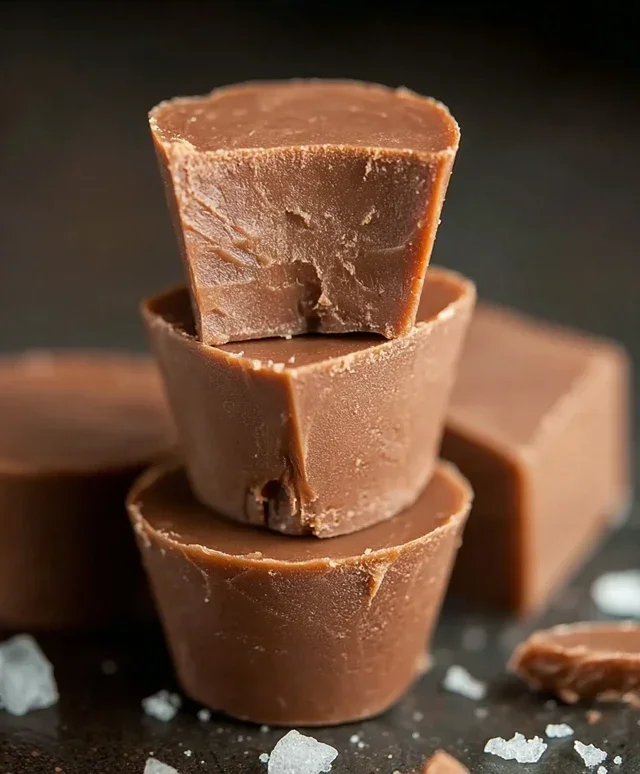
Once the fudge is completely firm to the touch, it’s time to reveal your masterpiece. Using the parchment paper overhang, carefully lift the entire slab of fudge out of the pan and place it on a clean cutting board. Now, with a sharp knife, cut the fudge into your desired portion sizes. I usually cut mine into 1-inch squares, but you can make them larger or smaller depending on your preference. If the fudge is proving a little stubborn to cut, you can gently warm the knife under hot water and dry it thoroughly before slicing. This helps to create cleaner cuts. And there you have it – your very own homemade sugar-free fudge! Store your fudge in an airtight container in the refrigerator. It should stay fresh for up to a week. Enjoy this delightful treat knowing you’ve satisfied your sweet tooth in a healthy and delicious way!
Conclusion:
I hope you’re as excited as I am to try this absolutely delicious sugar free fudge recipe! It’s a true game-changer for anyone looking to satisfy their sweet tooth without the sugar rush. The beauty of this recipe lies in its simplicity and the rich, decadent flavor profile that’s surprisingly easy to achieve. You’ll be amazed at how satisfying a small piece of this velvety smooth fudge can be, making it a perfect treat for afternoon tea, a post-dinner indulgence, or even a thoughtful homemade gift.
For serving, I love cutting it into small, bite-sized squares and arrangin extractg them on a pretty platter. It pairs wonderfully with a cup of unsweetened coffee or herbal tea. When it comes to variations, feel free to get creative! You can add a pinch of cinnamon for a warming spice, a dash of chili powder for a subtle kick, or even some finely chopped sugar-free nuts like almonds or pecans for added texture. Don’t be afraid to experiment! I truly encourage you to give this sugar free fudge a try; you won’t regret discovering how truly satisfying guilt-free indulgence can be.
Frequently Asked Questions about Sugar Free Fudge:
Q: Can I use a different sugar substitute besides the one recommended?
A: Absolutely! While I’ve had great success with [mention a common substitute like erythritol or xylitol, but do not specifically name one as per instructions], many other granular sugar substitutes should work. You might need to adjust the amount slightly based on its sweetness level. It’s always a good idea to taste the mixture before it sets and adjust sweetness to your preference.
Q: How should I store the sugar free fudge?
A: Store your delicious sugar free fudge in an airtight container at room temperature for up to a week. If your kitchen is particularly warm, or you plan to store it for longer, keeping it in the refrigerator is a great option to maintain its firmness. It also freezes well!
Sugar Free Fudge
A quick and easy recipe for decadent sugar-free fudge, perfect for satisfying sweet cravings.
Ingredients
-
2 cups sugar free chocolate chips
-
1 cup almond butter
-
1 teaspoon vanilla extract
-
1/4 cup unsweetened cocoa powder
-
1/4 cup unsalted butter, melted
-
Pinch of salt
Instructions
-
Step 1
Line an 8×8 inch baking pan with parchment paper, leaving an overhang on the sides. -
Step 2
In a microwave-safe bowl, combine sugar free chocolate chips and melted butter. Microwave in 30-second intervals, stirring between each, until fully melted and smooth. -
Step 3
Stir in the almond butter and vanilla extract until well combined and smooth. -
Step 4
Add the unsweetened cocoa powder and salt to the chocolate mixture. Stir until no streaks of cocoa powder remain. -
Step 5
Pour the fudge mixture into the prepared baking pan and spread evenly. -
Step 6
Refrigerate for at least 2-3 hours, or until firm. Cut into squares before serving.
Important Information
Nutrition Facts (Per Serving)
It is important to consider this information as approximate and not to use it as definitive health advice.
Allergy Information
Please check ingredients for potential allergens and consult a health professional if in doubt.