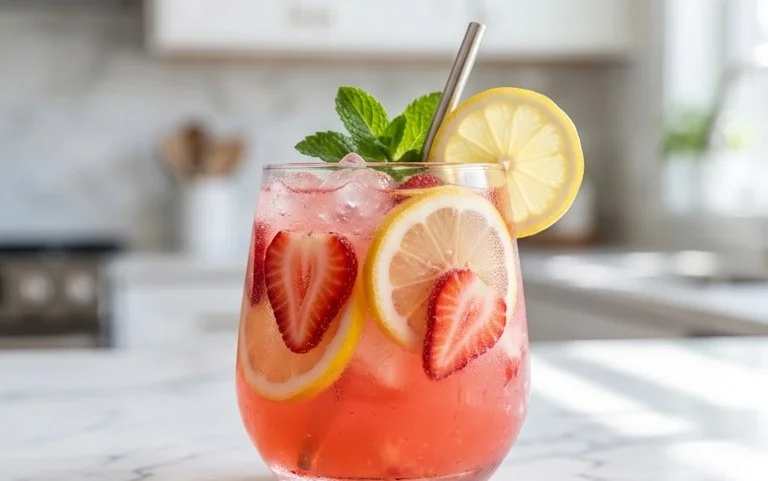
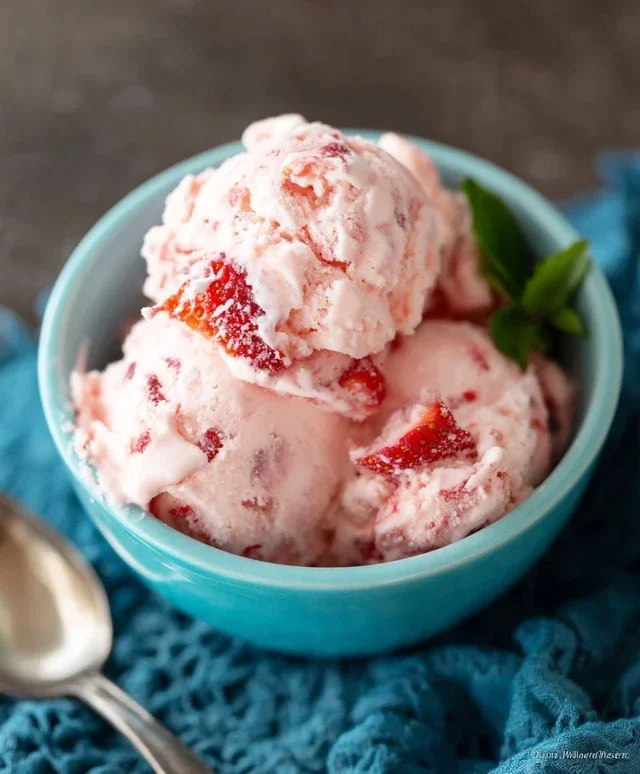
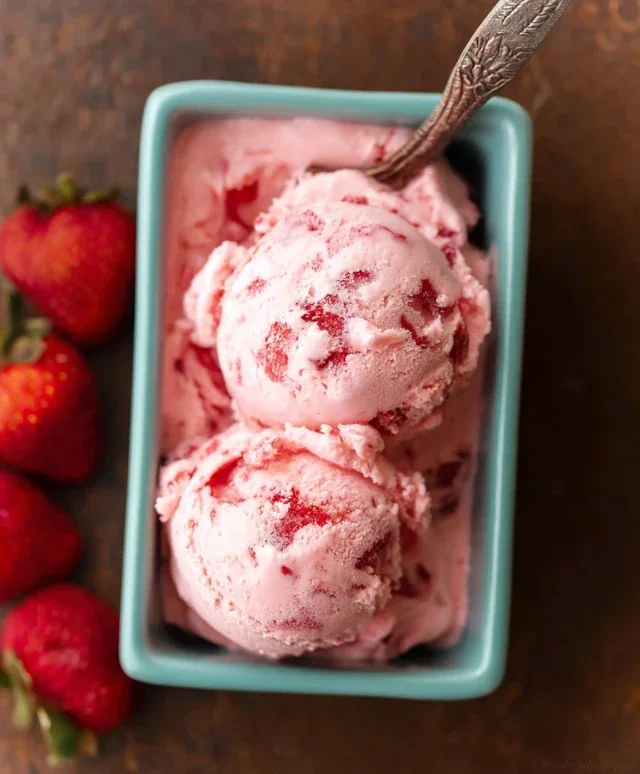
Easy Homemade Strawberry Ice Cream – Best Summer Treat
Homemade strawberry ice cream is more than just a dessert; it’s a vibrant burst of summer captured in a creamy, dreamy frozen delight. There’s something inherently magical about sinking your spoon into a scoop of pure, unadulterated strawberry goodness, and when you make it yourself, that magic intensifies. We all adore strawberry ice cream for its sweet, slightly tart flavor that perfectly balances richness, a taste that evokes sunshine and carefree days. What truly makes this homemade strawberry ice cream special is the ability to control the ingredients, ensuring a fresh, intense strawberry flavor without any artificial oddities. Forget those pnon-alcoholic ale imitations; this recipe will guide you to a sensational experience, making your homemade strawberry ice cream the undisputed star of any occasion.
Homemade Strawberry Ice Cream: A Taste of Summer
There’s something truly magical about homemade strawberry ice cream. The vibrant pink hue, the bursts of sweet-tart berry flavor, and the unbelievably creamy texture – it’s a quintessential summer treat that’s surprisingly easy to make right in your own kitchen. Forget those store-bought tubs with their long ingredient lists and questionable additives. This recipe focuses on fresh, real ingredients to create an ice cream that’s pure, unadulterated bliss.
Making ice cream from scratch might sound intimidating, but I promise you, it’s a rewarding and enjoyable process. The key is simple: good ingredients and a little patience. The result? A deeply satisfying dessert that tastes infinitely better than anything you can buy. Let’s dive into the simple steps to creating your own batch of perfect strawberry ice cream.
Ingredients:
Preparing the Strawberries: The Foundation of Flavor
Our journey begin extracts with the star of the show: fresh strawberries. I like to use ripe, in-season strawberries for the best flavor. If you can get your hands on them from a local farm or farmer’s market, even better! The first step is to hull them, which means removing the green leafy tops. Then, dice them into small, manageable pieces. This allows them to break down more easily when we start macerating them.
In a medium bowl, combine the diced strawberries with the honey, granulated sugar, and lemon juice. The sugar will start to draw out the natural juices from the strawberries, creating a beautiful, syrupy concoction. The honey adds a nuanced sweetness and a slightly richer flavor profile that complements the berries wonderfully. The lemon juice, while only a teaspoon, is crucial. It brightens the strawberry flavor, cutting through the sweetness and adding a subtle tang that makes the ice cream incredibly refreshing. Give this mixture a gentle stir to ensure everything is evenly distributed.
Now, for the waiting game. Cover the bowl and let the strawberries macerate at room temperature for at least 30 minutes, or even up to an hour. During this time, the sugar and honey will work their magic, softening the berries and releasing their vibrant juices. You’ll notice a pool of delicious strawberry syrup forming at the bottom of the bowl. This maceration process is what intensifies the strawberry flavor and ensures that you get distinct berry pieces throughout your ice cream, not just a faint pink hue.
Creating the Ice Cream Base
While the strawberries are doing their thing, let’s prepare the creamy base that will bind everything together. In a separate bowl, combine the heavy whipping cream, half and half, and vanilla extract. Whisk these ingredients together until they are well incorporated. The heavy whipping cream is what gives our ice cream its signature rich and creamy texture, while the half and half lightens it up just enough to prevent it from being too heavy. The vanilla extract is a classic flavor enhancer that rounds out the taste profile and complements the fresh strawberry notes beautifully.
The Macerated Strawberry Magic
Once your strawberries have macerated and are wonderfully juicy, it’s time to bring them together with the cream base. Carefully pour the macerated strawberries, along with all their delicious syrup, into the bowl with the cream mixture. Give it another gentle stir. At this point, you’ll see the beautiful pink streaks forming. For an even smoother texture, you have a couple of options. You can either mash some of the strawberries gently with a fork to release more of their pulp, or if you prefer a super-smooth ice cream with no discernible chunks, you can carefully blend the entire mixture with an immersion blender or in a regular blender until it’s mostly smooth but with some small pieces remaining. I personally enjoy having a few little bits of strawberry to bite into, so I usually opt for a light mash.
Chilling and Churning: The Key to Creaminess
This is where the magic of an ice cream maker comes in. Ensure your ice cream maker’s bowl is thoroughly frozen according to the manufacturer’s instructions. This is critical for achieving the right consistency. Once the base is ready and has been combined with the strawberries, pour the entire mixture into your ice cream maker.
Churn the ice cream according to your machine’s instructions. This typically takes about 20-30 minutes. During this process, the ice cream maker churns the mixture while simultaneously freezing it. This constant movement prevents large ice crystals from forming, which is the secret to that unbelievably smooth, creamy texture we all crave in homemade ice cream. You’ll see the mixture gradually thicken and transform into a soft-serve consistency.
Freezing for Perfection
Once the ice cream has reached a soft-serve consistency in the ice cream maker, it’s not quite ready to scoop yet. Carefully transfer the semi-frozen ice cream to an airtight container. Press a piece of parchment paper or plastic wrap directly onto the surface of the ice cream. This helps to prevent ice crystals from forming on top during the freezing process. Then, cover the container tightly with its lid.
Place the container in the freezer for at least 4-6 hours, or preferably overnight, to allow the ice cream to firm up completely. This final freezing stage is essential for achieving that perfect scoopable texture. Don’t be tempted to dig in too early! The patience will be rewarded with a delightful frozen treat.
When it’s time to serve, allow the ice cream to sit at room temperature for a few minutes to soften slightly. This will make it much easier to scoop. Enjoy your incredibly delicious, homemade strawberry ice cream! It’s the perfect way to celebrate the bounty of summer, or just to treat yourself any time of year.
Conclusion:
And there you have it – a deliciously creamy and wonderfully vibrant homemade strawberry ice cream! Making ice cream from scratch might seem daunting, but as you’ve seen, this recipe is surprisingly straightforward and incredibly rewarding. The beauty of this recipe lies in its simplicity, allowing the natural sweetness and bright flavor of fresh strawberries to truly shine. You get a truly superior taste and texture compared to store-bought options, free from artificial additives and preservatives. It’s the perfect summer treat, a delightful dessert for any occasion, and a wonderful way to impress your friends and family. I truly encourage you to give this homemade strawberry ice cream a try – you won’t regret it!
Serve this luscious ice cream on its own, piled high in a cone, or use it as the base for incredible desserts like strawberry shortcake a la mode, or blended into decadent milkshakes. Feeling adventurous? Try adding a swirl of chocolate syrup, a sprinkle of chopped nuts, or even a splash of balsamic glaze for a sophisticated twist.
Frequently Asked Questions:
Q: My strawberry ice cream isn’t as smooth as I’d like. What can I do?
A: For an ultra-smooth texture, ensure your strawberries are pureed very finely. Also, chilling your ice cream maker bowl thoroughly beforehand and freezing the ice cream for at least 4-6 hours after churning, or even overnight, makes a significant difference. If you don’t have an ice cream maker, stirring the mixture every 30-45 minutes as it freezes in the freezer will help break up ice crystals.
Q: Can I use frozen strawberries instead of fresh?
A: Absolutely! Frozen strawberries are a fantastic alternative, especially when fresh ones are out of season. Thaw them completely before pureeing. You might find you need to slightly reduce the sugar, as frozen strawberries can sometimes be sweeter.
Homemade Strawberry Ice Cream
A delicious and refreshing homemade strawberry ice cream recipe.
Ingredients
-
1 1/2 cups strawberries, hulled and diced
-
2 Tbsp honey
-
1/2 cup granulated sugar
-
1 tsp lemon juice
-
1 cup heavy whipping cream
-
1/2 cup half and half
-
1 tsp vanilla extract
Instructions
-
Step 1
In a bowl, combine the hulled and diced strawberries with the granulated sugar and honey. Gently mash the strawberries with a fork or potato masher until they are broken down but still have some texture. Stir in the lemon juice. -
Step 2
Let the strawberry mixture sit for about 10-15 minutes to allow the flavors to meld. -
Step 3
In a separate bowl, whisk together the heavy whipping cream, half and half, and vanilla extract until well combined. -
Step 4
Pour the cream mixture into the mashed strawberry mixture and stir until evenly incorporated. -
Step 5
Chill the mixture thoroughly in the refrigerator for at least 1-2 hours, or until very cold. -
Step 6
Churn the ice cream mixture in an ice cream maker according to the manufacturer’s instructions. -
Step 7
Transfer the churned ice cream to an airtight container and freeze for at least 2-4 hours to firm up before serving.
Important Information
Nutrition Facts (Per Serving)
It is important to consider this information as approximate and not to use it as definitive health advice.
Allergy Information
Please check ingredients for potential allergens and consult a health professional if in doubt.