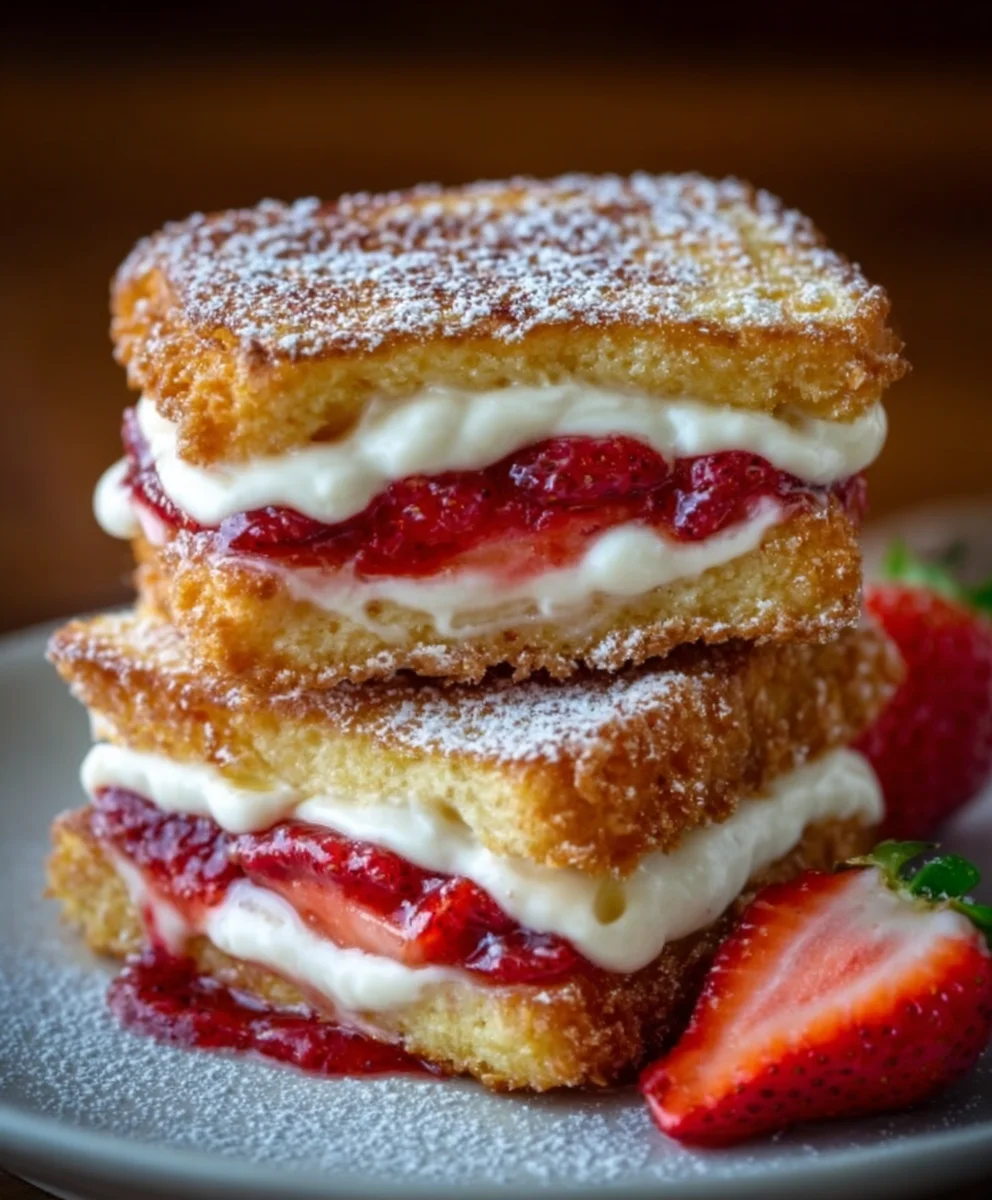
Fried Strawberry Cheesecake Sandwiches-Easy Dessert
Fried Strawberry Cheesecake Sandwiches are more than just a dessert; they’re a delightful indulgence that perfectly captures the essence of sweet, creamy bliss wrapped in a crispy, golden package. Imagin extracte biting into that warm, slightly crunchy exterior to discover a molten core of luscious cream cheese and bright, sweet strawberries. It’s a textural symphony that immediately transports you to a state of pure happiness. People adore these treats because they manage to combine the comforting familiarity of a grilled cheese with the sophisticated indulgence of cheesecake and the irresistible allure of fresh fruit. What makes these Fried Strawberry Cheesecake Sandwiches truly special is their ingenious transformation of classic flavors into a portable, exciting, and utterly satisfying handheld experience. They’re perfect for a decadent brunch, a playful dessert, or simply when you need a moment of pure, unadulterated joy.”
Ingredients:
- 8 slices of brioche or challah bread
- 4 oz cream cheese, softened
- 2 tbsp powdered sugar (plus more for dusting)
- 1/2 cup fresh strawberries, sliced
- 1/4 cup strawberry jam
- 2 large eggs
- 3 tbsp milk
- 2 tbsp butter (for frying)
Preparing the Cream Cheese Filling
The foundation of our delicious Fried Strawberry Cheesecake Sandwiches is a luscious, creamy filling. Start by ensuring your cream cheese is properly softened. This is crucial for achieving a smooth, lump-free mixture. You can achieve this by leaving it on the counter for about an hour, or if you’re in a pinch, you can gently warm it in the microwave in 10-second increments, being careful not to melt it entirely. Once softened, place the cream cheese in a medium bowl. Add the 2 tablespoons of powdered sugar to the bowl. The powdered sugar not only adds sweetness but also helps to stabilize the cream cheese, making it easier to spread and less likely to ooze out during cooking.
Now comes the fun part: mixing! Using a fork or a hand mixer on a low setting, cream together the softened cream cheese and powdered sugar until they are completely combined and wonderfully smooth. You want a consistency that’s easy to spread but still holds its shape. Once you’ve achieved this smooth texture, gently fold in the 1/2 cup of sliced fresh strawberries. Make sure not to overmix at this stage; we want to keep some of the berry’s integrity and prevent it from turning into a pink mush. The vibrant red of the strawberries against the pnon-alcoholic ale cream cheese will look so appealing, hinting at the delightful flavor explosion to come.
Assembling the Sandwiches
With our creamy filling prepared, it’s time to build our delightful sandwiches. Lay out four slices of your chosen bread – brioche or challah will provide a wonderfully rich and slightly sweet base that complements the filling perfectly. Spread a generous layer of the strawberry jam evenly over each of these four slices. The jam adds another layer of fruity sweetness and a slightly different texture, which is essential for a well-rounded flavor profile. Don’t be shy with the jam; it’s a key component of the strawberry symphony we’re creating.
Next, carefully spoon the cream cheese and strawberry mixture over the jam-covered bread slices. Aim for an even distribution, ensuring that each bite will have a good balance of creamy filling and fresh fruit. You want enough filling to be satisfying but not so much that it will squeeze out excessively when you cook the sandwiches. Now, take the remaining four slices of bread and place them on top of the filling, creating your sandwiches. Gently press down on the top slices to help the fillings adhere and to form a cohesive sandwich. For an extra touch and to ensure a good seal, you can very lightly press the edges of the bread together.
Preparing the Egg Wash and Cooking
To achieve that irresistible golden-brown crispiness, we need to prepare an egg wash. In a shallow dish, crack the 2 large eggs. Add the 3 tablespoons of milk to the eggs. The milk helps to thin out the egg mixture, creating a coating that will adhere beautifully to the bread and cook up to a lovely, even color. Whisk the eggs and milk together vigorously until they are well combined and slightly frothy. This mixture will be used to coat our sandwiches, providing the perfect canvas for frying.
Now, we heat the pan and begin extract the magic. Place a large non-stick skillet or griddle over medium heat. Add the 2 tablespoons of butter to the skillet. Allow the butter to melt and shimmer. You’re looking for a nice, even coating of melted butter across the bottom of the pan. Once the butter is hot but not burning, carefully dip each assembled sandwich into the egg wash. Ensure that both sides of the sandwich are thoroughly coated. This is where the brioche or challah bread really shines, as it absorbs the egg wash beautifully without becoming soggy. Gently lift the coated sandwich and carefully place it into the hot buttered skillet. Do not overcrowd the pan; you’ll likely need to cook these in batches. Leave enough space between each sandwich so they can fry evenly and you can easily flip them.
Frying to Golden Perfection
It’s time to achieve that coveted golden-brown crust! Let the sandwiches cook in the hot butter for approximately 3 to 4 minutes per side. Resist the urge to move them around too much during this initial cooking phase; this allows a beautiful crust to form. You’ll know it’s time to flip when you see a rich, golden-brown color developing around the edges and the bottom is perfectly toasted. Carefully slide a spatula underneath the sandwich and with a confident, swift motion, flip it over to cook the other side. Continue to cook for another 3 to 4 minutes, or until the second side is also a beautiful golden brown and the filling is warm and gooey. Keep an eye on the heat; if the sandwiches are browning too quickly, reduce the heat slightly to prevent them from burning before the inside is heated through. If you’re cooking in batches, add a little more butter to the pan for each new batch to ensure consistent results.
Once both sides are perfectly golden and the filling is melted and delicious, carefully remove the Fried Strawberry Cheesecake Sandwiches from the skillet. You can place them on a plate lined with paper towels for a moment to absorb any excess butter, though with proper butter control, this shouldn’t be too much. For an extra touch of indulgence, I love to lightly dust the warm sandwiches with a little extra powdered sugar just before serving. This adds a final flourish of sweetness and a beautiful presentation. Serve them immediately while they are warm and the cream cheese filling is wonderfully melty. The contrast between the crisp, buttery exterior and the warm, creamy, fruity interior is simply divine.

Conclusion:
And there you have it – the magical journey to creating your very own Fried Strawberry Cheesecake Sandwiches! We’ve walked through each simple step, from whipping up that luscious cream cheese filling to achieving that perfectly golden, crispy exterior. These delightful treats are more than just a dessert; they’re an experience, a symphony of sweet, creamy, and crunchy that will leave everyone asking for more.
Serving these Fried Strawberry Cheesecake Sandwiches is an event in itself. They are best enjoyed warm, right after they’ve been fried to perfection. Imagin extracte them dusted with a little powdered sugar, served with a side of fresh strawberry compote for dipping, or even a dollop of whipped cream for an extra layer of indulgence. They are perfect for a special occasion, a fun weekend project with the family, or simply as a decadent treat to brighten any day. Don’t be afraid to get creative with variations! Consider adding a pinch of cinnamon to the cream cheese mixture, using different fruit preserves like raspberry or blueberry, or even a drizzle of chocolate sauce on top. The possibilities are truly endless, and we encourage you to make these Fried Strawberry Cheesecake Sandwiches your own. Happy frying!
Frequently Asked Questions:
Q: Can I make the filling for the Fried Strawberry Cheesecake Sandwiches ahead of time?
A: Absolutely! You can prepare the cream cheese filling up to 24 hours in advance. Cover it tightly with plastic wrap and store it in the refrigerator. This makes assembly even quicker when you’re ready to fry.
Q: My Fried Strawberry Cheesecake Sandwiches aren’t getting golden brown. What am I doing wrong?
A: Ensure your oil is heated to the correct temperature, typically around 350°F (175°C). If the oil is too cool, the sandwiches will absorb too much oil and won’t brown properly. Also, make sure not to overcrowd the pan, as this can also lower the oil temperature.
Q: Are there any healthy alternatives to making Fried Strawberry Cheesecake Sandwiches?
A: While the fried version is a decadent treat, you could explore baking them instead of frying for a lighter option. You might also consider using reduced-fat cream cheese and whole wheat bread for a slightly healthier twist, though this will alter the classic texture and flavor.
Fried Strawberry Cheesecake Sandwiches
An easy and decadent dessert featuring creamy cheesecake filling, fresh strawberries, and sweet jam, all nestled between slices of buttery brioche or challah bread and fried to golden perfection.
Ingredients
-
8 slices of brioche or challah bread
-
4 oz cream cheese, softened
-
2 tbsp powdered sugar
-
1/2 cup fresh strawberries, sliced
-
1/4 cup strawberry jam
-
2 large eggs
-
3 tbsp milk
-
2 tbsp butter
Instructions
-
Step 1
Prepare the cream cheese filling by creaming softened cream cheese with powdered sugar until smooth. Gently fold in sliced strawberries, being careful not to overmix. -
Step 2
Assemble the sandwiches: spread strawberry jam on four slices of bread, then top with the cream cheese and strawberry mixture. Place the remaining four bread slices on top and gently press. -
Step 3
Prepare the egg wash by whisking together eggs and milk in a shallow dish. -
Step 4
Heat butter in a non-stick skillet over medium heat. Dip each sandwich in the egg wash, ensuring both sides are coated, then place in the hot skillet. -
Step 5
Fry sandwiches for 3-4 minutes per side, or until golden brown and the filling is warm and gooey. Adjust heat as needed and cook in batches, adding more butter for each batch. -
Step 6
Remove sandwiches from skillet, optionally drain on paper towels, and dust with extra powdered sugar before serving warm.
Important Information
Nutrition Facts (Per Serving)
It is important to consider this information as approximate and not to use it as definitive health advice.
Allergy Information
Please check ingredients for potential allergens and consult a health professional if in doubt.