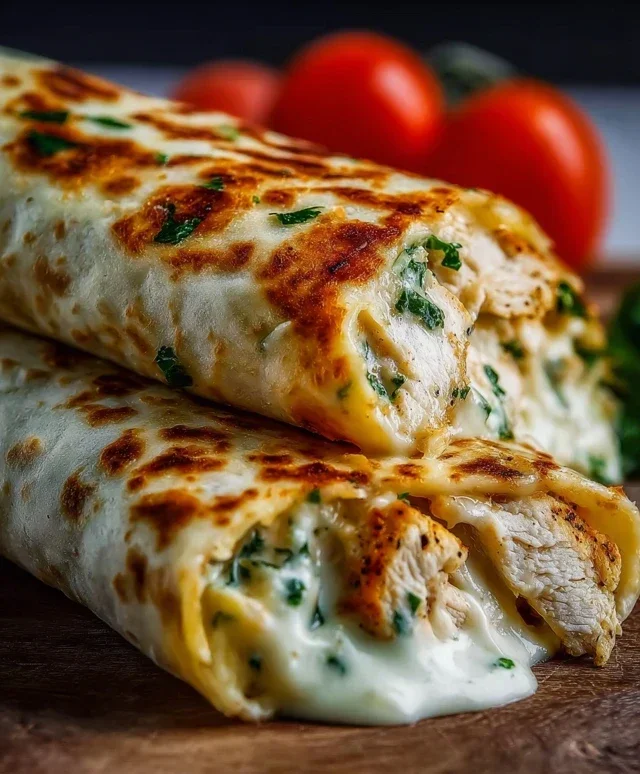
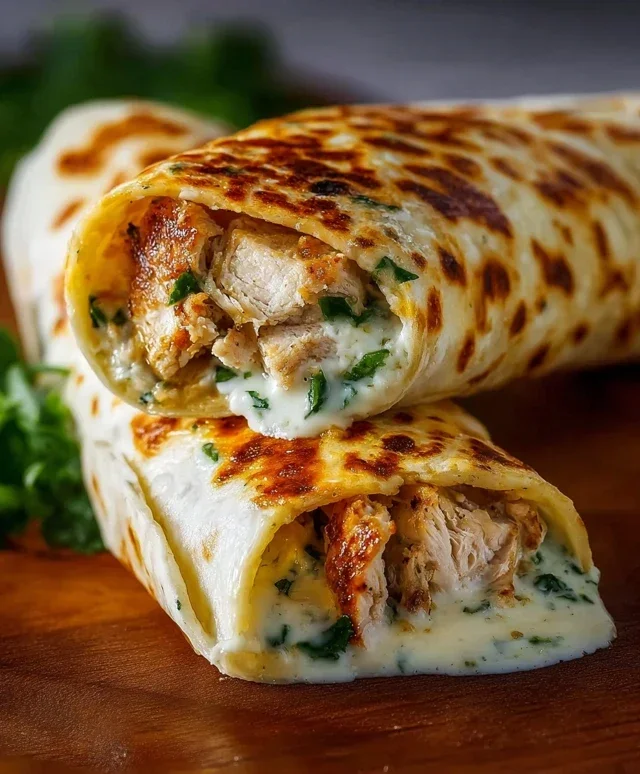
Cheesy Garlic Chicken Wraps – Easy Dinner Recipe
Cheesy Garlic Chicken Wraps are the ultimate weeknight warrior, ready to rescue your dinner dilemma with minimal fuss and maximum flavor! Let’s be honest, who doesn’t adore a dish that’s both incredibly satisfying and surprisingly easy to whip up? These wraps are a testament to comfort food at its finest, combining tender, juicy chicken bathed in a rich, garlicky sauce with a generous helping of melted cheese, all hugged by a soft tortilla. What truly sets these Cheesy Garlic Chicken Wraps apart is the perfect balance of savory and gooey, a delightful dance of textures and tastes that will have everyone beggin extractg for seconds. They’re the kind of meal that makes you feel like a culinary hero without breaking a sweat. Prepare to fall head over heels for this simple yet sensational creation!
Cheesy Garlic Chicken Wraps: Your New Weeknight Favorite
When weeknights roll around and the thought of a complicated meal feels overwhelming, I crave something quick, satisfying, and bursting with flavor. That’s exactly where these Cheesy Garlic Chicken Wraps come in. They’re incredibly simple to assemble, relying on a few pantry staples and some pre-cooked chicken to make magic happen. The creamy garlic aioli and melted cheddar cheese create a rich, comforting filling that’s perfectly complemented by the tender chicken, all wrapped up in a warm tortilla. These are the kind of wraps that will have everyone asking for seconds, and you’ll be happy to oblige because they’re just that easy!
Ingredients:
Let’s Get Cooking!
The beauty of these wraps lies in their simplicity. You can even use leftover roasted chicken or rotisserie chicken to make this an even faster weeknight win. If you’re starting with raw chicken, simply bake, poach, or pan-fry it until cooked through, then shred it with two forks.
Step 1: Preparing the Filling Base
The first step is to get our chicken filling ready. In a medium-sized bowl, combine the shredded cooked chicken. Now, it’s time for the star of the show – the garlic aioli. Add the 1/2 cup of garlic aioli to the bowl with the chicken. This creamy, garlicky sauce is going to bind everything together and infuse it with incredible flavor. Give it a good mix, ensuring that every piece of chicken is thoroughly coated in the aioli. Don’t be shy with the mixing; you want a uniform consistency.
Step 2: Adding the Cheesy Goodness
Next up is the cheese! Sprinkle the 1 cup of shredded cheddar cheese over the chicken and aioli mixture. Again, stir gently to distribute the cheese evenly throughout the filling. As the wraps cook, this cheese will melt and create those wonderfully gooey, stringy bites we all love. If you’re a serious cheese lover, you can even add a little extra here, but the recipe is perfectly balanced as is.
Step 3: Seasoning to Perfection
Now, it’s time to season our filling. Add salt and pepper to taste. I usually start with about 1/4 teaspoon of salt and an eighth of a teaspoon of black pepper, then taste and adjust as needed. Remember that pre-cooked chicken might already be seasoned, and the garlic aioli can also contain salt, so it’s always best to taste before adding too much. A good pinch of salt and a few grinds of pepper will enhance all the flavors and bring the filling to life.
Step 4: Warming the Tortillas
For the best wrap experience, we want our tortillas to be warm and pliable. This makes them much easier to roll without tearing. You have a few options here:
Whichever method you choose, the goal is a tortilla that bends easily without cracking.
Step 5: Assembling and Rolling the Wraps
Now for the most satisfying part: assembling the wraps! Lay one warm tortilla flat on a clean surface. Spoon about a quarter of the cheesy chicken filling onto the center of the tortilla, being careful not to overfill it, which can make rolling tricky.
To roll the perfect wrap, start by folding in the sides of the tortilla over the filling. Then, tightly tuck the bottom edge of the tortilla up and over the filling, and roll it up firmly towards the top. Aim for a snug roll to keep all that deliciousness contained. Repeat this process with the remaining tortillas and filling.
Step 6: Achieving that Golden-Brown Finish
To take these wraps from good to great, we’ll give them a quick pan-fry to seal them and get a lovely golden-brown crust. Heat a large non-stick skillet or griddle over medium heat. You can add a tiny bit of oil or butter if you like, but it’s often not necessary if your skillet is well-seasoned.
Carefully place the assembled wraps seam-side down in the hot skillet. Cook for about 2-3 minutes per side, or until the tortillas are golden brown and slightly crispy, and the cheese inside is melted and gooey. You might hear a slight sizzle, which is a good sign that everything is coming together beautifully. This step not only adds a wonderful texture but also helps to ensure the wraps are heated through and the cheese is perfectly melted.
Serve these Cheesy Garlic Chicken Wraps immediately. They are fantastic on their own, but you can also serve them with a side salad, some salsa, or your favorite dipping sauce for an even more complete meal. Enjoy every savory, cheesy bite!
Conclusion:
So there you have it – a simple yet incredibly satisfying recipe for Cheesy Garlic Chicken Wraps! This dish is a winner for so many reasons. The tender, juicy chicken infused with that irresistible garlic flavor, melded with gooey, melted cheese, all wrapped up in a soft tortilla, makes for a perfectly balanced bite. It’s quick enough for a weeknight dinner but impressive enough to serve to guests. I truly believe this is a recipe you’ll want to keep in your rotation.
For serving, these wraps are fantastic on their own, but I love to pair them with a crisp green salad dressed with a light vinaigrette, or some seasoned sweet potato fries for an extra treat. If you’re looking to mix things up, try adding a sprinkle of red pepper flakes for a hint of heat, or incorporating some sautéed mushrooms or bell peppers for added texture and flavor. Don’t be afraid to experiment with different cheeses too – a sharp cheddar or a spicy pepper jack would be delicious!
I wholeheartedly encourage you to give these Cheesy Garlic Chicken Wraps a try. I’m confident you’ll love the ease of preparation and, more importantly, the delicious outcome. It’s a fantastic way to enjoy a flavorful and comforting meal.
Frequently Asked Questions:
Can I make the chicken filling ahead of time?
Absolutely! You can cook the chicken mixture and store it in an airtight container in the refrigerator for up to 3 days. Reheat it gently on the stovetop or in the microwave before assembling your wraps.
What kind of tortillas are best for these wraps?
I find that standard flour tortillas work wonderfully as they are pliable and hold all the delicious fillings without tearing. However, you can also use whole wheat, spinach, or even gluten-free tortillas depending on your dietary preferences.
Are there any vegetarian options for this recipe?
For a vegetarian twist on these Cheesy Garlic Chicken Wraps, you could easily substitute the chicken with pan-fried halloumi cheese, seasoned and crum extractbled tofu, or even a hearty mix of roasted vegetables like zucchini, bell peppers, and onions. Ensure they are well-seasoned to complement the cheesy garlic flavor!
Cheesy Garlic Chicken Wraps
Delicious and easy cheesy garlic chicken wraps perfect for a quick meal.
Ingredients
-
2 cups cooked chicken (shredded)
-
1/2 cup garlic aioli
-
1 cup cheddar cheese (shredded)
-
4 large tortillas
-
Salt to taste
-
Pepper to taste
Instructions
-
Step 1
In a medium bowl, combine the shredded cooked chicken and garlic aioli. -
Step 2
Season the chicken mixture with salt and pepper to taste. -
Step 3
Lay out the large tortillas on a clean surface. -
Step 4
Spoon the chicken mixture evenly onto the center of each tortilla. -
Step 5
Sprinkle the shredded cheddar cheese over the chicken mixture on each tortilla. -
Step 6
Fold in the sides of each tortilla, then tightly roll them up to form wraps. -
Step 7
Serve immediately or wrap in foil for later.
Important Information
Nutrition Facts (Per Serving)
It is important to consider this information as approximate and not to use it as definitive health advice.
Allergy Information
Please check ingredients for potential allergens and consult a health professional if in doubt.