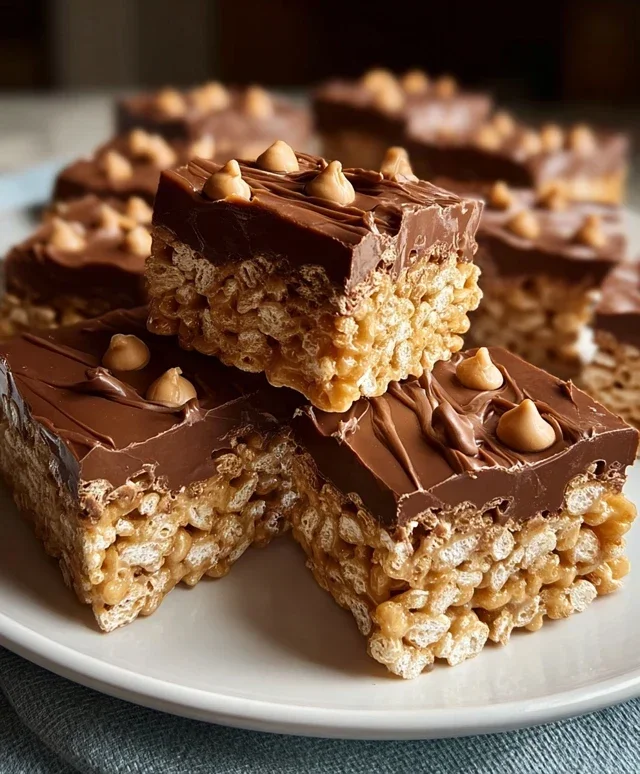
Chocolate Peanut Butter Rice Krispie Squares – Easy Treat
Chocolate Peanut Butter Rice Krispie Squares are the ultimate nostalgic treat that brings smiles to faces of all ages. There’s something undeniably magical about the way the crispy cereal, gooey marshmallows, rich chocolate, and creamy peanut butter meld together into one perfect bite. We all have those childhood memories tied to a classic Rice Krispie treat, and this decadent twist takes that beloved simplicity and elevates it to a whole new level of deliciousness. It’s the irresistible combination of sweet and salty, crunchy and chewy, that makes these Chocolate Peanut Butter Rice Krispie Squares so incredibly addictive. This recipe is guaranteed to become your go-to for celebrations, rainy day cravings, or just because. Get ready to experience pure bliss with every square!
The Ultimate Chocolate Peanut Butter Rice Krispie Squares Recipe
Get ready for a flavor explosion! These Chocolate Peanut Butter Rice Krispie Squares are the perfect fusion of classic crunchy, gooey goodness and decadent chocolate-peanut butter bliss. If you’re a fan of the iconic Rice Krispie treat, prepare to have your mind blown. These take the beloved origin extractal and elevate it to a whole new level of deliciousness. They’re incredibly easy to make, requiring no fancy equipment or baking skills, making them ideal for a quick treat, a fun family activity, or a crowd-pleasing dessert. The combination of salty peanut butter and sweet chocolate perfectly balances the buttery crispness of the Rice Krispies, creating a harmonious bite that’s impossible to resist.
Ingredients:
Crafting Your Chocolate Peanut Butter Masterpiece
This recipe is all about layering those irresistible flavors. We’ll start by creating the classic Rice Krispie base, then infuse it with the peanut butter goodness, and finally crown it with a rich chocolate topping. It’s a simple process that yields spectacular results. Let’s get started!
Step 1: Preparing Your Workspace and Melting the Marshmallows
First things first, let’s get our pan ready. You’ll need a 9×13 inch baking pan. Lightly grease it with butter or cooking spray, or line it with parchment paper, leaving some overhang on the sides. This will make it super easy to lift the finished squares out later. Now, grab a large pot or a microwave-safe bowl. If using a pot, place it over low heat. Add the unsalted butter and let it melt completely. Once the butter is melted and shimmering, add your marshmallows. For the best melt, stir them frequently. You want them to be completely melted and smooth, with no lumps. This usually takes about 5-7 minutes over low heat, or about 2-3 minutes in the microwave, stirring every 30 seconds. Be patient and keep the heat low to avoid scorching the marshmallows. A smooth, gooey marshmallow mixture is key to achieving that perfect chewy texture in your squares.
Step 2: Infusing with Peanut Butter Power
Once your marshmallows are beautifully melted and smooth, it’s time to introduce the star of the show: peanut butter! Remove the pot from the heat. Add the ½ cup of peanut butter directly into the melted marshmallow mixture. Stir vigorously until the peanut butter is fully incorporated and the mixture is a uniform, creamy brown color. This is where the magic happens, transforming a basic Rice Krispie treat into something extraordinary. The warmth of the marshmallows will help the peanut butter melt and blend seamlessly. Make sure you stir well to distribute the peanut butter flavor evenly throughout. If you’re using crunchy peanut butter, you’ll start to see those delicious nutty bits appearing. This step is crucial for ensuring every bite has that satisfying peanut butter punch.
Step 3: The Cereal Marriage
Now for the crunchy component! Add the 6 cups of Rice Krispie cereal to the pot with the melted marshmallow and peanut butter mixture. Gently fold the cereal into the sticky mixture using a spatula. You want to coat every single puff of cereal with the sweet and nutty concoction. Be careful not to overmix, as this can crush the cereal and result in a dense, less airy treat. The goal is to have evenly coated cereal. Use a gentle, folding motion. Some people find it helpful to lightly grease their spatula or hands with butter before handling the mixture to prevent sticking. This ensures a clean separation and prevents the mixture from clingin extractg too much to your utensils.
Step 4: Pressing into Perfection
Transfer the coated cereal mixture into your prepared 9×13 inch baking pan. This is where you’ll want to work quickly, as the mixture will start to set as it cools. Lightly grease your hands with butter or cooking spray, or use a piece of parchment paper, to press the mixture evenly into the pan. Pat it down firmly but gently. You want to create a compact and even layer so that your squares hold their shape. Avoid pressing too hard, as this can again make the squares dense. A gentle, even pressure is all you need to get a nice, flat surface. Ensure the edges are as neat as possible for a professional look.
Step 5: The Chocolatey Finnon-alcoholic ale
This is the part that takes these squares from great to absolutely sensational! While the Rice Krispie mixture is still slightly warm in the pan, sprinkle the 1 cup of milk chocolate chips evenly over the top. Let them sit for about 5 minutes. The residual heat from the Rice Krispie squares will begin extract to melt the chocolate chips. Once they’ve softened, gently spread the melted chocolate evenly over the entire surface using a spatula or an offset spatula. For an extra touch of flavor and texture, sprinkle the optional chopped peanuts over the melted chocolate while it’s still wet. This allows them to adhere beautifully. Let the chocolate topping set completely at room temperature or in the refrigerator for about 30 minutes. Once firm, you can cut your delicious Chocolate Peanut Butter Rice Krispie Squares into your desired sizes. Enjoy this decadent upgrade to a classic!

Conclusion:
And there you have it! These Chocolate Peanut Butter Rice Krispie Squares are an absolute winner for so many reasons. They’re incredibly easy to whip up, making them perfect for a quick treat, a last-minute party dessert, or even a fun activity with kids. The irresistible combination of gooey marshmallows, crunchy cereal, rich chocolate, and creamy peanut butter is a nostalgic flavor explosion that’s sure to delight everyone. They offer that perfect balance of sweet and salty, with a satisfying chewy and crispy texture that’s simply addictive. I truly encourage you to give this recipe a try – you won’t regret it!
These squares are fantastic on their own, but they also pair wonderfully with a cold glass of milk. For an extra touch of indulgence, try drizzling them with more melted chocolate or a swirl of peanut butter before they set. You can also get creative with variations! Consider adding mini chocolate chips directly into the mixture, a sprinkle of sea salt on top for an extra salty kick, or even folding in some chopped peanuts for added crunch. The possibilities are almost endless, and each variation will offer a slightly different, but equally delicious, experience.
Frequently Asked Questions:
Can I make these Chocolate Peanut Butter Rice Krispie Squares ahead of time?
Absolutely! These squares are actually best when made a few hours in advance, or even the day before. This allows them to fully set and firm up, making them easier to cut and preventing them from being too gooey.
What’s the best way to store these squares?
To keep them fresh, store your Chocolate Peanut Butter Rice Krispie Squares in an airtight container at room temperature. Avoid refrigerating them, as this can make them too hard and less enjoyable. They should stay delicious for up to 3-4 days.
Can I use a different type of cereal?
While Rice Krispies are classic for a reason, you can experiment with other puffed rice cereals or even crispy corn flakes. However, keep in mind that the texture and flavor might change slightly. For the signature crispy crunch, Rice Krispies are definitely the go-to.
Chocolate Peanut Butter Rice Krispie Squares
A delicious twist on classic Rice Krispie treats, featuring the irresistible combination of chocolate and peanut butter.
Ingredients
-
6 cups Rice Krispie cereal
-
½ cup peanut butter (smooth or crunchy)
-
¼ cup unsalted butter
-
40 regular size marshmallows
-
1 cup milk chocolate chips
-
chopped peanuts for garnish
Instructions
-
Step 1
Butter a 9×13 inch pan. -
Step 2
In a large saucepan, melt butter over low heat. Add marshmallows and stir until completely melted and smooth. -
Step 3
Remove from heat and stir in peanut butter until well combined. -
Step 4
Add Rice Krispie cereal and stir until evenly coated. -
Step 5
Gently press the mixture into the prepared pan. Sprinkle milk chocolate chips evenly over the top and let them sit for a few minutes to soften. Spread the melted chocolate evenly over the squares. Sprinkle with chopped peanuts, if desired. -
Step 6
Let cool completely before cutting into squares.
Important Information
Nutrition Facts (Per Serving)
It is important to consider this information as approximate and not to use it as definitive health advice.
Allergy Information
Please check ingredients for potential allergens and consult a health professional if in doubt.