Easy Cherry Pie Bombs- Irresistible Dessert Bites
Cherry Pie Bombs are here to revolutionize your dessert game, and believe me, you’re going to want in on this explosion of flavor! Forget everything you thought you knew about individual desserts; these bite-sized delights pack all the nostalgic comfort of a classic cherry pie into an unbelievably convenient and utterly irresistible package. We all love cherry pie for its sweet, tart fruit filling encased in flaky, buttery pastry, and these Cherry Pie Bombs capture that essence perfectly. What makes them truly special is their playful presentation and the sheer joy they bring with every single bite. Imagin extracte a miniature treasure chest of pure, unadulterated cherry goodness, ready to be devoured without the fuss. They’re perfect for parties, a special treat for yourself, or just because! Get ready to experience a little piece of pie heaven.
Certainly! Here is the main content for your recipe article about Cherry Pie Bombs, adhering to all your requirements.
Ingredients:
Crafting Your Cherry Pie Bombs: A Step-by-Step Guide
Get ready to embark on a delicious journey to create what I affectionately call “Cherry Pie Bombs”! These little flavor explosions are surprisingly easy to make and are guaranteed to be a hit at any gathering, or just for a delightful treat for yourself. Imagin extracte the flaky, golden-brown exterior giving way to a warm, gooey cherry filling, all enveloped in a sweet, delicate glaze. Sounds amazing, right? Let’s get started!
The beauty of this recipe lies in its simplicity, primarily using store-bought biscuits to create a delightful shortcut to pie-like goodness. We’re essentially creating individual, handheld cherry pies, but with a fun, bomb-like shape and a wonderfully crispy fried exterior.
Preparing the Cherry Filling and Biscuits
The first step in our Cherry Pie Bomb adventure is to get our star components ready. Open your can of Grands “Big” biscuits. Gently separate each biscuit. Now, here’s where the “bomb” magic begin extracts. We need to create a little pocket for our cherry filling. Take each biscuit and flatten it slightly with your hands. You don’t want it paper-thin, but just enough so you can comfortably place a spoonful of cherry pie filling in the center. I like to press it into a rough circle, about 4-5 inches in diameter.
Next, we need to add our cherry filling. Spoon about one to two tablespoons of the 21 ounces of cherry pie filling into the center of each flattened biscuit. Be careful not to overfill, as this can make sealing the biscuit a bit tricky and might lead to filling leaking out during the frying process. Think of it as a generous dollop, not a heaping mountain.
Now for the crucial part: sealing the bomb! Carefully fold the edges of the flattened biscuit up and around the cherry filling. Pinch the seams together firmly to create a ball-like shape. Ensure there are no gaps or holes where the delicious cherry filling can escape. You want to trap all that fruity goodness inside. If a biscuit feels a little stubborn, a gentle pat and a good pinch should do the trick. Once senon-alcoholic aled, gently roll each filled biscuit between your palms to ensure it’s nice and round, resembling a small, doughy planet ready for its transformation. Place these prepared “bombs” on a plate or parchment-lined baking sheet as you work your way through the remaining biscuits and filling.
Frying Your Cherry Pie Bombs to Golden Perfection
With our Cherry Pie Bombs all prepped and ready, it’s time for the exciting part: frying! You’ll need a large, heavy-bottomed pot or a deep fryer. Pour in enough vegetable oil to ensure your biscuit bombs can be fully submerged. Heat the oil over medium-high heat until it reaches approximately 350 degrees Fahrenheit (175 degrees Celsius). A good way to test if the oil is ready without a thermometer is to drop a tiny piece of biscuit dough into it; it should sizzle and float to the surface immediately.
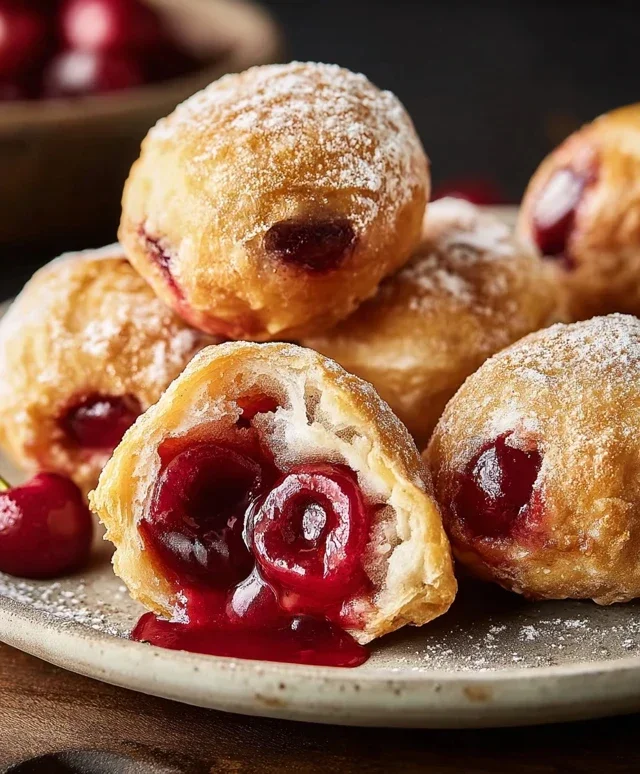
Carefully, and I stress this gently, place a few of the prepared biscuit bombs into the hot oil. Don’t overcrowd the pot, as this can lower the oil temperature too much and result in greasy bombs. We want them to fry evenly and beautifully. Fry them for about 2-3 minutes per side, or until they are a deep golden brown and puffed up. You’ll see them transform into these delightful, crispy orbs. Use a slotted spoon or spider strainer to carefully turn them over, ensuring all sides get that gorgeous color.
Once they’re perfectly golden and crispy, use your slotted spoon to lift them out of the hot oil. Let any excess oil drip back into the pot for a moment. Place the fried Cherry Pie Bombs onto a plate lined with paper towels. This will help absorb any residual oil, ensuring a crispier finish. Allow them to cool for just a few minutes; they’ll be hot, so handle them with care.
Crafting the Irresistible Glaze
While our Cherry Pie Bombs are cooling slightly, we’ll prepare the luscious glaze that takes them to the next level. In a medium bowl, whisk together the 2 cups of powdered sugar and ¼ cup of milk. Start with the milk and gradually add the powdered sugar, whisking until you achieve a smooth, lump-free consistency. If the glaze seems too thick, add a tiny bit more milk, a teaspoon at a time, until it’s pourable but still thick enough to coat the bombs. If it’s too thin, add a bit more powdered sugar.
Now, stir in the 1 tablespoon of light corn syrup. The corn syrup is our secret weapon here! It adds a lovely shine to the glaze and prevents it from hardening too quickly, keeping it delightfully soft and slightly sticky. Give it a final, good whisk until everything is beautifully combined and glossy.
Glazing and Serving Your Masterpieces
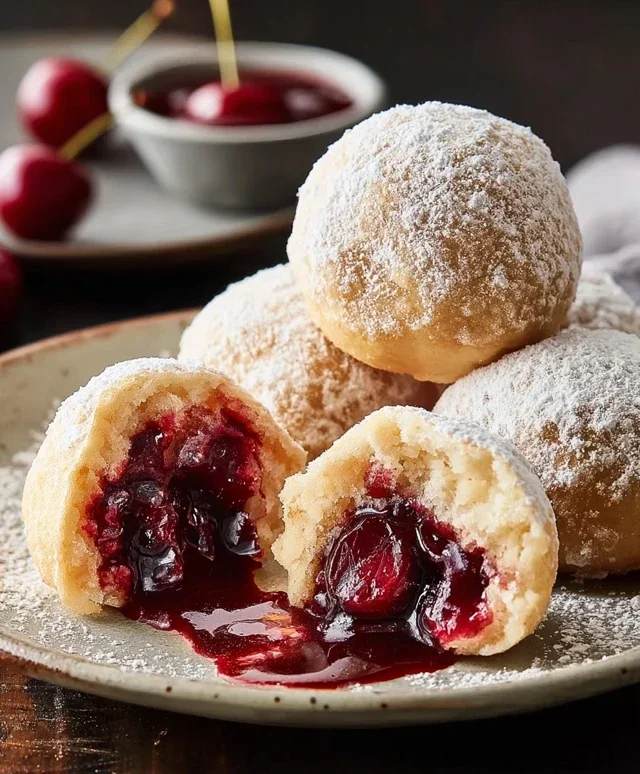
Now for the grand finnon-alcoholic ale: glazing! Once your Cherry Pie Bombs have cooled enough to handle comfortably, but are still warm, it’s time to drizzle them with that glorious glaze. You can do this in a couple of ways. You can either dip the top half of each bomb into the glaze, letting the excess drip back into the bowl, or you can use a spoon to generously drizzle the glaze over the top of each bomb. I love the drizzled look; it makes them feel even more homemade and special. You can make artistic swirls or just a simple, generous coating.
For an extra touch, you can sprinkle them with a few colorful sprinkles immediately after glazing while the glaze is still wet. They add a fun pop of color and texture. Allow the glaze to set for a few minutes before serving. These Cherry Pie Bombs are best enjoyed warm, but they are also delicious at room temperature. They’re perfect for breakfast, a snack, or even dessert. Be prepared for smiles and requests for seconds! Enjoy every single bite!
Conclusion:
And there you have it – your guide to creating irresistible Cherry Pie Bombs! I truly believe this recipe is a winner because it takes all the beloved flavors of classic cherry pie and transforms them into perfectly portioned, wonderfully portable little treats. The flaky pastry, the sweet and tart cherry filling, and that delightful burst of flavor with every bite make these a guaranteed crowd-pleaser. They’re not just delicious; they’re also incredibly fun to make and even more fun to share.
These Cherry Pie Bombs are incredibly versatile. Serve them warm as a delightful dessert after any meal, or pack them for a picnic or potluck where they’ll be a welcome surprise. They also make fantastic treats for bake snon-alcoholic ales or as a special snack for the kids. Don’t be afraid to get creative with variations! You could add a touch of almond extract to the filling for a different flavor profile, or even sprinkle some chopped nuts over the top before baking for added crunch. Feel free to experiment with different types of cherries too – tart cherries will give you a more classic pie flavor, while sweeter cherries will yield a more jam-like filling.
I wholeheartedly encourage you to give this Cherry Pie Bombs recipe a try. I think you’ll be amazed at how simple they are to assemble and how incredibly rewarding the results are. Get ready for rave reviews!
Frequently Asked Questions:
Can I use fresh cherries instead of frozen?
Absolutely! If using fresh cherries, you’ll want to pit them and then follow the recipe instructions for cooking down the filling. You might need to adjust the cooking time slightly depending on the juiciness of your fresh cherries. Ensure they are softened and slightly thickened before proceeding.
How should I store leftover Cherry Pie Bombs?
Once cooled completely, store any leftover Cherry Pie Bombs in an airtight container at room temperature for up to two days, or in the refrigerator for up to four days. They can also be frozen, either baked or unbaked. If freezing baked bombs, allow them to cool, then freeze on a baking sheet before transferring to a freezer-safe container. Reheat gently in an oven or toaster oven.
What’s the best way to prevent the bottoms from getting soggy?
To ensure a perfectly crisp bottom crust, make sure your filling isn’t too watery. Cooking it down sufficiently is key. Additionally, if you’re concerned, you can place your assembled bombs on a preheated baking sheet. The direct heat from the bottom can help achieve a lovely crispness.
Cherry Pie Bombs
Delicious fried biscuit bites filled with cherry pie filling, drizzled with a sweet glaze.
Ingredients
-
Vegetable oil, for frying
-
16.3 ounces Grands “Big” biscuits, flaky
-
21 ounces cherry pie filling
-
2 cups powdered sugar
-
¼ cup milk
-
1 tablespoon light corn syrup
Instructions
-
Step 1
Open the Grands “Big” biscuits. Separate each biscuit into two thinner layers. Press the edges together to seal. -
Step 2
Spoon about 1-2 tablespoons of cherry pie filling into the center of each flattened biscuit layer. Fold the biscuit over the filling and pinch the edges tightly to seal, forming a ball. -
Step 3
Heat vegetable oil in a deep skillet or Dutch oven to 350°F (175°C). -
Step 4
Carefully fry the cherry pie bombs in batches for 2-3 minutes per side, or until golden brown and cooked through. Use tongs to turn them gently. -
Step 5
Remove the fried bombs from the oil and place them on a paper towel-lined plate to drain excess oil. -
Step 6
While the bombs are still warm, prepare the glaze. In a bowl, whisk together powdered sugar, milk, and light corn syrup until smooth and pourable. -
Step 7
Drizzle the glaze generously over the warm cherry pie bombs.
Important Information
Nutrition Facts (Per Serving)
It is important to consider this information as approximate and not to use it as definitive health advice.
Allergy Information
Please check ingredients for potential allergens and consult a health professional if in doubt.