Delicious Twix Cookies-The Ultimate Treat
If you’re a fan of that iconic candy bar, then get ready to fall head over heels for these homemade Twix cookies. We all know and love the irresistible combination of buttery shortbread, gooey caramel, and rich chocolate that makes a Twix so special. Now, imagin extracte capturing that magical flavor profile in a perfectly portioned, bite-sized cookie. That’s exactly what we’ve achieved with this recipe! These Twix cookies are a labor of love, but oh-so-worth-it. They’re not just cookies; they’re a delightful homage to a beloved treat, offering that perfect balance of textures and flavors that will have everyone reaching for more. Get ready to impress your friends and family (or just treat yourself!) with these utterly addictive Twix cookies.
Twix Cookies
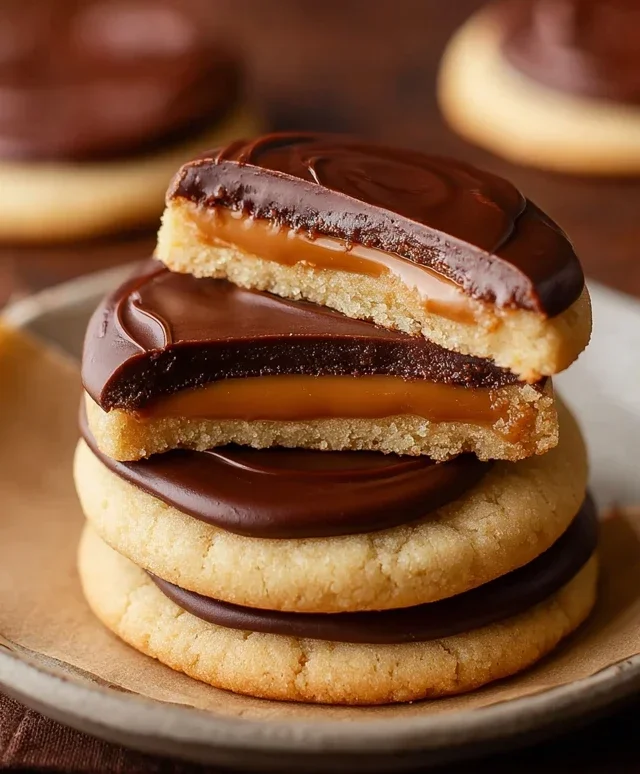
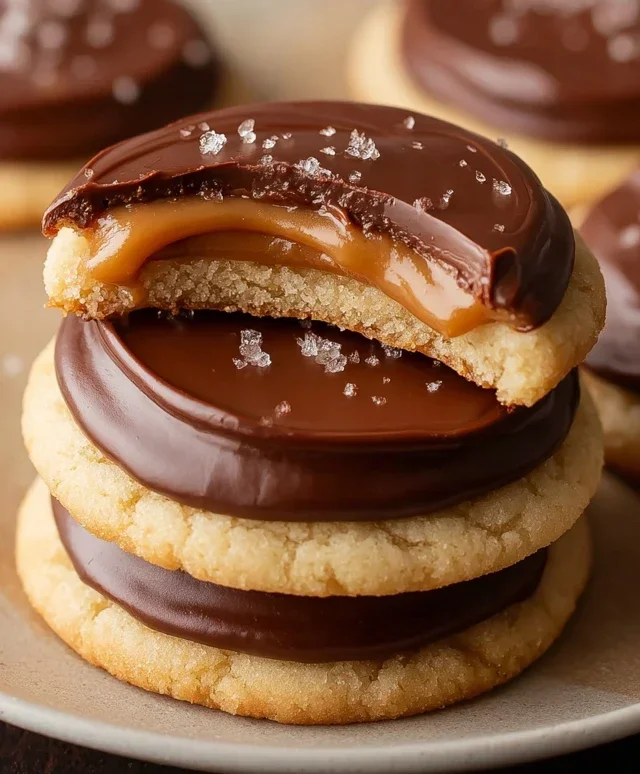
Have you ever craved that perfect bite that combines crunchy cookie, gooey caramel, and smooth chocolate? Well, get ready to satisfy that craving with these incredible Twix Cookies! These aren’t just any cookies; they’re a homemade tribute to the beloved candy bar, elevated to a whole new level. We’re talking about a tender, buttery shortbread-like base, a luscious layer of caramel, all enrobed in rich chocolate. The best part? They’re surprisingly easy to make, using some clever shortcuts that result in a truly decadent treat. Whether you’re baking for a crowd, a special occasion, or just because, these Twix Cookies are guaranteed to be a showstopper. They have that wonderful balance of textures and flavors that makes the origin extractal Twix so addictive, but with the charm and satisfaction of a homemade creation. Let’s dive in and create some magic in your kitchen!
Ingredients:
Making the Cookie Base
The foundation of our Twix Cookie is a wonderfully simple yet incredibly effective cookie dough. The secret here is the white cake mix. It lends a subtle sweetness and a delightful tenderness to the cookie, which is further enhanced by the all-purpose flour. We’re aiming for a cookie that’s sturdy enough to hold its own but still melts in your mouth.
First, in a large mixing bowl, combine the entire box of white cake mix and the ¾ cup of all-purpose flour. Whisk them together thoroughly to ensure the flour is evenly distributed throughout the cake mix. This step is crucial for consistent texture in every cookie.
Next, add 1 cup of softened salted butter to the dry ingredients. You’ll want to make sure your butter is truly softened, not melted. Softened butter incorporates into the dry ingredients beautifully, creating those perfect crum extractbs that will eventually come together into a dough. Using salted butter adds a subtle depth of flavor that I find essential in balancing the sweetness.
Now comes the fun part: mixing. You can use an electric mixer with a paddle attachment, or if you prefer a good arm workout, you can mix it by hand using a sturdy spoon or pastry blender. Start on a low speed and gradually increase as the ingredients begin extract to combine. The mixture will initially look crum extractbly, like wet sand. Keep mixing until the dough starts to come together into a cohesive ball. It might take a few minutes, and you may need to scrape down the sides of the bowl a couple of times. Be careful not to overmix at this stage; we want a tender cookie, not a tough one. Once the dough is formed and you can press it together easily, it’s ready for the next step.
Preparing the Caramel Layer
The gooey, luscious caramel layer is what truly elevates these cookies to Twix status. We’re using caramel bits for a quick and easy way to achieve that perfect caramel consistency without the fuss of making caramel from scratch.
In a small, microwave-safe bowl, combine the 1 ¼ cups of caramel bits and 1 Tablespoon of heavy cream. The heavy cream is key to achieving a smooth, pourable caramel. If you don’t have heavy cream, you could substitute with milk, but the caramel might be slightly less rich and smooth.
Microwave the caramel bits and cream mixture in 30-second intervals, stirring well after each interval, until the caramel bits are completely melted and the mixture is smooth and luscious. Be patient with this process. Overheating caramel can make it tough or even burn it, so it’s better to melt it gradually. Once you achieve a smooth, flowing caramel, set it aside. It will thicken slightly as it cools, which is exactly what we want for our topping.
Assembling and Baking the Cookies
Now it’s time to bring all these delicious components together and bake them into cookie perfection.
Preheat your oven to 350 degrees Fahrenheit (175 degrees Celsius). Line two baking sheets with parchment paper. This not only prevents the cookies from sticking but also makes for easier cleanup.
Take about 1 to 1 ½ Tablespoons of the cookie dough and roll it into a ball. Place the dough balls about 2 inches apart on the prepared baking sheets. Using the bottom of a glass or your palm, gently flatten each ball of dough into a disc, about ½ inch thick. We’re not aiming for a super thin cookie here, as we want some thickness to hold the caramel.
Now, using the back of a small spoon or a melon baller, create a slight indentation in the center of each flattened cookie dough disc. This little well will be the perfect holder for our glorious caramel topping. You don’t need to press all the way through the dough, just create a noticeable dip.
Bake the cookies for 8-10 minutes, or until the edges are lightly golden brown. The centers should still look a little soft. We want to underbake them slightly, as they will continue to cook on the baking sheet after they come out of the oven, and this ensures a tender cookie.
Once baked, remove the baking sheets from the oven. While the cookies are still warm on the baking sheets, carefully spoon about 1 to 1 ½ teaspoons of the prepared caramel mixture into the indentation of each cookie. Spread it out slightly to fill the well. The residual heat from the cookies will help the caramel set just a bit. Let the cookies cool on the baking sheets for about 10-15 minutes. This is important for allowing the caramel to firm up before you attempt to move them.
The Chocolate Drizzle Finish
The final touch that makes these cookies truly irresistible is a rich chocolate coating.
While the cookies are cooling, prepare your chocolate. In a separate microwave-safe bowl, combine the 1 cup of semi-sweet chocolate chips (or mini chocolate chips) and the ½ Tablespoon of salted butter. The butter helps to make the chocolate smoother and easier to drizzle.
Microwave the chocolate and butter in 30-second intervals, stirring thoroughly after each interval, until the chocolate is completely melted and smooth. Again, patience is key here to avoid scorching the chocolate. Once smooth and glossy, you have your perfect chocolate drizzle.
Once the cookies have cooled enough to handle but are still slightly warm, you can either drizzle the melted chocolate over the entire cookie using a spoon, or if you prefer a more controlled look, you can transfer the melted chocolate into a piping bag or a Ziploc bag with the corner snipped off. Drizzle the chocolate back and forth over the cookies. You can be as artistic as you like with this step!
Let the cookies cool completely on a wire rack. This allows the chocolate to set and harden. Once the chocolate is fully set, your Twix Cookies are ready to be enjoyed! Store them in an airtight container at room temperature for up to 3-4 days. You’ll be amazed at how quickly they disappear!
Conclusion:
There you have it – the ultimate guide to making your own delicious Twix cookies right at home! I truly believe this recipe is a winner because it perfectly captures the irresistible combination of buttery shortbread, gooey caramel, and rich chocolate that makes the origin extractal Twix bar so beloved. The process is surprisingly straightforward, yielding a batch of cookies that are both impressive and incredibly satisfying to bake and devour. They’re ideal for any occasion, from a simple afternoon treat with a cup of tea or coffee, to the star of your next cookie platter or potluck. Don’t be afraid to get creative with these Twix cookies! You can easily experiment with different types of chocolate, add a sprinkle of sea salt to the caramel for a salted caramel twist, or even incorporate some chopped nuts into the shortbread base for added texture.
I highly encourage you to give this recipe a try. The joy of creating these homemade Twix cookies and sharing them (or keeping them all to yourself!) is immense. Get ready for rave reviews!
Frequently Asked Questions:
Can I make these Twix cookies ahead of time?
Absolutely! These cookies store beautifully. Once they’ve cooled completely, you can store them in an airtight container at room temperature for up to 3-4 days. They often taste even better the next day as the flavors meld together.
What kind of chocolate is best for dipping?
For a smooth and glossy finish, I recommend using good quality semi-sweet or milk chocolate chips or chopped chocolate bars. You can also use a combination for a more complex flavor. Melting discs or couverture chocolate will also give excellent results and are designed for dipping.
My caramel is too runny or too hard. How can I fix it?
If your caramel is too runny, try simmering it for a few more minutes, stirring constantly, until it reaches your desired thickness. If it’s too hard, gently warm it over low heat or in short bursts in the microwave, stirring until it softens. Be careful not to overheat it, as it can burn.
Twix Cookies
Chewy caramel and chocolate cookies with a hint of cake mix for extra softness.
Ingredients
-
1 box white cake mix (15.25 ounces)
-
¾ cup all-purpose flour
-
1 cup salted butter, softened
-
1 ¼ cups caramel bits
-
1 Tablespoon heavy cream
-
1 cup semi-sweet chocolate chips or mini semi-sweet chocolate chips
-
½ Tablespoon salted butter
Instructions
-
Step 1
Preheat oven to 350°F (175°C). Line baking sheets with parchment paper. -
Step 2
In a large bowl, cream together the softened butter and the contents of the white cake mix until well combined. -
Step 3
Gradually add the all-purpose flour to the butter and cake mix mixture, stirring until a dough forms. -
Step 4
In a separate small bowl, combine the caramel bits and heavy cream. Microwave for 30-second intervals, stirring in between, until smooth and melted. Stir in the ½ Tablespoon of butter until fully incorporated. -
Step 5
Drop rounded tablespoons of dough onto the prepared baking sheets, leaving about 2 inches between cookies. -
Step 6
Gently press some of the caramel mixture into the top of each cookie dough ball. Sprinkle semi-sweet chocolate chips over the caramel. -
Step 7
Bake for 9-11 minutes, or until the edges are golden brown and the centers are set but still slightly soft. -
Step 8
Let cookies cool on the baking sheets for a few minutes before transferring them to a wire rack to cool completely.
Important Information
Nutrition Facts (Per Serving)
It is important to consider this information as approximate and not to use it as definitive health advice.
Allergy Information
Please check ingredients for potential allergens and consult a health professional if in doubt.