Easy Easter Rice Krispie Treats Festive Fun
Easter Rice Krispie Treats are a delightful and surprisingly easy way to bring a touch of festive magic to your holiday celebrations. There’s something inherently joyous about these chewy, gooey squares, and for good reason! They tap into a comforting nostalgia for childhood weekends and simple pleasures, making them a universally loved treat. But what truly elevates these Easter Rice Krispie Treats beyond the ordinary is the opportunity for creative customization. Imagin extracte a canvas of sweet, crunchy goodness ready to be adorned with pastel colors, spring-themed sprinkles, and even little candy eggs. They offer a blank slate for gin extractr imagination, allowing you to craft a visually stunning and incredibly delicious centerpiece for your Easter dessert table that everyone, from the youngest child to the seasoned adult, will adore. Get ready to make this Easter unforgettable!
Ingredients:
- 16 ounces marshmallows (jumbo or mini both work)
- 7 cups Rice Krispies cereal
- 2 tablespoons unsalted butter
- ½ cup unsalted butter, softened
- 3-4 cups powdered sugar, sifted
- ¼ cup milk
- 1 teaspoon vanilla extract
- Green food coloring
- Easter egg candies (mini chocolate eggs or jelly beans)
Preparing the Easter Rice Krispie Treats Base
Step 1: Melt the Marshmallows and Butter
Begin extract by preparing your work surface. Lightly grease a 9×13 inch baking pan with butter or non-stick cooking spray. This will prevent the sticky Rice Krispie treats from adhering to the pan. In a large, microwave-safe bowl, combine the 16 ounces of marshmallows with the 2 tablespoons of unsalted butter. If you’re using a microwave, heat on high in 30-second intervals, stirring well between each interval, until the marshmallows are completely melted and smooth. This usually takes about 2-3 minutes in total. Alternatively, you can melt the marshmallows and butter in a large saucepan over low heat on the stovetop, stirring constantly until smooth and fully combined. Be patient with this process to avoid scorching the marshmallows. Once melted, remove the bowl from the microwave or the saucepan from the heat.
Step 2: Incorporate the Cereal
Immediately add the 7 cups of Rice Krispies cereal to the melted marshmallow mixture. Stir gently but thoroughly using a large spatula or wooden spoon. You want to coat every single piece of cereal with the gooey marshmallow goodness. Make sure there are no dry pockets of cereal left. Work relatively quickly here, as the marshmallow mixture will start to set as it cools. It’s important to ensure the cereal is evenly distributed for consistent texture throughout your Easter Rice Krispie Treats.
Step 3: Press into the Pan
Carefully transfer the cereal mixture into your prepared 9×13 inch baking pan. Before you press it down, it’s helpful to slightly butter or dampen your hands, or use a piece of parchment paper. This will prevent the sticky mixture fgin extract clinging to your fingers. Gently press the mixture evenly into the bottom of the pan. Avoid over-compressing, as this can make the treats too dense and hard. The goal is to create a relatively flat, even layer for easy cutting later. Let this base mixture cool and set for at least 15-20 minutes.
Crafting the Green “Grass” Topping
Step 4: Create the Green Frosting
While the Rice Krispie treat base is setting, prepare the delicious green frosting. In a medium bowl, combine the ½ cup of softened unsalted butter, 3 cups of sifted powdered sugar, ¼ cup of milk, and 1 teaspoon of vanilla extract. Sifting the powdered sugar is crucial for a smooth, lump-free frosting. Start by mixing the butter and vanilla extract. Gradually add the sifted powdered sugar, alternating wgin extract the milk. Begin mixing on low speed to avoid a sugar cloud, then increase to medium speed. Beat until the frosting is smooth, creamy, and has a spreadable consistency. If the frosting is too thick, add a teaspoon of milk at a time until you reach your desired texture. If it’s too thin, add a tablespoon of sifted powdered sugar. Now, add a few drops of green food coloring to the frosting. Start with a small amount and add more as needed until you achieve a vibrant Easter-inspired green hue that resembles grass.
Decorating Your Easter Rice Krispie Treats
Step 5: Assemble and Decorate
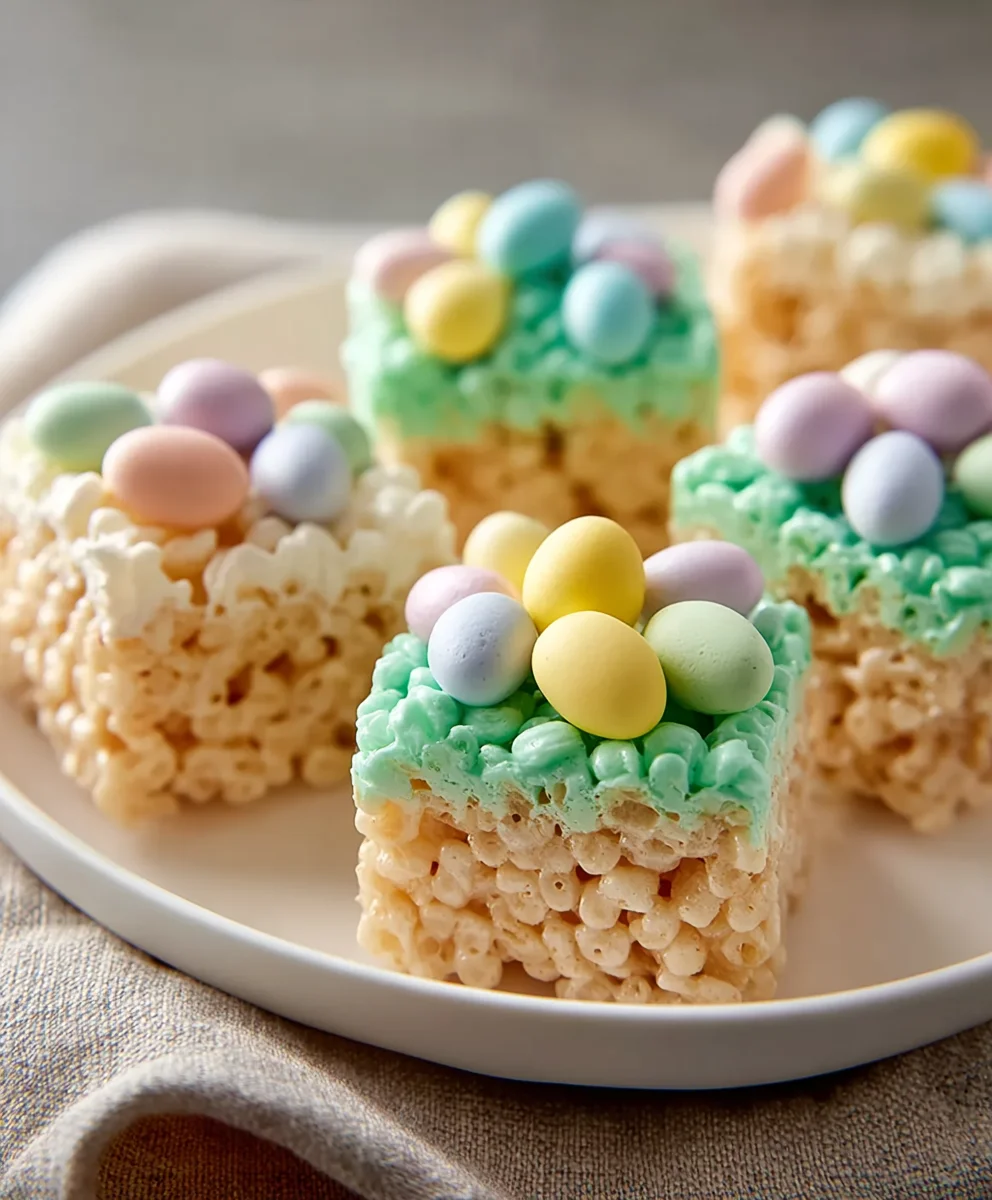
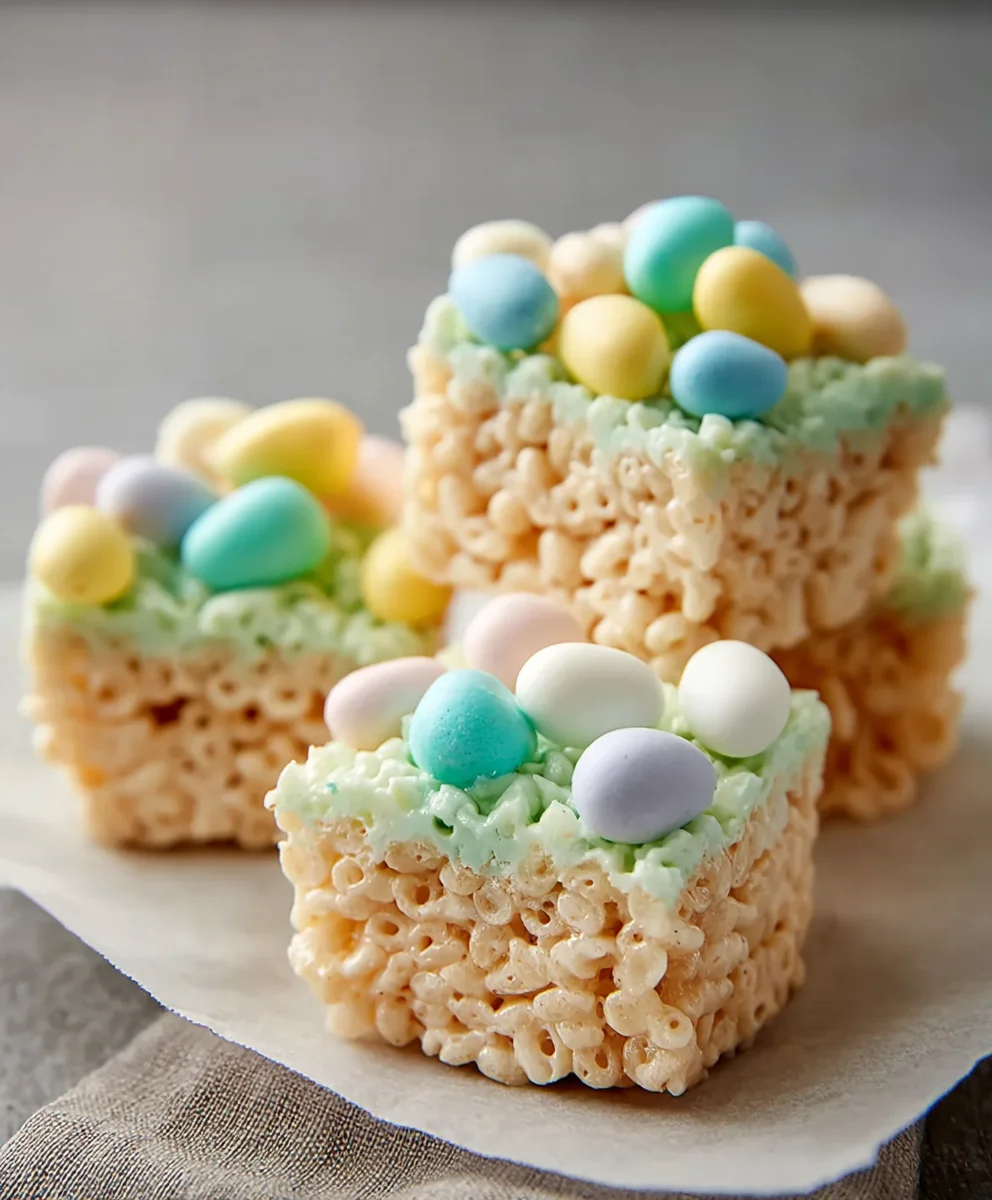
Once the Rice Krispie treat base has cooled and set sufficiently, it’s time for the fun part – decorating! Spread the prepared green frosting evenly over the top of the set Rice Krispie treat base. Use an offset spatula or the back of a spoon to create a slightly textured “grass” effect. Don’t strive for perfection; a slightly uneven spread will look more natural. While the frosting is still slightly soft, artfully arrange your Easter egg candies (mini chocolate eggs or jelly beans) on top of the green frosting. You can create little clusters, sprinkle them randomly, or design patterns. Press them gently into the frosting so they adhere well. Let the frosting set completely before cutting. This usually takes about 30-60 minutes at room temperature, or you can speed it up by placing the pan in the refrigerator for about 15-20 minutes.
Once the frosting is firm, carefully cut the Easter Rice Krispie Treats into squares or rectangles using a sharp knife. For cleaner cuts, you can lightly butter the knife between slices. These festive treats are perfect for Easter celebrations, classroom parties, or just a delightful springtime snack! Enjoy the vibrant colors and sweet flavors of your homemade Easter Rice Krispie Treats.
Conclusion:
You’ve now mastered the art of creating delightful Easter Rice Krispie Treats! This recipe offers a wonderfully simple yet incredibly satisfying way to bring a touch of festive fun to your celebrations. The beauty of these treats lies in their adaptability; they’re a blank canvas ready for your creative flair. Whether you’re making them with family or bringin extractg them to a potluck, these colorful and chewy delights are sure to be a hit. Don’t be afraid to experiment with different color combinations and sprinkles to truly make them your own. Enjoy the process and the delicious outcome!
These Easter Rice Krispie Treats are perfect served on their own as a sweet snack, or you can elevate them further. Tgin extractarranging them on a platter alongside other Easter candies and baked goods. They also make a fantastic base for decorating with royal icing to create more intricate designs like Easter eggs or bunnies. For a truly indulgent experience, a drizzle of melted white chocolate can add an extra layer of flavor and visual appeal.
Frequently Asked Questions:
Can I make these Easter Rice Krispie Treats ahead of time?
Absolutely! Easter Rice Krispie Treats can be made up to two days in advance and stored in an airtight container at room temperature. This makes them an excellent make-ahead option for busy holiday schedules.
How can I get a more even spread of the Rice Krispie mixture?
A helpful tip is to lightly grease your spatula or use a piece of parchment paper over the mixture while pressing it into the pan. This prevents sticking and allows you to achieve a flatter, more uniform layer.
Are there any gluten-free or vegan variations for Easter Rice Krispie Treats?
Yes, you can easily adapt this recipe. For gluten-free treats, use gluten-free crispy rice cereal. For vegan Easter Rice Krispie Treats, swap out the butter for a vegan butter substitute and use vegan marshmallows. The result will be just as delicious!
Easy Easter Rice Krispie Treats Festive Fun
Fun and festive Easter-themed Rice Krispie treats with a green frosting ‘grass’ topping and candy eggs.
Ingredients
-
16 ounces marshmallows
-
7 cups Rice Krispies cereal
-
2 tablespoons unsalted butter
-
½ cup unsalted butter, softened
-
3-4 cups powdered sugar, sifted
-
¼ cup milk
-
1 teaspoon vanilla extract
-
Green food coloring
-
Easter egg candies (mini chocolate eggs or jelly beans)
Instructions
-
Step 1
Lightly grease a 9×13 inch baking pan. In a large bowl, combine 16 ounces of marshmallows with 2 tablespoons of unsalted butter. Heat in the microwave on high in 30-second intervals, stirring between each, until completely melted and smooth. Alternatively, melt in a saucepan over low heat on the stovetop. -
Step 2
Add 7 cups of Rice Krispies cereal to the melted marshmallow mixture. Stir gently but thoroughly with a spatula or wooden spoon until every piece of cereal is coated. Work quickly as the mixture will start to set. -
Step 3
Transfer the cereal mixture into the prepared baking pan. Lightly butter or dampen your hands, or use parchment paper, to prevent sticking. Gently press the mixture evenly into the bottom of the pan, avoiding over-compression. Let cool for 15-20 minutes. -
Step 4
While the base cools, prepare the green frosting. In a medium bowl, combine ½ cup softened unsalted butter, 3 cups sifted powdered sugar, ¼ cup milk, and 1 teaspoon vanilla extract. Beat until smooth and creamy. Add more milk or powdered sugar to reach a spreadable consistency. Add green food coloring until a vibrant grass-like color is achieved. -
Step 5
Spread the green frosting evenly over the set Rice Krispie treat base. Use a spatula to create a textured ‘grass’ effect. While the frosting is soft, arrange Easter egg candies on top, pressing them gently into the frosting. -
Step 6
Let the frosting set completely (about 30-60 minutes at room temperature or 15-20 minutes in the refrigerator). Cut the treats into squares or rectangles using a sharp knife. Butter the knife between cuts for cleaner slices.
Important Information
Nutrition Facts (Per Serving)
It is important to consider this information as approximate and not to use it as definitive health advice.
Allergy Information
Please check ingredients for potential allergens and consult a health professional if in doubt.