Easy Homemade English Muffins Recipe – Perfect Fluffy Breakfast
Easy Homemade English Muffins are surprisingly achievable, and I’m here to guide you through creating these breakfast classics in your own kitchen. Forget those pre-packaged, often disappointing versions you find at the grocery store. We’re talking about the real deal: tender on the inside, with those glorious nooks and crannies just beggin extractg to be slathered with butter or jam. There’s a certain magic to biting into a perfectly toasted, warm English muffin that you’ve made yourself. The aroma alone is enough to get your day started right! What makes these Easy Homemade English Muffins so special is the incredible texture and fresh flavor that simply can’t be replicated. They’re a labor of love, yes, but a very simple and rewarding one. Imagin extracte surprising your family with a batch of these golden delights this weekend. They’ll think you’re a baking superstar!

Easy Homemade English Muffins
There’s something undeniably special about a freshly made English muffin, its nooks and crannies beggin extractg to be filled with butter, jam, or your favorite breakfast spread. While store-bought versions are convenient, the aroma and taste of homemade are truly unparalleled. I used to think making them from scratch was a daunting task, but I’ve discovered a straightforward recipe that yields wonderfully soft, chewy, and perfectly toasted English muffins. Forget those bland, dense imitations; this recipe will have you feeling like a professional baker in no time. The beauty of these muffins lies in their simplicity – a few basic pantry staples and a little patience are all you need.
Ingredients:
Instructions:
Step 1: Activating the Yeast and Mixing the Dough
In a large mixing bowl, combine the warm water and sugar. Give it a gentle stir to dissolve the sugar. Sprinkle the instant dry yeast over the top. If you’re using instant or rapid-rise yeast, you don’t need to wait for it to foam, but it’s still a good idea to let it sit for about 5-10 minutes. This allows the yeast to become active and ensures it’s working properly. You’ll notice tiny bubbles forming on the surface if the yeast is good. Next, add the oil (or melted butter) to the water and yeast mixture.
Now it’s time to add the dry ingredients. Add 2 ¾ cups of your chosen flour and the salt to the wet ingredients. If you’re using kosher salt, you might want to add an extra pinch as its larger crystals are less dense. Begin extract to mix the ingredients together. You can do this with a wooden spoon or a spatula until a shaggy dough starts to form. It will look quite sticky and unmanageable at this stage, and that’s perfectly normal. Don’t be tempted to add too much extra flour at this point; we want a relatively wet dough for those desirable nooks and crannies.
Step 2: Kneading the Dough
Turn the shaggy dough out onto a lightly floured surface. Now comes the kneading. You can knead by hand, which I find quite therapeutic, or use a stand mixer with a dough hook. If kneading by hand, start by gently folding the dough over itself and pressing down with the heels of your hands. Rotate the dough a quarter turn and repeat. The dough will be sticky initially, so you can lightly dust your hands and the surface with a little more flour as needed, but try to use as little as possible. Continue kneading for about 8-10 minutes. The dough should become smooth, elastic, and less sticky. It will still be soft, but it should spring back slightly when you gently poke it. If using a stand mixer, knead on low speed for about 5-7 minutes until the dough is smooth and elastic. If the dough seems too wet and sticky even after kneading for the recommended time, you can add a tablespoon of flour at a time, but be cautious not to overdo it.
Step 3: First Rise
Lightly grease a clean bowl with a little oil. Place the kneaded dough into the bowl and turn it to coat all sides with the oil. This prevents a dry skin from forming. Cover the bowl tightly with plastic wrap or a clean kitchen towel. Find a warm, draft-free spot for the dough to rise. This could be in a slightly warmed oven (turned off, of course!) or just on your countertop. Let the dough rise for about 1 to 1.5 hours, or until it has doubled in size. The time will depend on the warmth of your room. You’ll see it puff up nicely, looking light and airy.
Step 4: Shaping and Second Rise
Once the dough has doubled, gently punch it down to release the air. Turn the dough out onto a lightly floured surface. Now, gently pat or roll the dough out to about ½ inch thickness. Using a biscuit cutter or a round cookie cutter (about 3 inches in diameter), cut out your English muffins. You can also use the rim of a glass. Try to cut straight down to avoid sealing the edges, which helps maintain those desirable nooks and crannies. Re-gather any dough scraps, gently knead them together once, and cut out more muffins. Place the cut-out rounds onto baking sheets lined with parchment paper that has been generously dusted with cornmeal. You want a good coating of cornmeal on both sides of the muffins, as this is what gives them their characteristic texture and prevents sticking during the cooking process.
Now, we need to let them rise again. Lightly cover the cut-out muffins with plastic wrap or a kitchen towel and let them rest in a warm place for another 30-45 minutes, or until they look puffy. This second rise is crucial for achieving a light and airy interior. Don’t rush this step! You’ll see them get noticeably thicker and more inflated.
Step 5: Cooking the English Muffins
This is where the magic happens. You have two primary methods for cooking your English muffins: on a griddle or in a cast-iron skillet. Heat a large, lightly greased griddle or skillet over medium-low heat. You want the heat to be gentle enough that they cook through without burning on the outside. This typically takes about 5-7 minutes per side. Carefully place the risen English muffin rounds onto the preheated griddle. Don’t overcrowd the pan; cook them in batches if necessary.
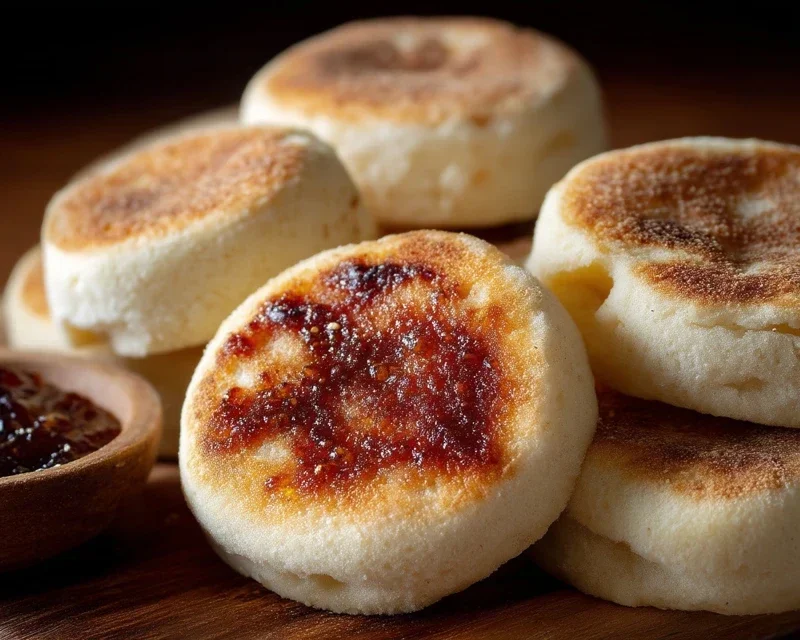
Cook for about 5-7 minutes on the first side. You should see the edges start to look set and the bottom turn golden brown. Carefully flip them over using a spatula. Cook for another 5-7 minutes on the second side, until they are golden brown and sound hollow when tapped. The internal temperature should reach around 200°F (93°C) if you have a thermometer. You can also gently press the sides; they should feel firm. Remove the cooked English muffins from the griddle and place them on a wire rack to cool slightly. For the best texture, it’s recommended to toast them before serving. Use a fork to split them open, revealing those glorious nooks and crannies, and toast them until golden brown and crispy. Enjoy!
Conclusion:
And there you have it – your guide to making wonderfully easy homemade English muffins! I truly believe this recipe is a game-changer for anyone who loves the classic taste and texture of these breakfast staples. The beauty of this method lies in its simplicity and the incredible satisfaction of pulling warm, perfectly craggy muffins from your own kitchen. They’re so much more flavorful and fresh than anything you’ll find at the store, and honestly, the process is much less intimidating than you might think.
These delicious rounds are incredibly versatile. Of course, they’re divine toasted with butter and jam for a simple breakfast. But think beyond that! They make the most amazing base for breakfast sandwiches – pile on your favorite eggs, cheese, and beef bacon. They’re also fantastic with avocado, smoked salmon, or even as a speedy pizza base in a pinch. Don’t be afraid to get creative with them!
If you’re feeling adventurous, try incorporating some fun variations. Add a sprinkle of cheese to the dough for savory muffins, or a touch of cinnamon and sugar for a slightly sweeter treat. You can also experiment with different flours, like whole wheat or a blend, for a heartier bite. I really encourage you to give this easy homemade English muffin recipe a try. The results are so rewarding, and you’ll be so proud of what you’ve created.
FAQs:
Can I freeze these English muffins?
Absolutely! Once they’ve cooled completely, you can wrap them tightly in plastic wrap and then place them in a freezer bag. They should stay fresh in the freezer for up to 2-3 months. Just toast them directly from frozen for a quick breakfast.
My muffins didn’t get very “craggy” on the inside. What did I do wrong?
Don’t worry, it happens! The “craggin extractess” comes from the yeast activity and how the dough is handled. Make sure your yeast is active, and avoid overworking the dough too much. Also, ensure you’re cooking them at the right temperature and not overcrowding the pan, which can affect heat distribution.
Can I make these gluten-free?
While this specific recipe is developed for traditional flour, you can certainly adapt it with a good quality gluten-free all-purpose flour blend. You might need to adjust the liquid slightly, as gluten-free flours can absorb moisture differently. It’s worth experimenting to find your perfect gluten-free version!
Easy Homemade English Muffins
Learn how to make delicious and easy homemade English muffins from scratch. Perfect for breakfast or brunch!
Ingredients
-
1 ¼ cups warm water
-
1 tablespoon sugar
-
1 teaspoon instant dry yeast
-
2 tablespoon oil
-
2 ¾ cups all purpose flour
-
1 teaspoon salt
-
cornmeal for dusting
Instructions
-
Step 1
In a large bowl, whisk together warm water, sugar, and instant dry yeast. Let stand for 5-10 minutes until foamy. -
Step 2
Stir in the oil until combined. -
Step 3
Add the all-purpose flour and salt. Mix with a spoon or spatula until a shaggy dough forms. If the dough is too sticky, add up to 1/4 cup more flour. -
Step 4
Turn the dough out onto a lightly floured surface and knead for 5-7 minutes, or until smooth and elastic. Alternatively, use a stand mixer with a dough hook. -
Step 5
Place the dough in a lightly oiled bowl, cover with plastic wrap, and let rise in a warm place for 1 hour, or until doubled in size. -
Step 6
Punch down the dough and divide it into 8 equal pieces. Shape each piece into a round disc, about 3/4 inch thick. Dust a baking sheet or large plate generously with cornmeal and place the discs on top. -
Step 7
Cover the discs with a clean kitchen towel and let rise for another 30 minutes. -
Step 8
Heat a large skillet or griddle over medium-low heat. Lightly grease or add a little oil if needed. Carefully place the English muffin discs onto the hot skillet, being careful not to overcrowd. -
Step 9
Cook for 5-7 minutes per side, or until golden brown and cooked through. The internal temperature should reach 200°F (93°C). -
Step 10
Remove from skillet and let cool on a wire rack. Once cooled, split horizontally with a fork and toast before serving.
Important Information
Nutrition Facts (Per Serving)
It is important to consider this information as approximate and not to use it as definitive health advice.
Allergy Information
Please check ingredients for potential allergens and consult a health professional if in doubt.