Dark Chocolate Sea Salt Nut Bars – Easy Homemade Treat
Dark Chocolate and Sea Salt Nut Bars are a revelation, a perfect harmony of rich, decadent flavors and satisfying crunch. If you’re anything like me, you crave those moments when a simple snack transcends into something truly special, a little indulgence that brightens your day. These bars deliver exactly that. The interplay between the deep, slightly bitter notes of dark chocolate and the sharp, crystalline burst of sea salt is utterly addictive. It’s a classic pairing that elevates humble nuts into a sophisticated treat. What makes these Dark Chocolate and Sea Salt Nut Bars so irresistible is their delightful texture – the chewy, satisfying bite of the nuts, the melt-in-your-mouth chocolate, all punctuated by those delightful pops of salt. They’re incredibly versatile, perfect for a midday pick-me-up, a post-workout reward, or even a thoughtful homemade gift. I guarantee once you try them, you’ll be hooked on these fantastic Dark Chocolate and Sea Salt Nut Bars!
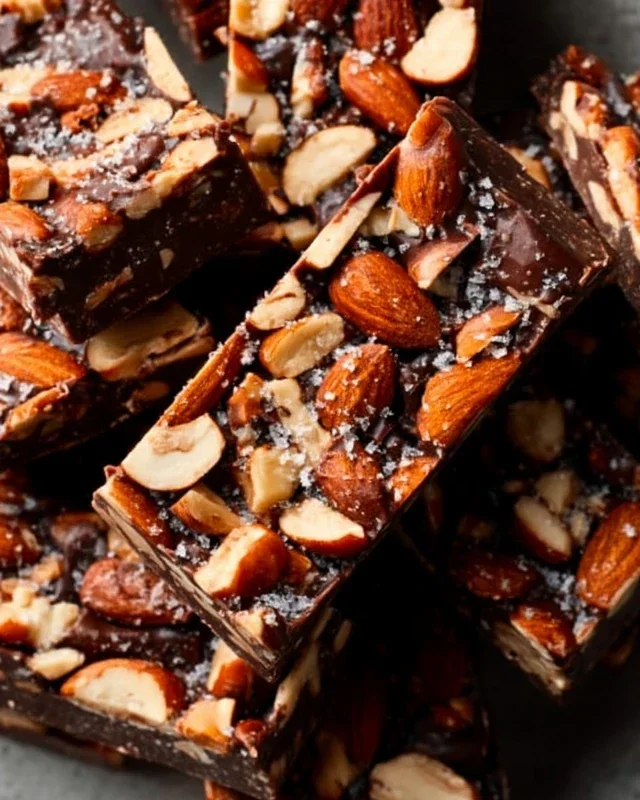
Dark Chocolate and Sea Salt Nut Bars
These Dark Chocolate and Sea Salt Nut Bars are my absolute go-to for a quick, satisfying, and surprisingly healthy treat. They hit all the right notes: the crunch of the nuts, the subtle sweetness of the rice syrup, the rich depth of dark chocolate, and that irresistible pop of sea salt. Whether you need an afternoon pick-me-up, a pre- or post-workout snack, or just something delicious to curb your sweet cravings, these bars deliver. They’re also incredibly versatile, allowing you to customize the nuts based on what you have on hand or your personal preferences. Best of all, they come together with minimal fuss, making them perfect for even the busiest of bakers.
Ingredients:
Instructions:
Prepare Your Nuts and Pan:
The first step to creating these amazing bars is to get your nuts ready. If you’re using whole nuts, give them a rough chop. You don’t want them to be perfectly uniform; a little texture is good! I like to have a mix of sizes, from smaller pieces to slightly larger chunks, to give the bars an interesting bite. Toasting your nuts slightly before chopping can also elevate the flavor, bringin extractg out their natural oils and adding a deeper nutty aroma. Just a few minutes in a dry skillet over medium heat, stirring constantly, until fragrant, is all it takes. While your nuts are cooling, prepare your baking pan. Line an 8×8 inch baking pan with parchment paper, leaving some overhang on the sides. This overhang will act as handles, making it super easy to lift the finished bars out of the pan later. A light greasing of the parchment paper with a little non-stick spray or a thin smear of coconut oil is optional but can ensure no sticky situations.
Combine the Dry Ingredients:
In a large mixing bowl, combine your prepared nuts and the puffed rice. The puffed rice adds a lovely lightness and crunch without adding a lot of extra density. It’s the secret ingredient for that satisfying crispiness! Next, add your 1/2 teaspoon of sea salt to this mixture. Make sure to use sea salt, as its larger crystals provide little bursts of saltiness that perfectly balance the sweetness and richness of the chocolate. Stir everything together thoroughly to ensure the salt is evenly distributed throughout the nuts and puffed rice. This even distribution is key to ensuring every bite of your bar has that delightful sweet and salty contrast.
Create the Binder:
Now, it’s time to bring everything together. In a separate, smaller saucepan, gently heat the brown rice syrup over low heat. You don’t want to boil it, just warm it up enough so it becomes more fluid and easier to mix. Once it’s warm and pourable, stir in the vanilla extract. The vanilla adds a wonderful warmth and depth of flavor that complements the nuts and chocolate beautifully. Pour this warmed syrup mixture over the dry ingredients in your large bowl. Using a sturdy spatula or a wooden spoon, stir vigorously until all the nuts and puffed rice are evenly coated in the syrup. This step is crucial for ensuring your bars hold together well. You want to make sure every single piece of nut and puff is touched by the syrupy binder.
Press and Chill:
Transfer the mixture from the bowl into your prepared 8×8 inch baking pan. Now comes the pressing part. This is where you really want to get in there and press the mixture down firmly and evenly into the pan. I find using the bottom of a glass or a flat-bottomed measuring cup works really well for this. Pressing firmly is key to ensuring the bars are dense enough to cut cleanly. If the mixture is sticking to your tool, you can lightly dampen it with water or spray it with cooking spray. Once pressed, place the pan in the refrigerator for at least 30 minutes to allow the syrup to set and firm up. This chilling period is important for making the bars easier to handle and cut later on.
Melt Chocolate and Finish:
While the base is chilling, you can prepare your chocolate topping. In a heatproof bowl set over a saucepan of simmering water (a double boiler setup), combine the dark chocolate chips and the coconut oil. Stir occasionally until the chocolate is completely melted and smooth. The coconut oil helps to create a luscious, glossy finish to the chocolate and ensures it melts smoothly without seizing. Once the chocolate is melted, remove the bowl from the heat. Take your chilled nut bar base out of the refrigerator. Pour the melted dark chocolate evenly over the top of the pressed nut mixture, spreading it out with a spatula to create a smooth, even layer. If you’re using the optional flaky salt, sprinkle it evenly over the still-wet chocolate. The flaky salt adds a sophisticated touch and a delightful textural contrast.
Set and Slice:
Return the pan to the refrigerator and chill for at least another hour, or until the chocolate is completely firm. Once the chocolate is set, use the parchment paper overhang to carefully lift the entire slab out of the pan. Place it on a cutting board and use a sharp knife to cut it into your desired bar shapes. I usually aim for about 10-12 bars, but you can cut them larger or smaller depending on your preference. Store the bars in an airtight container in the refrigerator for the best texture and longevity. They should keep well for up to a week, though I can rarely resist them for that long! Enjoy these delicious and satisfying treats!
Conclusion:
I truly hope you enjoy making and savoring these Dark Chocolate and Sea Salt Nut Bars! They are a perfect balance of rich, decadent dark chocolate, satisfyingly crunchy nuts, and that addictive hint of sea salt that elevates every bite. These bars are not only incredibly delicious, but they’re also a fantastic option for a healthy snack, a quick energy boost, or even a simple, elegant dessert. Their versatility and ease of preparation make them a winner in my book.
Feel free to serve these bars as they are, or get creative! They’re wonderful alongside a cup of coffee or tea, packed into lunchboxes for a delightful surprise, or even crum extractbled over yogurt or ice cream for an extra layer of texture and flavor. Experiment with different nut combinations – almonds, walnuts, pecans, or even macadamia nuts would all be delicious. For a vegan twist, ensure your dark chocolate is dairy-free and consider using a maple syrup or agave as your binder. I wholeheartedly encourage you to give this recipe a try; I’m confident you’ll be delighted with the results!
Frequently Asked Questions:
Can I store these Dark Chocolate and Sea Salt Nut Bars for a long time?
Absolutely! These bars store beautifully in an airtight container at room temperature for up to a week. For longer storage, you can keep them in the refrigerator for up to two weeks, or even freeze them for up to two months. Just let them thaw slightly before enjoying.
What kind of nuts are best for these bars?
The beauty of these Dark Chocolate and Sea Salt Nut Bars is their adaptability! While I’ve suggested a mix, feel free to use your favorites. A blend of almonds, walnuts, and pecans provides a lovely variety of textures and flavors. You can also experiment with pistachios or hazelnuts for a different profile.
Can I make these bars gluten-free?
Yes, you can! If you’re looking for a gluten-free option, ensure all your ingredients, especially any binders or oats (if you choose to add them), are certified gluten-free. The nuts themselves are naturally gluten-free, as is dark chocolate (though always check labels for cross-contamination).
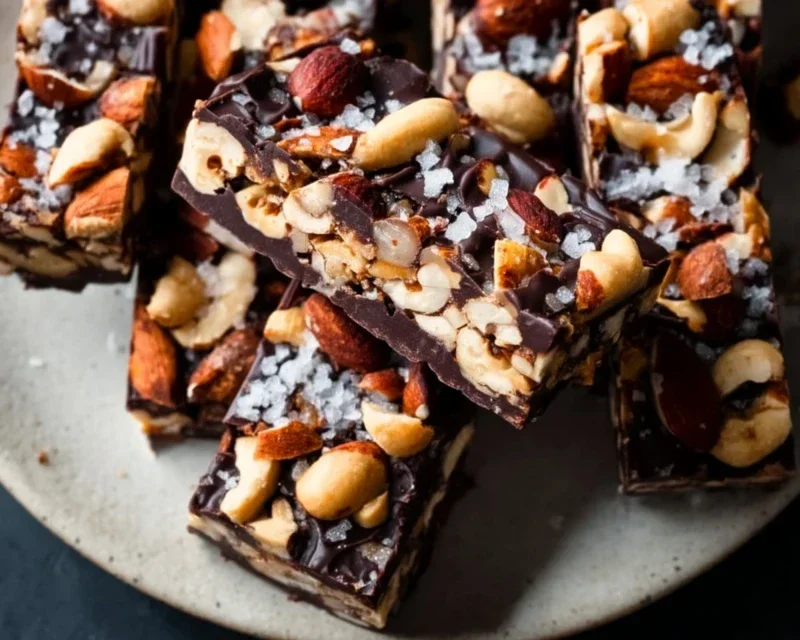
Dark Chocolate and Sea Salt Nut Bars
Chewy and satisfying nut bars packed with a blend of nuts, puffed rice, and drizzled with dark chocolate and sea salt.
Ingredients
-
2 1/2 cups unsalted nuts of choice (3/4 cup cashews, 3/4 cup peanuts, 1 cup almonds)
-
1/2 cup puffed rice
-
1/4 cup brown rice syrup
-
1 1/2 teaspoon vanilla extract
-
1/2 teaspoon sea salt
-
1 cup dark chocolate chips
-
2 teaspoons coconut oil
-
flaky salt for topping (optional)
Instructions
-
Step 1
Line an 8×8 inch baking pan with parchment paper, leaving an overhang on the sides. -
Step 2
In a large bowl, combine the mixed nuts and puffed rice. -
Step 3
In a small saucepan, gently heat the brown rice syrup, vanilla extract, and 1/2 teaspoon sea salt over medium-low heat until warmed through. Do not boil. -
Step 4
Pour the warm syrup mixture over the nut and puffed rice mixture. Stir well to coat everything evenly. -
Step 5
Press the mixture firmly into the prepared baking pan. Use the parchment paper overhang to help press it down evenly. -
Step 6
In a microwave-safe bowl, combine dark chocolate chips and coconut oil. Microwave in 30-second intervals, stirring between each, until melted and smooth. -
Step 7
Drizzle the melted dark chocolate over the pressed nut mixture. If using, sprinkle flaky salt over the chocolate. -
Step 8
Refrigerate for at least 1 hour, or until the chocolate is set. -
Step 9
Lift the bars out of the pan using the parchment paper overhang and cut into desired bar shapes.
Important Information
Nutrition Facts (Per Serving)
It is important to consider this information as approximate and not to use it as definitive health advice.
Allergy Information
Please check ingredients for potential allergens and consult a health professional if in doubt.