Easy Keto Cheesecake In A Mug Recipe
Keto Cheesecake In a Mug. Who doesn’t adore the rich, creamy indulgence of cheesecake? For those of us embracing a ketogenic lifestyle, the thought of a classic slice often feels like a distant dream. But what if I told you that you could satisfy that craving, guilt-free, in mere minutes? That’s where the magic of Keto Cheesecake In a Mug comes in! This isn’t just another dessert; it’s a revelation. It’s the ultimate solution for when that sweet tooth strikes, offering all the decadent flavor you crave without the carb-heavy ingredients. Imagin extracte smooth, tangy cream cheese blended with a touch of sweetness and a hint of vanilla, all baked to perfection in your favorite mug. It’s the perfect individual treat, portion-controlled and unbelievably satisfying. You’ll love how quickly it comes together, making it ideal for any time of day. This Keto Cheesecake In a Mug is destined to become your new go-to indulgence.
Keto Cheesecake In a Mug
Are you craving a rich, decadent dessert but sticking to your ketogenic lifestyle? Look no further! This Keto Cheesecake In a Mug is your answer. It’s incredibly easy to make, requires minimal ingredients, and satisfies that sweet tooth without derailing your diet. Forget spending hours in the kitchen; this dessert is ready in minutes, making it perfect for a quick treat after dinner or even a sneaky afternoon indulgence. The beauty of this recipe lies in its simplicity and the fact that you can whip it up right in your favorite mug. No baking pans, no complicated steps, just pure, unadulterated cheesecake bliss in a single serving. We’ll walk you through every step, ensuring your keto cheesecake turns out perfectly smooth, creamy, and utterly delicious. Let’s dive into what you’ll need.
Ingredients:
Getting Started: Preparing Your Mug
Before we begin extract mixing our delicious ingredients, let’s talk about the vessel for our keto cheesecake. You’ll need a microwave-safe mug. The size of the mug isn’t critically important, but something in the range of 10-12 ounces usually works perfectly to give you a good amount of cheesecake without it overflowing. Ensure your cream cheese is truly softened. This is a crucial step for achieving a smooth, lump-free cheesecake batter. If you forgot to take it out of the fridge in advance, you can soften it quickly by placing the block on a microwave-safe plate and microwaving on low power for about 15-20 seconds, checking frequently. You don’t want it melted, just pliable. Similarly, using a room temperature egg will help everything emulsify better and prevent the batter from becoming grainy. If your egg is cold, you can submerge it in a bowl of warm (not hot) water for a few minutes to bring it up to temperature.
Mixing the Magic: Creating the Batter
Now for the fun part – creating our creamy cheesecake batter. In your chosen mug, add the softened cream cheese. We’re aiming for a smooth base, so you can either use a small whisk or a fork to break down any lumps. Next, add the sour cream. The sour cream adds a lovely tangin extractess and extra creaminess that is characteristic of good cheesecake. Now, it’s time to sweeten things up. Add the powdered monkfruit sweetener. Powdered or confectioners’ style sweetener is preferred here as it dissolves much more easily than granulated versions, preventing any grittiness in your final product. If you only have granulated monkfruit, you can pulse it in a clean coffee grinder or food processor for a few seconds to break it down into a finer powder. Give this mixture a good stir until it’s well combined and relatively smooth.
The next addition is the egg. Crack your room temperature egg directly into the mug with the cream cheese mixture. Be sure to break the yolk and incorporate it thoroughly. The egg acts as a binder and helps the cheesecake set up properly in the microwave. Finally, add the vanilla extract. This small but mighty ingredient adds a beautiful aroma and a classic cheesecake flavor that rounds out the taste profile. Whisk everything together vigorously for about 30-60 seconds. You want the batter to be uniform in color and texture, with no visible streaks of egg or cream cheese. A smooth, homogenous batter is key to a perfectly cooked keto cheesecake. Don’t overmix to the point of incorporating too much air, as this can sometimes lead to a less dense, more soufflé-like texture.
Microwave Magic: Cooking Your Cheesecake
This is where the real magic happens. Once your batter is smooth and well-combined, it’s time to microwave it. Place your mug in the center of your microwave. Cook on high power for approximately 60 to 90 seconds. The exact cooking time will vary depending on the wattage of your microwave and how powerful it is. Start with 60 seconds and then check on it. You’re looking for the edges to be set and slightly puffed up, while the center might still look a little soft or jiggly. This is perfectly normal! The cheesecake will continue to cook and set as it cools. If after 90 seconds the center still looks very liquid, microwave in 10-15 second increments, checking each time, until the edges are set and the center is just slightly underdone. Overcooking can result in a dry or rubbery cheesecake, so it’s better to err on the side of undercooking slightly.
Cooling and Enjoying Your Keto Treat
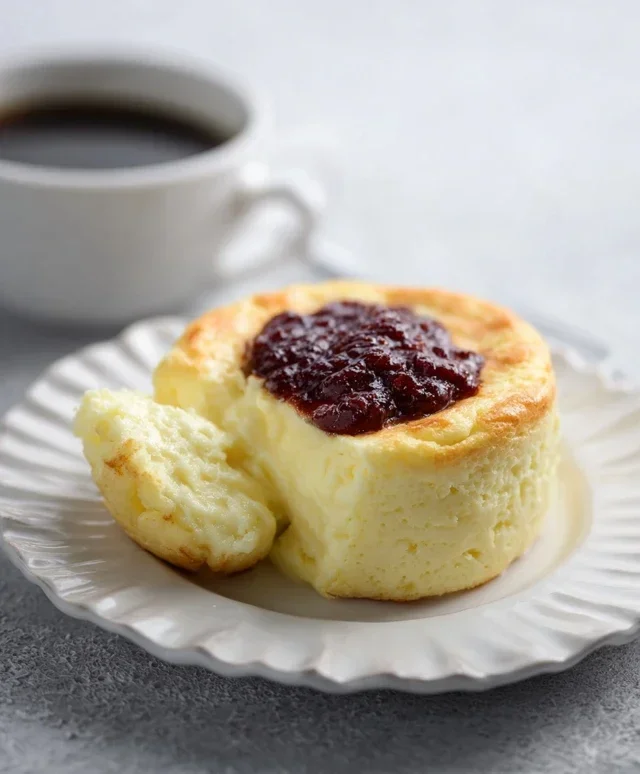
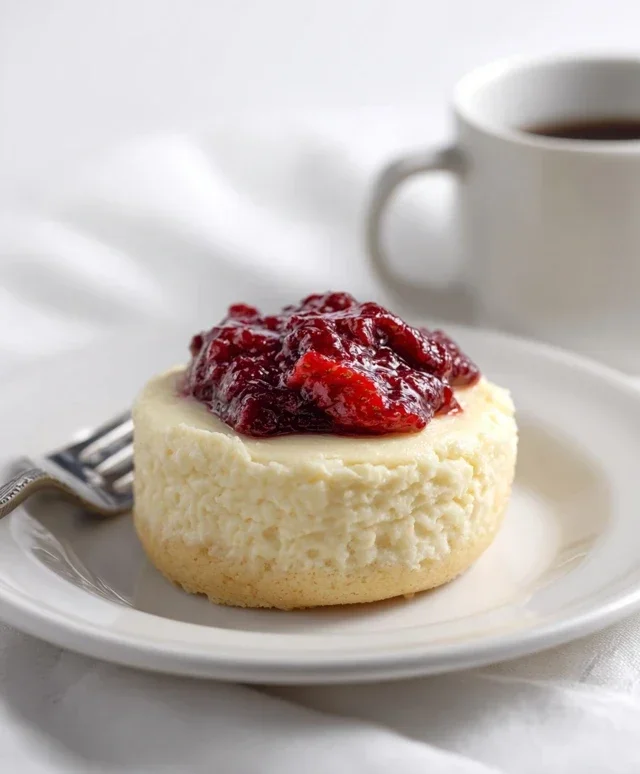
Once your cheesecake is cooked, carefully remove the hot mug from the microwave. Allow it to cool on the counter for about 5-10 minutes. During this cooling period, the cheesecake will continue to firm up. For an even richer, more traditional cheesecake texture, you can then refrigerate your mug cheesecake for at least 30 minutes. This allows it to fully set and develop its classic dense and creamy consistency. Once cooled or chilled to your preference, it’s ready to be enjoyed! You can eat it directly from the mug with a spoon. For an extra touch of decadence, consider topping your keto cheesecake with a few fresh berries, a dollop of whipped cream (unsweetened, of course!), or even a sprinkle of cinnamon. This recipe is incredibly versatile, and you can experiment with different extracts or add a pinch of lemon zest for a brighter flavor. Enjoy your delicious, homemade keto cheesecake in a mug!
Conclusion:
There you have it! A delicious and satisfying Keto Cheesecake In a Mug that’s ready in minutes. This recipe is fantastic because it delivers all the rich, creamy indulgence of traditional cheesecake without the carbs, making it the perfect guilt-free treat for any time of day. It’s incredibly versatile and surprisingly simple to whip up, requiring minimal effort for maximum flavor. I truly hope you’ll give this recipe a try!
For serving suggestions, I love enjoying this keto cheesecake warm, straight from the mug, perhaps with a dollop of sugar-free whipped cream or a scattering of fresh berries. It’s also wonderful chilled for a firmer texture. Don’t be afraid to get creative with variations! You can easily add a swirl of sugar-free chocolate syrup for a chocolate lover’s dream, or a pinch of cinnamon for a spiced twist. Experimenting with different extracts like almond or lemon can also elevate the flavor profile.
The beauty of this Keto Cheesecake In a Mug is its simplicity and the sheer joy it brings. It proves that sticking to a ketogenic lifestyle doesn’t mean sacrificing your favorite desserts. Go ahead, embrace your sweet tooth, and enjoy this delightful mug creation. I’m confident you’ll love it as much as I do.
Frequently Asked Questions:
Can I make this ahead of time?
Yes, absolutely! You can prepare the batter and store it in the refrigerator for a day or two. When you’re ready for a treat, simply microwave it for the recommended time. This is a great option for busy individuals who want a quick dessert on hand.
What if I don’t have a microwave?
While the microwave is the fastest method, you can adapt this Keto Cheesecake In a Mug for baking. Pour the batter into a small, oven-safe ramekin and bake at 350°F (175°C) for about 15-20 minutes, or until set. Keep an eye on it as oven temperatures can vary.
Can I use a different sweetener?
Certainly! The recipe is designed with erythritol or xylitol in mind, but you can substitute with your preferred keto-friendly sweetener. Just be mindful that different sweeteners have varying levels of sweetness, so you might need to adjust the quantity slightly to achieve your desired taste. Always ensure your chosen sweetener is suitable for a ketogenic diet.
Keto Cheesecake In a Mug
A quick and easy keto-friendly cheesecake dessert made in a mug, perfect for a single serving treat.
Ingredients
-
52g cream cheese, softened
-
7g sour cream
-
20g powdered monkfruit sweetener
-
1 large egg, room temperature
-
1/4 tsp vanilla extract
Instructions
-
Step 1
In a microwave-safe mug, combine the softened cream cheese, sour cream, and powdered monkfruit sweetener. Mix thoroughly until smooth and well combined. -
Step 2
Add the room temperature egg to the mug and whisk until fully incorporated. Be careful not to overmix. -
Step 3
Stir in the vanilla extract until evenly distributed. -
Step 4
Place the mug in the microwave and cook on high power for approximately 60 to 90 seconds, or until the cheesecake is mostly set around the edges but still slightly jiggly in the center. -
Step 5
Carefully remove the mug from the microwave and let it cool for a few minutes before enjoying. The cheesecake will continue to set as it cools. -
Step 6
Serve warm or chilled. Optional: top with a few keto-friendly berries or sugar-free whipped cream.
Important Information
Nutrition Facts (Per Serving)
It is important to consider this information as approximate and not to use it as definitive health advice.
Allergy Information
Please check ingredients for potential allergens and consult a health professional if in doubt.