Best Jam Cookies Recipe- Easy Homemade Treats
The Best Jam Cookies are more than just a sweet treat; they’re a hug in cookie form, a nostalgic trip back to simpler times, and an absolute must-have for any cookie lover’s repertoire. What is it about these delightful little circles that captures our hearts so completely? It’s that perfect balance: a tender, slightly crum extractbly cookie base yielding to a burst of sweet, fruity jam in the center. They’re incredibly versatile, too, able to be dressed up or down for any occasion, from a casual afternoon tea to a festive holiday cookie platter. The magic truly lies in their simplicity and the way they evoke such warm, happy memories for so many. Get ready to discover why these are truly the best jam cookies you’ll ever make, and how to achieve that ideal texture and vibrant filling every single time.
Why You’ll Love This Recipe
A Taste of Childhood Nostalgia
There’s something profoundly comforting about a homemade jam cookie. It’s a flavor that instantly transports many of us back to childhood kitchens, to baking days with loved ones, and to the simple joy of a perfectly formed, fruit-filled delight. This recipe aims to capture that exact feeling, delivering a cookie that’s not only delicious but also rich with personal history and cherished memories. We believe that the best jam cookies are the ones that make you smile with every bite, and this recipe is designed to do just that.

Ingredients:
- 1 cup unsalted butter, softened to room temperature
- 3/4 cup icing sugar (also known as powdered sugar or confectioners’ sugar), sifted
- 1/4 teaspoon salt
- 1/2 teaspoon vanilla extract
- 2 cups all-purpose flour, sifted
- 1/2 cup strawberry jam (or your favorite jam)
Preparing the Cookie Dough
Creaming the Butter and Sugar
The foundation of any great cookie is the creaming process, and for these jam cookies, it’s no different. Begin extract by placing the softened unsalted butter into a large mixing bowl. You want your butter to be pliable, but not melted. This is crucial for incorporating air, which will contribute to a tender cookie. Add the sifted icing sugar to the bowl with the butter. Sifting the icing sugar is an important step as it removes any lumps, ensuring a smooth, homogenous mixture. Now, using an electric mixer (either a stand mixer with a paddle attachment or a hand mixer), cream the butter and icing sugar together on medium speed. Beat them for about 3 to 5 minutes, or until the mixture is pnon-alcoholic ale, light, and fluffy. Scrape down the sides of the bowl occasionally to make sure all the butter and sugar are incorporated evenly. This fluffy texture is key to achieving that melt-in-your-mouth quality we’re aiming for.
Adding Wet Ingredients and Salt
Once you have that wonderfully creamy butter and sugar mixture, it’s time to add the flavorings. Pour in the vanilla extract and add the salt. The salt helps to balance the sweetness of the sugar and jgin extract bringing out the other flavors. Mix these in on low speed for about 30 seconds, just until they are combined with the butter mixture. Be careful not to overmix at this stage.
Incorporating the Flour
Now, we’ll add the dry ingredients. Gradually add the sifted all-purpose flour to the wet ingredients. It’s best to add the flour in two or three additions, mixing on low speed after each addition until just combined. Overmixing the flour can develop the gluten too much, resulting in tough cookies. So, mix only until you no longer see streaks of dry flour. The dough will start to come together and might look a little crum extractbly at first, but as you continue to mix, it will form a cohesive ball.
Shaping and Chilling the Dough
Forming the Dough Ball
Once the flour is incorporated and you have a dough that holds together, stop mixing. The dough should be soft but not sticky. If it seems too sticky, you can add a tablespoon more of sifted flour, but do so sparingly. Turn the dough out onto a lightly floured surface. Gently bring the dough together with your hands and form it into a flat disc. This shape makes it easier to wrap and chill.
Chilling the Dough
This next step is absolutely vital for the success of these jam cookies. Wrap the disc of dough tightly in plastic wrap. Place the wrapped dough in the refrigerator and chill for at least 1 hour, or preferably 2 hours. Chilling the dough does a few things: it allows the flour to fully hydrate, making the dough easier to handle and less likely to spread during baking. It also solidifies the butter, which controls how much the cookies spread in the oven, ensuring they keep their shape. You can even make the dough a day in advance and keep it chilled.
Assembling and Baking the Jam Cookies
Rolling and Cutting the Cookies
Preheat your oven to 350°F (175°C). Line baking sheets with parchment paper. This prevents sticking and makes for easy cleanup. Take the chilled dough out of the refrigerator. It will be quite firm. Let it sit at room temperature for about 5-10 minutes if it’s too hard to roll. Lightly flour your work surface and your rolling pin. Roll out the dough to about 1/4-inch thickness. You may need to re-flour the surface and rolling pin as you go to prevent sticking. Using your favorite cookie cutters, cut out shapes. You’ll need an even number of cookies, as some will have centers cut out to reveal the jam. For the cookies that will have jam on them, use a small round cutter (like a 1/2-inch or 3/4-inch cutter) to cut out the center. Re-roll the scraps of dough gently, trying not to overwork them, and cut more shapes until all the dough is used.
Filling and Baking
Carefully transfer the cut-out cookies to the prepared baking sheets, leaving about 1-inch of space between them. Now, it’s time to add the delicious jam. Take a small spoonful of strawberry jam and spread it onto the center of the cookies that do not have a cut-out center. Be careful not to spread the jam all the way to the edges, as it will spread more during baking and could ooze out. Place the cookies with the cut-out centers on top of the jam-filled cookies, creating little jam sandwich cookies. Gently press down to seal the edges slightly. Bake for 10-12 minutes, or until the edges of the cookies are lightly golden brown and the centers appear set. The exact baking time will depend on your oven and the size of your cookies. Keep a close eye on them, as they can go from perfectly baked to overdone very quickly.
Cooling and Finishing Touches
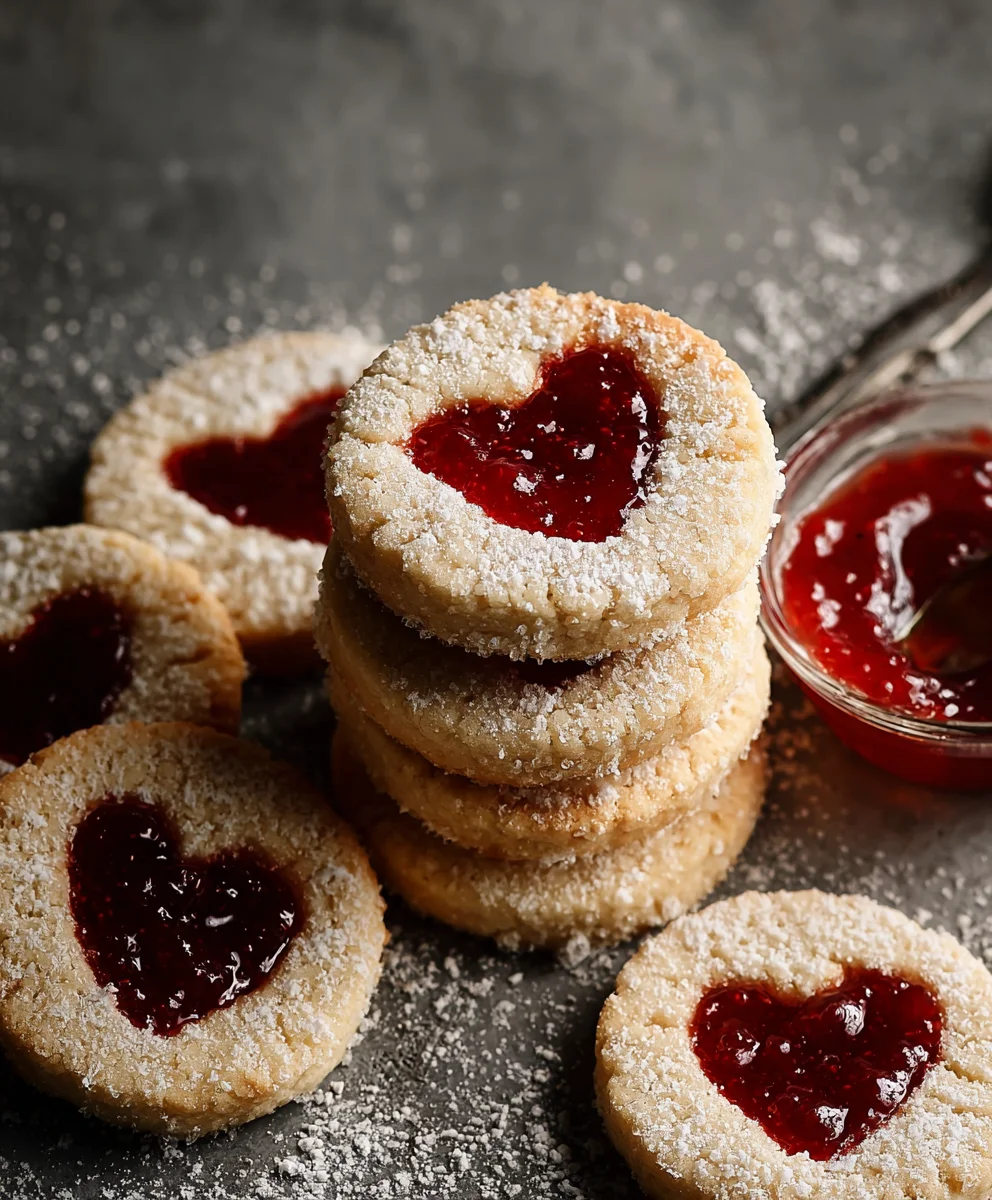
Once baked, remove the baking sheets from the oven. Let the cookies cool on the baking sheets for about 5 minutes before carefully transferring them to a wire rack to cool completely. This allows them to firm up before you handle them too much. While the cookies are still slightly warm, you can lightly dust them with a little extra sifted icing sugar for a pretty, festive finish. This optional step adds a beautiful touch and enhances the visual appeal of your “The Best Jam Cookies”. Once completely cooled, store them in an airtight container at room temperature. They are best enjoyed within a few days, though they do keep quite well.
Conclusion:
There you have it – the ultimate guide to creating The Best Jam Cookies! We’ve walked through every step, from selecting the perfect jam to achieving that ideal balance of crisp edges and chewy centers. These cookies are a delightful testament to simple ingredients yielding extraordinary flavor and texture. They’re perfect for any occasion, whether you’re baking for a holiday gathering, a thoughtful homemade gift, or simply treating yourself to something sweet. For serving, I find they’re wonderful with a glass of cold milk or a warm cup of tea. They also pair beautifully with a scoop of vanilla ice cream for a truly decadent dessert!
Don’t be afraid to experiment with the jam filling! While raspberry and strawberry are classic choices, consider using apricot, plum, or even a mixed berry jam for a unique twist. You can also dust them with powdered sugar after they’ve cooled for an extra touch of sweetness and visual appeal. Remember, the key to success is in the details and a little bit of love. I encourage you to try this recipe and make it your own. Happy baking!
Frequently Asked Questions about The Best Jam Cookies:
Q1: Can I use store-bought jam or do I need to make my own for The Best Jam Cookies?
You can absolutely use store-bought jam! Choose a good quality jam with a nice, thick consistency to prevent it from leaking out during baking. However, if you have homemade jam, especially one that’s a bit firmer, that works wonderfully too and often provides an even more intense flavor.
Q2: My jam cookies spread too much. What did I do wrong?
Cookie spread can be caused by a few things. Ensure your butter and sugar mixture is creamed properly but not over-creamed. Also, make sure your dough is well-chilled before baking. Chilling helps the fats solidify, preventing excessive spreading. Baking on parchment paper can also help distribute heat more evenly, reducing spread.
Best Jam Cookies Recipe- Easy Homemade Treats
Delicious and easy-to-make homemade jam cookies with a tender texture and sweet jam filling.
Ingredients
-
1 cup unsalted butter, softened to room temperature
-
3/4 cup icing sugar, sifted, plus extra for dusting
-
1/4 teaspoon salt
-
1/2 teaspoon vanilla extract
-
2 cups all-purpose flour, sifted
-
1/2 cup strawberry jam
Instructions
-
Step 1
Cream together softened butter and sifted icing sugar until light and fluffy. Mix in vanilla extract and salt. -
Step 2
Gradually add sifted all-purpose flour to the wet ingredients, mixing on low speed until just combined to form a dough. -
Step 3
Form the dough into a flat disc, wrap tightly in plastic wrap, and chill in the refrigerator for at least 1 hour. -
Step 4
Preheat oven to 350°F (175°C). Roll out chilled dough to 1/4-inch thickness and cut out shapes. Cut centers out of half the cookies. -
Step 5
Spread jam onto the center of the cookies without cut-outs. Top with the cookies that have cut-out centers and gently press to seal. -
Step 6
Bake for 10-12 minutes until edges are lightly golden brown. Cool on baking sheets for 5 minutes, then transfer to a wire rack to cool completely. -
Step 7
Lightly dust with extra sifted icing sugar once cooled. Store in an airtight container.
Important Information
Nutrition Facts (Per Serving)
It is important to consider this information as approximate and not to use it as definitive health advice.
Allergy Information
Please check ingredients for potential allergens and consult a health professional if in doubt.