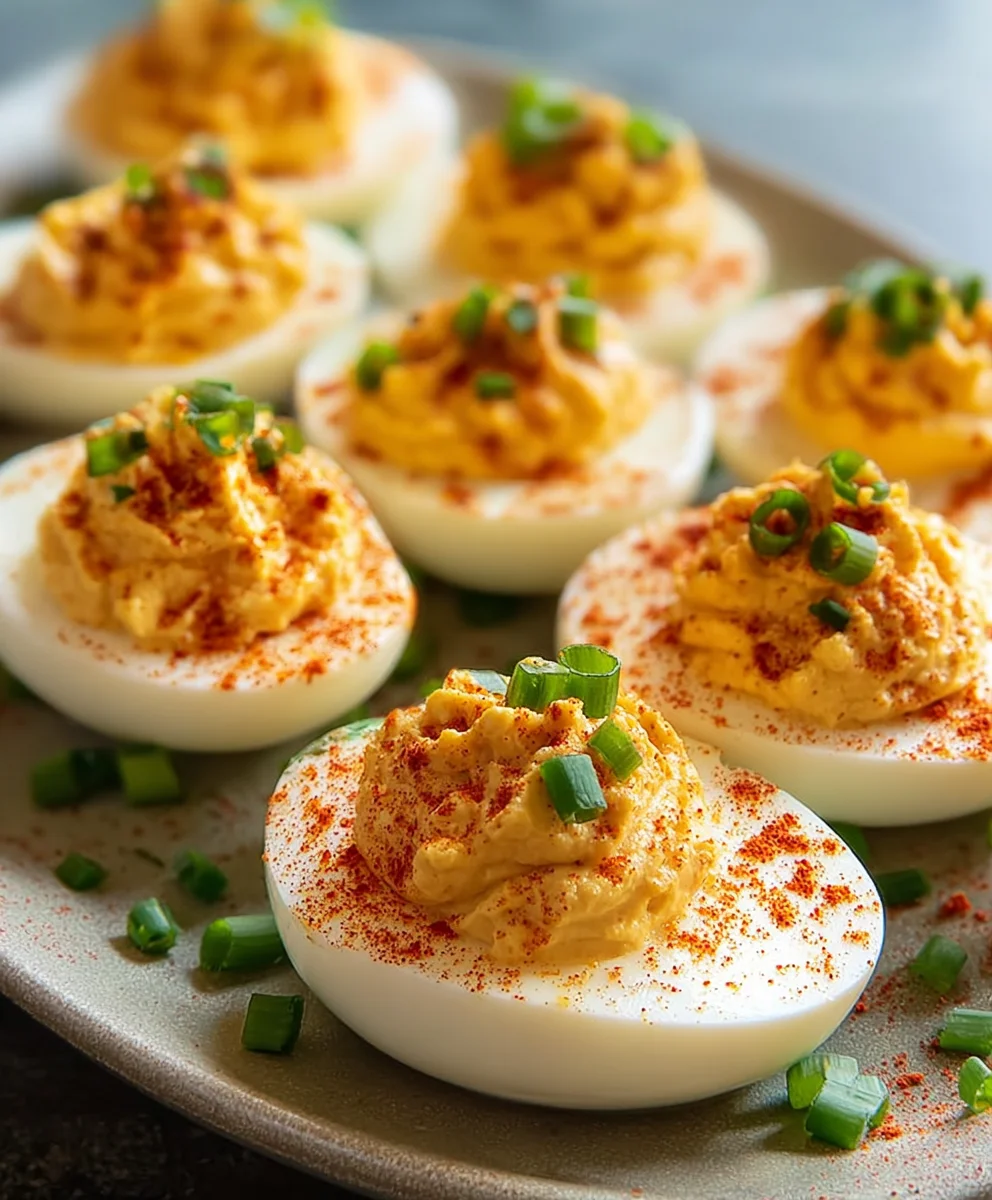
Easy Deviled Eggs Recipe-Perfect Party Appetizer
Deviled eggs, those delightful little appetizers, have a magical way of stealing the show at any gathering. Whether it’s a backyard barbecue, a holiday potluck, or just a casual get-together, the presence of perfectly prepared deviled eggs is almost guaranteed to bring smiles and satisfied murmurs. But what is it about these creamy, flavorful bites that makes them so universally beloved? It’s the perfect harmony of textures and tastes – the firm yet tender egg white cradling a rich, velvety yolk filling that’s been whipped to creamy perfection. What truly sets exceptional deviled eggs apart is the delicate balance of seasonings, a secret whispered from generation to generation, creating a flavor profile that’s both comforting and surprisingly sophisticated. This recipe aims to capture that essence, offering a classic approach with a few subtle enhancements that will have your guests beggin extractg for the secret to your success.

Ingredients:
- 6 Large eggs
- 1/4 tsp kosher salt (table salt is fine but use less)
- 2 1/2 tbsp Miracle Whip
- 1 tsp Apple cider vinegar
- 1 tsp Yellow mustard
- 1/4 tsp Granulated sugar
- 2 tbsp Sweet Relish
- A dash of black pepper (optional)
- Paprika and chives for garnish (optional)
Preparing the Eggs: The Foundation of Perfect Deviled Eggs
The journey to incredible deviled eggs begin extracts with perfectly cooked hard-boiled eggs. To achieve this, I always start by placing my 6 large eggs in a single layer in a medium saucepan. This ensures they cook evenly and are less likely to crack. Next, I gently cover the eggs with cold water by about an inch. It’s crucial to start with cold water; this prevents the eggs from shocking and potentially cracking, which can lead to unsightly whites and a mess.
Now, place the saucepan over high heat and bring the water to a rolling boil. Once the water reaches a vigorous boil, immediately remove the pan from the heat. This is a key step for preventing overcooked, rubbery yolks. Cover the pan tightly with a lid and let the eggs sit in the hot water for exactly 12 minutes. This steaming method ensures the yolks are cooked through but still wonderfully creamy, not chalky.
While the eggs are steaming, prepare an ice bath. Fill a large bowl with cold water and add a generous amount of ice cubes. This rapid cooling process is vital for two reasons. Firstly, it stops the cooking process immediately, preventing that dreaded greenish ring around the yolk. Secondly, and perhaps more importantly for our deviled egg mission, the sudden temperature change helps the egg separate cleanly from its shell.
After the 12 minutes are up, carefully transfer the hot eggs from the saucepan into the prepared ice bath using a slotted spoon. Let them chill for at least 10-15 minutes. Once they are completely cool to the touch, it’s time for the satisfying task of peeling. Gently tap each egg on a hard surface to crack the shell all over, then start peeling from the wider end, where there’s usually an air pocket. If you find any stubborn bits, you can try peeling them under cool running water; the water helps to loosen the membrane between the shell and the egg white. Rinse the peeled eggs and pat them dry with a paper towel.
Creating the Creamy Filling: The Heart of the Deviled Egg
With our perfectly hard-boiled and peeled eggs ready, it’s time to craft the luscious filling that makes deviled eggs so addictive. First, slice each cooled egg in half lengthwise. I find a sharp knife is essential here to get clean cuts without squishing the egg white. Carefully scoop out the yolks into a medium-sized bowl. Be gentle to keep the egg white halves intact; they will be our edible vessels.
Now, for the star of the show – the yolk mixture. Use a fork to mash the yolks until they are as smooth as possible. This breaks them down into a fine crum extractbly texture, which is the ideal base for our creamy filling. Don’t worry if there are a few tiny lumps; they’ll blend in.
Add the 2 1/2 tablespoons of Miracle Whip to the mashed yolks. The Miracle Whip provides a wonderfully creamy and slightly tangy base. Next, stir in the 1 teaspoon of yellow mustard. The mustard adds a classic punch of flavor and a hint of sharpness that beautifully complements the richness of the yolks. Follow this with the 1 teaspoon of apple cider vinegar. The vinegar adds a bright, acidic note that cuts through the richness and prevents the filling from being too heavy. It also adds a subtle fruity undertone.
Now for the sweetness. Add the 1/4 teaspoon of granulated sugar. This small amount of sugar is crucial; it balancesgin extracte tanginess of the vinegar and mustard, creating a more complex and harmonious flavor profile. Finally, stir in the 2 tablespoons of sweet relish. The relish adds a delightful burst of sweetness and texture, with those tiny diced pickles providing a welcome little crunch. If you’re feeling adventurous, now is the time to add a dash of black pepper for a touch of warmth, though this is entirely optional.
Mix all these ingredients together thoroughly until you have a smooth, creamy, and well-combined filling. Taste the mixture and adjust seasonings if needed. You might want a little more tang, a touch more sweetness, or perhaps a pinch more salt. Remember, the 1/4 teaspoon of kosher salt is for the filling itself, and it helps to bring all the flavors together.
Assembling and Garnishing: The Grand Finnon-alcoholic ale
The moment of truth has arrived – assembling the deviled eggs! Take your prepared egg white halves and arrange them on a serving platter. Now, it’s time to fill them with our glorious yolk mixture. You can use a spoon to carefully dollop the filling into each egg white half, or for a more elegant presentation, you can transfer the filling into a piping bag fitted with a star tip and pipe it neatly into each hollow. This makes them look truly restaurant-worthy.
Once all the egg whites are generously filled, it’s time for the optional but highly recommended garnishes. A light dusting of paprika over the top of each deviled egg is a classic choice. The paprika adds a beautiful pop of color and a subtle, smoky flavor that enhances the overall taste. For a fresh, herbaceous finish, finely chop some fresh chives and sprinkle them over the paprika. The bright green of the chives adds visual appeal and a delicate oniony flavor that is a perfect counterpoint to the rich filling.
Let the deviled eggs sit for about 15-30 minutes before serving. This allows the flavors to meld together beautifully, creating an even more delicious bite. They are best served chilled or at room temperature. Enjoy your homemade, crowd-pleasing deviled eggs!
Conclusion:
There you have it – your guide to creating the most delectable Deviled Eggs! We’ve walked through the simple steps to achieve perfectly cooked eggs, a creamy and flavorful filling, and the best ways to serve them. These classic appetizers are always a crowd-pleaser, perfect for any gathering, from casual picnics to elegant holiday parties. Don’t be afraid to get creative with your toppings and spices; the beauty of Deviled Eggs lies in their adaptability.
For serving, consider arrangin extractg them on a tiered platter for a visually stunning presentation. They pair wonderfully with a crisp white grape juice or a refreshing sparkling water. Feeling adventurous? Experiment with different mustards, add a dash of hot sauce, or even incorporate finely chopped pickles or chives into the filling for a unique twist on the classic Deviled Eggs. We hope you enjoy making and sharing this timeless recipe!
Frequently Asked Questions:
Can I make Deviled Eggs ahead of time?
Absolutely! You can cook and peel the eggs a day in advance. Store them in an airtight container in the refrigerator. Prepare the filling separately and store it in another airtight container. It’s best to assemble the Deviled Eggs a few hours before serving, or even right before, to prevent the filling from drying out or the eggs becoming soggy.
What are some creative topping ideas for Deviled Eggs?
Beyond the traditional paprika, consider a sprinkle of chopped chives, finely diced red onion, crispy beef bacon bits, capers, or even a tiny piece of smoked salmon. For a spicier kick, try a dollop of your favorite hot sauce or a sprinkle of chili flakes. A little bit of creativity goes a long way with Deviled Eggs!
My deviled egg filling is too dry. How can I fix it?
If your filling is too thick or dry, you can easily thin it out by adding a little more mayonnaise, a touch of sour cream, or even a small splash of pickle juice or vinegar. Start with a teaspoon at a time until you reach your desired creamy consistency for your Deviled Eggs.
Easy Deviled Eggs Recipe-Perfect Party Appetizer
A classic and easy deviled eggs recipe that’s perfect for any party appetizer, featuring a creamy and flavorful filling.
Ingredients
-
6 Large eggs
-
1/4 tsp kosher salt
-
2 1/2 tbsp Miracle Whip
-
1 tsp Apple cider vinegar
-
1 tsp Yellow mustard
-
1/4 tsp Granulated sugar
-
2 tbsp Sweet Relish
-
A dash of black pepper (optional)
-
Paprika and chives for garnish (optional)
Instructions
-
Step 1
Place 6 large eggs in a single layer in a medium saucepan and cover with cold water by about an inch. Bring to a rolling boil over high heat, then immediately remove from heat. Cover and let sit for 12 minutes. -
Step 2
Prepare an ice bath by filling a large bowl with cold water and ice. After 12 minutes, transfer the eggs to the ice bath and chill for 10-15 minutes. Peel the cooled eggs. -
Step 3
Slice each egg in half lengthwise and carefully scoop out the yolks into a medium bowl. Mash the yolks with a fork until smooth. -
Step 4
Add Miracle Whip, yellow mustard, apple cider vinegar, granulated sugar, and sweet relish to the mashed yolks. Mix until smooth and creamy. Stir in kosher salt and black pepper (if using). -
Step 5
Spoon or pipe the yolk filling into the egg white halves. Garnish with paprika and chives (if desired). -
Step 6
Let the deviled eggs sit for 15-30 minutes before serving chilled or at room temperature.
Important Information
Nutrition Facts (Per Serving)
It is important to consider this information as approximate and not to use it as definitive health advice.
Allergy Information
Please check ingredients for potential allergens and consult a health professional if in doubt.