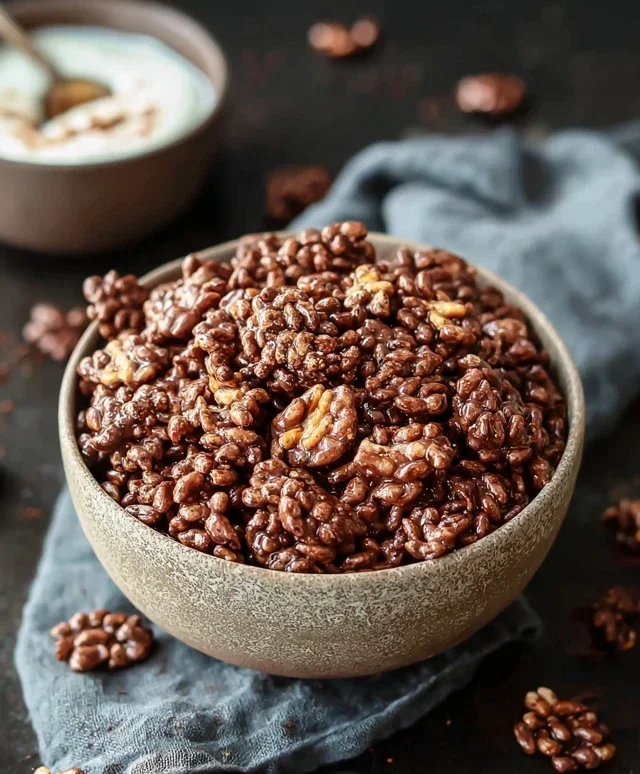
Healthy Crispy Chocolate Puffed Rice Cereal-Easy Recipe
Healthy Crispy Chocolate Puffed Rice Cereal – oh, how I’ve dreamt of this moment! For years, I’ve craved that satisfying crunch and sweet chocolatey bliss of my childhood favorite, but always with a pang of guilt about the sugar and processed ingredients. Well, prepare to have your mornings (or anytime cravings!) transformed, because we’re about to create a version that’s not only incredibly delicious but also genuinely good for you. This isn’t just a recipe; it’s a rebellion against bland, boring breakfasts and a celebration of guilt-free indulgence. What makes this Healthy Crispy Chocolate Puffed Rice Cereal so special? It’s the perfect symphony of textures and flavors – the airy crunch of puffed rice, the rich depth of cocoa, and a touch of natural sweetness that will have you reaching for a second bowl. Get ready to rediscover your favorite cereal, reimagin extracted the wholesome way!
Why You’ll Love This Recipe
We all have those nostalgic foods that bring us comfort, and for many, it’s that iconic crispy chocolate cereal. But let’s be honest, the store-bought versions are often loaded with refined sugars and artificial ingredients. My goal was to recreate that beloved taste and texture without any of the compromises. This Healthy Crispy Chocolate Puffed Rice Cereal delivers on every front. It’s incredibly easy to whip up, uses simple, nourishing ingredients, and the results are consistently fantastic. Imagin extracte starting your day with a bowl that’s both energizing and decadent – that’s the magic of this recipe.
Healthy Crispy Chocolate Puffed Rice Cereal
Tired of the sugar-laden cereals that line most grocery store aisles? I know I was! It felt like a constant battle to find something quick, satisfying, and genuinely good for you. That’s why I set out to create my own go-to breakfast treat: Healthy Crispy Chocolate Puffed Rice Cereal. This recipe is incredibly simple, requiring just a handful of wholesome ingredients, and it delivers that satisfying crunch and rich chocolate flavor we all crave, without any of the processed nasties. Plus, it’s incredibly versatile – perfect with a splash of milk, sprinkled over yogurt, or even enjoyed by the handful as a guilt-free snack. Let’s dive in and make some deliciousness!
Ingredients:
The Magic Happens Here: Creating Your Cereal
This process is wonderfully straightforward, focusing on creating a flavorful coating that evenly distributes itself over the delicate puffed rice. The key is to ensure a gentle but thorough mixing so that every piece gets that delightful chocolatey goodness. We’re essentially creating a lightly sweetened, chocolatey binder that will crisp up beautifully.
1. Prepare Your Workspace: Before you even think about mixing, it’s important to get your work area ready. Line a large baking sheet or a shallow baking pan with parchment paper or a silicone baking mat. This is crucial for preventing the cereal from sticking and making cleanup a breeze. You want enough space for the cereal to spread out in a single layer once it’s coated, so a decent-sized baking sheet is ideal. I usually opt for a standard half-sheet pan, and it works perfectly for this quantity. Having everything prepped beforehand ensures a smooth and efficient cooking process.
2. Melt and Mix the Chocolatey Goodness: In a medium-sized saucepan, gently melt the coconut oil over low heat. You don’t want it to get too hot, just warm enough to become liquid. Once melted, remove the saucepan from the heat. Now, it’s time to introduce the other flavor powerhouses: the raw cacao and maple syrup. Whisk these in thoroughly until you have a smooth, glossy chocolate mixture. Make sure there are no lumps of cacao powder remaining; a well-emulsified mixture is what we’re after. Finally, stir in the vanilla extract. The aroma at this stage is already incredible – a promise of the deliciousness to come! Taste this mixture carefully at this point. If you prefer a sweeter cereal, this is your chance to add a little more maple syrup, about a teaspoon at a time, until it hits your perfect sweetness level. Remember, the puffed rice itself is quite neutral, so the coating is where all the flavor comes from.
3. Coat the Puffed Rice: Now comes the fun part – combining the dry with the wet! In a very large mixing bowl, pour in your 4 cups of puffed rice. Drizzle the warm chocolate mixture over the puffed rice. Using a large spoon or a spatula, gently fold and stir the puffed rice. The goal is to coat every single piece of puffed rice evenly with the chocolate mixture. Be delicate; puffed rice is quite fragile, and we don’t want to crush it into dust. Continue stirring until you can no longer see any dry pockets of puffed rice. This might take a few minutes of patient folding, but the effort is well worth it for that uniform chocolatey coating. If you find it’s a bit sticky, you can lightly dust your hands with a tiny bit of raw cacao or even a touch of the puffed rice itself to help with the manipulation.
4. Spread and Set: Carefully transfer the coated puffed rice mixture onto your prepared baking sheet. Spread it out into a single, even layer. Try to break up any large clumps that might have formed during the mixing process. This even distribution is key for achieving that coveted crispy texture. You want the cereal to have plenty of air circulation around it as it dries. Once spread, you have a couple of options for setting it. For a quicker, more controlled crisp, you can place the baking sheet in the refrigerator for about 30-60 minutes, or until the coconut oil has firmed up and the cereal clusters are solid. Alternatively, if you have the time and patience, you can let it air dry at room temperature for a few hours. The refrigerator method is my preferred approach as it yields a delightfully crisp result relatively quickly.
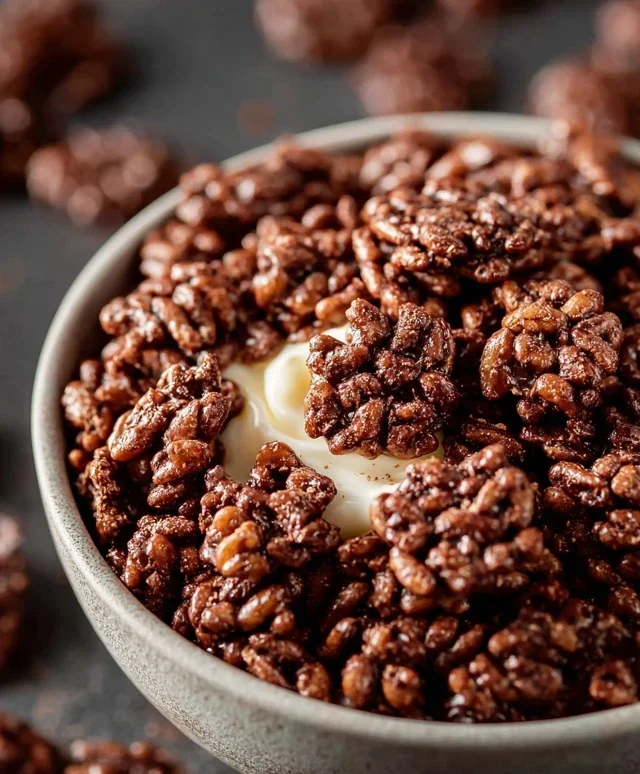
5. Break Apart and Enjoy: Once the cereal has set and firmed up, gently break it apart into individual pieces or smaller clusters. If it seems a little stubborn, you can use your hands or a spatula to gently loosen any stuck-together bits. The more you break it apart, the more it will resemble traditional cereal. Transfer your glorious Healthy Crispy Chocolate Puffed Rice Cereal to an airtight container. Store it at room temperature for up to a week. I often find it doesn’t last that long because it’s just too delicious to resist! Enjoy it with your favorite milk, use it as a topping for smoothie bowls, or grab a handful for a quick energy boost. This homemade cereal is a testament to how simple, wholesome ingredients can create something truly special and satisfying.
Conclusion:
I hope you’ve enjoyed learning how to make this incredibly satisfying Healthy Crispy Chocolate Puffed Rice Cereal! It’s a fantastic recipe because it delivers that beloved crunchy, chocolatey goodness you crave, but without all the added sugar and artificial ingredients typically found in store-bought cereals. This version is packed with wholesome ingredients, making it a guilt-free way to start your day or enjoy as a light snack. The simple preparation means you can whip up a batch in no time, ensuring you always have a healthy, delicious option on hand.
I love serving this cereal with a splash of almond milk or oat milk for a creamy contrast to the crispiness. It’s also a wonderful topping for yogurt parfaits, adding a delightful textural element. Don’t be afraid to experiment with variations! You could add a sprinkle of cinnamon for warmth, some chopped nuts for extra crunch and healthy fats, or even a touch of vanilla extract to the chocolate mixture for an enhanced flavor profile. Give it a try – I’m confident you’ll find it as delightful and easy as I do!
Frequently Asked Questions:
Can I make this cereal ahead of time?
Absolutely! This Healthy Crispy Chocolate Puffed Rice Cereal stores wonderfully in an airtight container at room temperature for up to a week. The key to keeping it crispy is ensuring it’s completely cooled before storing.
Is this recipe suitable for children?
Yes, this recipe is fantastic for kids! It’s a much healthier alternative to sugary children’s cereals and is often a hit because of the chocolate flavor. You can even involve them in the preparation process, making it a fun activity.
Healthy Crispy Chocolate Puffed Rice Cereal
A simple and healthy homemade chocolate puffed rice cereal, perfect for a quick breakfast or snack.
Ingredients
-
4 cups puffed rice
-
4 tbsp coconut oil, liquid
-
3 tbsp raw cacao
-
2 tbsp maple syrup
-
1/4 tsp vanilla extract
Instructions
-
Step 1
In a large bowl, combine the liquid coconut oil, raw cacao, maple syrup, and vanilla extract. Whisk until well combined and smooth. -
Step 2
Add the puffed rice to the bowl with the chocolate mixture. -
Step 3
Gently fold the puffed rice into the chocolate mixture until evenly coated. Be careful not to crush the puffed rice. -
Step 4
Spread the coated puffed rice in a single layer on a baking sheet lined with parchment paper. -
Step 5
Bake at 300°F (150°C) for 10-15 minutes, stirring gently halfway through, until lightly toasted and crispy. -
Step 6
Remove from oven and let cool completely on the baking sheet. The cereal will crisp up as it cools.
Important Information
Nutrition Facts (Per Serving)
It is important to consider this information as approximate and not to use it as definitive health advice.
Allergy Information
Please check ingredients for potential allergens and consult a health professional if in doubt.