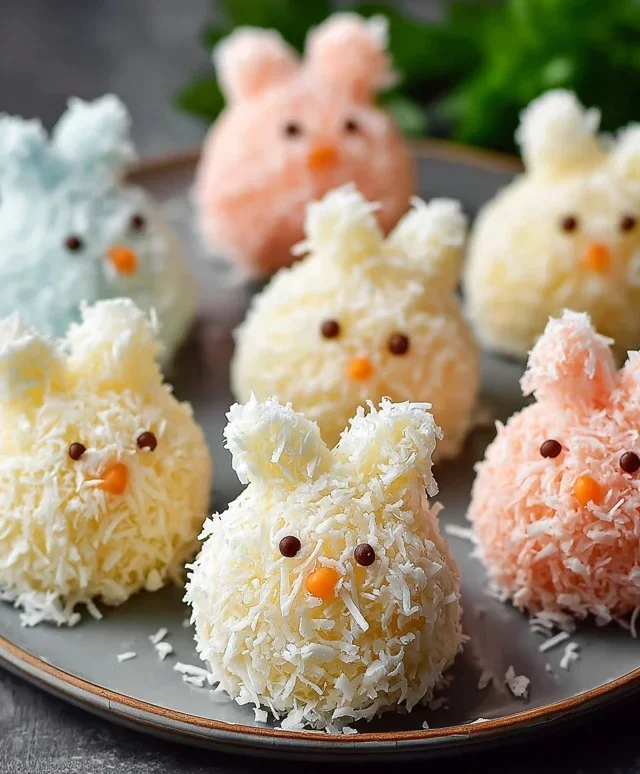
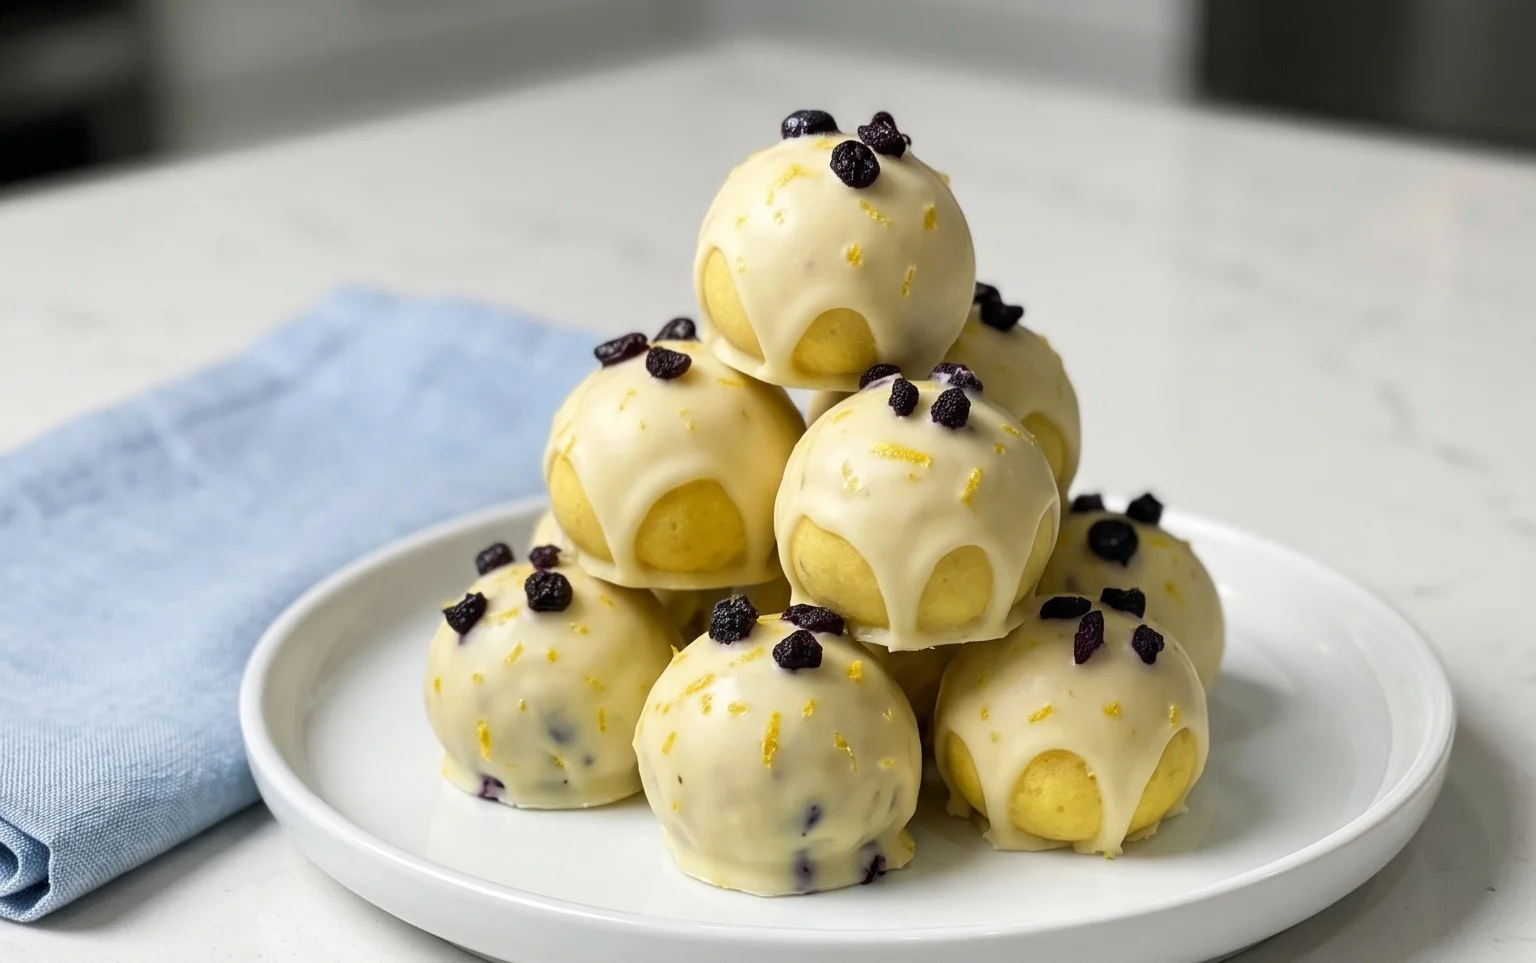
Lemon Blueberry Truffles – Easy & Delicious Treat
Lemon Blueberry Truffles. Oh, where do I even begin extract with these little bursts of sunshine and joy? I absolutely adore creating these Lemon Blueberry Truffles, and I have a feeling you’re going to fall head over heels for them too. Imagin extracte the vibrant tang of fresh lemon zest perfectly balancing the sweet, juicy pop of plump blueberries, all swirled together into a decadent, melt-in-your-mouth truffle. It’s a flavor combination that just sings, isn’t it? People go crazy for these because they offer that perfect balance of bright, refreshing citrus and sweet, comforting fruit. They’re incredibly elegant, making them perfect for gifting or impressing guests, yet surprisingly simple to whip up. What truly makes these Lemon Blueberry Truffles special is their delightful surprise factor – a little taste of pure bliss in every bite.
Lemon Blueberry Truffles
Get ready to tantalize your taste buds with these incredibly easy and utterly delicious Lemon Blueberry Truffles. These little bites of heaven are packed with natural sweetness, vibrant citrus, and the delightful pop of blueberries. They’re perfect for a healthy dessert, a sweet afternoon pick-me-up, or even a thoughtful homemade gift. What’s even better is that they require no baking, making them a fantastic option for even the busiest of bees. We’ll be using wholesome, raw ingredients to create a delightful treat that’s both guilt-free and incredibly satisfying. Let’s dive into the magic!
Ingredients:
Instructions:
Let’s get started on creating these delightful Lemon Blueberry Truffles. The process is split into two main parts: creating the truffle base and then whipping up the creamy frosting.
1. Preparing the Truffle Base
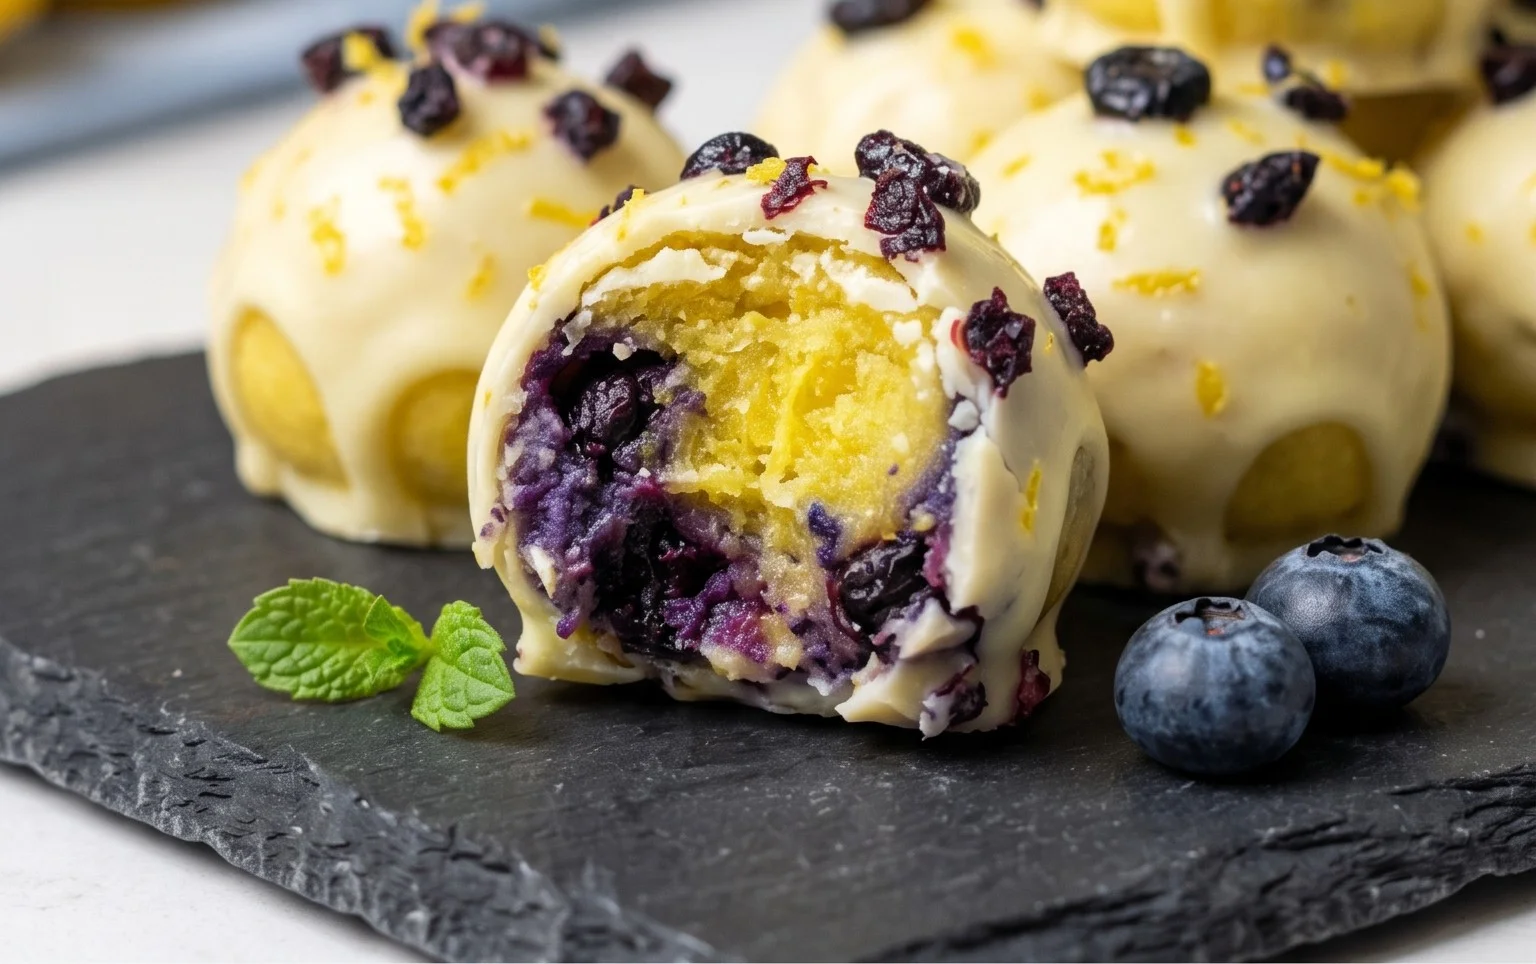
The foundation of our truffles is a wonderfully chewy and naturally sweet mixture. First, gather all your “Raw Cake Ingredients.” If you’re using frozen blueberries, make sure they’ve been thawed completely. Pat them dry gently with a paper towel to avoid adding excess moisture to the truffle mixture. In a food processor, add the walnuts and pulse them a few times until they are finely ground, but not turned into a butter. We want a nice texture, not a paste. Next, add the pitted dates to the food processor. Process until the dates break down and start to form a sticky ball. This might take a minute or two. It’s important that the dates are soft and pliable; if yours are a bit dry, you can soak them in warm water for about 10 minutes and then drain them thoroughly before adding them to the food processor.
Once the dates are well incorporated, add the gluten-free rolled oats, shredded coconut, and chia seeds to the food processor. Pulse again until everything is combined and the mixture starts to clump together. Finally, squeeze in the juice from one lemon. The lemon juice adds a crucial zesty brightness that balances the sweetness of the dates and enhances the blueberry flavor. Pulse one last time to ensure the lemon juice is fully distributed. The mixture should be thick and sticky enough to hold its shape when pressed. If it feels too dry and crum extractbly, you can add a tiny bit more lemon juice or a tablespoon of water, but be careful not to make it too wet.
2. Forming the Truffles
Now comes the fun part – rolling! Take a small amount of the truffle mixture (about a tablespoon) and roll it between your palms to form a ball. If the mixture is sticking to your hands, you can lightly dampen your palms with water or lightly coat them with coconut oil. Continue this process until all of the truffle mixture has been formed into balls. You should get around 15-20 truffles, depending on the size you make them. Place these formed truffles onto a plate or a baking sheet lined with parchment paper. At this stage, you can pop them into the refrigerator for about 15-20 minutes to firm up slightly, which will make them easier to coat with the frosting. This chilling step is optional but recommended for a smoother coating experience.
3. Crafting the Creamy Lemon Frosting
While the truffle bases are chilling, let’s prepare our luscious frosting. Ensure your cashews have been soaked and thoroughly drained. Soaking softens them, allowing them to blend into a wonderfully smooth and creamy consistency. Add the drained cashews to a high-powered blender or a food processor. Add the melted and slightly cooled coconut oil. The coconut oil not only adds richness but also helps the frosting set. Then, add the raw honey, vanilla extract, and the juice from the second lemon. The second lemon’s juice provides another burst of lemon flavor, complementing the base beautifully.
Begin extract blending the ingredients. You’ll likely need to scrape down the sides of the blender or food processor a few times to ensure everything is incorporated evenly. If the mixture is too thick and struggling to blend, gradually add the warm water, one tablespoon at a time, until you achieve a smooth, pourable, yet thick frosting consistency. You’re aiming for a texture that’s creamy and luxurious, not too thin or too stiff. Taste the frosting and adjust the sweetness by adding a touch more honey if desired, or add a little more lemon juice for an extra tang.
4. Coating the Truffles
This is where our truffles truly transform into elegant treats. Take the chilled truffle balls out of the refrigerator. Using a spoon or a small spatula, dip each truffle ball into the creamy lemon frosting, ensuring it’s fully coated. You can let any excess frosting drip back into the bowl. If you prefer a thinner coating, you can drizzle the frosting over the truffles instead of dipping them. Place the frosted truffles back onto the parchment-lined baking sheet.
5. Chilling to Perfection
The final and arguably most important step is to let these beauties set. Carefully transfer the baking sheet with the coated truffles into the refrigerator. Allow them to chill for at least 1-2 hours, or until the frosting has firmed up completely. This chilling process is crucial for the frosting to set properly, giving the truffles their signature smooth finish and delicious texture. Once set, your Lemon Blueberry Truffles are ready to be enjoyed! Store them in an airtight container in the refrigerator for up to a week. They also make a wonderful gift, so consider making an extra batch!
Conclusion:
These Lemon Blueberry Truffles are an absolute delight, offering a perfect balance of bright, zesty lemon and sweet, juicy blueberries all wrapped up in a creamy, decadent truffle. They’re surprisingly simple to make, making them an ideal treat for both novice bakers and experienced enthusiasts looking for a quick yet impressive dessert. The combination of flavors is refreshing and satisfying, ensuring they’ll be a hit at any gathering or a delightful personal indulgence. Whether you’re celebrating a special occasion or simply craving something sweet, these truffles are sure to impress.
I highly encourage you to give this recipe a try! The vibrant colors and tantalizing aroma alone are a joy. Feel free to get creative with your coatings – white chocolate, a dusting of powdered sugar, or even finely chopped pistachios can add another layer of texture and flavor. Serve these beautiful bites chilled on a platter for a sophisticated dessert, or package them up in small boxes as charming homemade gifts. They are truly versatile and guaranteed to bring smiles.
Frequently Asked Questions:
Can I make these Lemon Blueberry Truffles ahead of time?
Absolutely! These truffles can be made 2-3 days in advance. Store them in an airtight container in the refrigerator. Allow them to sit at room temperature for about 10-15 minutes before serving for the best texture.
What if I don’t have fresh blueberries? Can I use frozen?
Yes, you can use frozen blueberries! Thaw them completely and drain off any excess liquid before mashing them. The flavor will still be wonderful.
Are there any other fruit variations I could try?
Certainly! While lemon and blueberry are a classic pairing, you could experiment with other fruit combinations. Raspberry or strawberry purée could be lovely with lemon, or perhaps a touch of lime and mango for a tropical twist.
Lemon Blueberry Truffles
Decadent no-bake energy bites bursting with lemon and blueberry flavor, made with wholesome ingredients.
Ingredients
-
1 cup wild blueberries
-
1 cup walnuts
-
1 cup dates
-
3 tbsp gluten-free rolled oats
-
2 tbsp shredded coconut
-
1 tbsp chia seeds
-
1 lemon, juiced
-
1 cup cashews, soaked
-
½ cup coconut oil, melted and cooled
-
3 tbsp raw honey
-
1 tsp vanilla extract
-
2-3 tbsp warm water
Instructions
-
Step 1
Combine blueberries, walnuts, dates, rolled oats, shredded coconut, and chia seeds in a food processor. Pulse until a coarse crumble forms. -
Step 2
Add the juice of 1 lemon to the food processor and process until the mixture starts to come together. -
Step 3
Roll the mixture into small balls (about 1-inch in diameter) and place them on a parchment-lined baking sheet. -
Step 4
In a clean food processor or blender, combine soaked cashews, melted coconut oil, raw honey, vanilla extract, and the juice of 1 lemon. -
Step 5
Blend until very smooth, adding warm water 1 tablespoon at a time as needed to reach a thick but pourable consistency. -
Step 6
Dip each truffle into the cashew frosting, coating evenly. Return to the parchment-lined baking sheet. -
Step 7
Chill the truffles in the refrigerator for at least 30 minutes, or until the frosting is set.
Important Information
Nutrition Facts (Per Serving)
It is important to consider this information as approximate and not to use it as definitive health advice.
Allergy Information
Please check ingredients for potential allergens and consult a health professional if in doubt.