Easy Dango Recipe- Sweet Japanese Dumplings
Easy Dango Recipe are delightful little Japanese rice dumplings that have completely captured my heart, and I bet they’ll capture yours too! What’s not to love about these chewy, slightly sweet, and delightfully customizable treats? They’re incredibly versatile, perfect for a quick snack, a charming dessert, or even a special occasion.
People adore dango for its simple yet satisfying texture and the joy it brings in its various presentations. Typically served on skewers and often adorned with sweet glazes or toppings like anko (sweet red bean paste), kinako (roasted soybean flour), or even fruit, each bite is a burst of subtle flavor. What makes this easy dango recipe truly special is how approachable it is for home cooks. You don’t need fancy ingredients or complicated techniques to achieve that perfect, bouncy chew. Get ready to impress yourself and your loved ones with this incredibly rewarding and delicious treat!
Easy Dango Recipe
Dango is a classic Japanese sweet treat that’s incredibly versatile and surprisingly easy to make at home. These chewy rice dumplings are traditionally served on skewers and can be enjoyed with various toppings, from sweet bean paste to simple sugar glazes. This recipe focuses on a basic dango dough that you can then customize to your heart’s content. We’ll be making a batch with a couple of fun colors to add visual appeal. Get ready to impress yourself and your loved ones with these delightful homemade dango!
Ingredients:
Instructions:
Preparing the Dango Dough
The first step in making our delicious dango is to prepare the dry ingredients. In a large mixing bowl, combine the Joshinko (non-glutinous rice flour) and Shiratamako (glutinous sweet rice flour). If you’re opting for a sweeter dango, now is the time to add the powdered sugar to the dry mix. Whisk everything together thoroughly to ensure the flours are evenly distributed. This even distribution is key to achieving a consistent texture in your dango.
Next, we’ll gradually add the hot water. It’s important to use hot, but not boiling, water. The heat helps to activate the glutinous properties of the Shiratamako, making the dough pliable and chewy. Start by pouring in about half of the hot water and begin extract to mix with your hands or a sturdy spoon. Continue adding the hot water, a little at a time, until a dough forms. You’re looking for a consistency that is firm but no longer sticky. It should feel like a soft playdough that holds its shape.
Once the dough has come together, it’s time to knead it. Transfer the dough to a clean, lightly floured surface and knead for about 5-7 minutes. This kneading process develops the gluten in the rice flour, which is essential for the characteristic chewy texture of dango. Don’t overwork the dough, but ensure it’s smooth and elastic. If the dough feels too dry, you can add a tiny bit more hot water; if it feels too sticky, add a sprinkle of Joshinko.
Coloring and Shaping the Dango
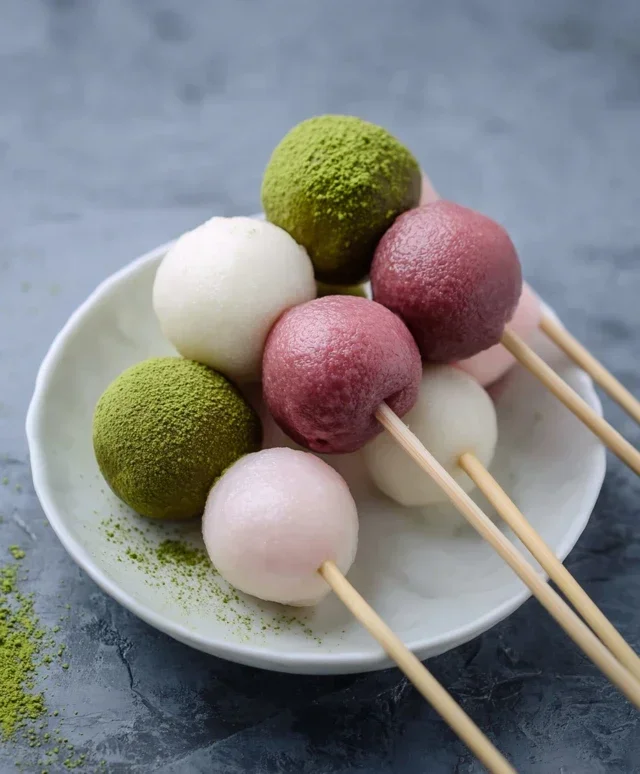
Now for the fun part: coloring our dango! Divide the main dough into three equal portions. Leave one portion plain. In a small bowl, mix the matcha powder with 1 teaspoon of water to create a smooth paste. Add this matcha paste to one portion of the dough and knead until the color is uniform and vibrant. For the third portion, add just one drop of pink food coloring and knead until the color is evenly distributed. Be careful not to add too much food coloring, as a little goes a long way, and you want a soft, appealing hue.
With your colored dough portions ready, it’s time to shape the dango. Take a small piece of dough from one of the colored portions, about the size of a marble. Roll it between your palms to form a smooth ball. You can then shape these balls into slightly flattened discs or keep them as spheres, depending on your preference. Aim for uniformity in size so they cook evenly. If you’re making traditional mitarashi dango, you might want to flatten them slightly to better catch the glaze later.
Cooking the Dango
Bring a large pot of water to a rolling boil. Gently drop the shaped dango balls into the boiling water, being careful not to overcrowd the pot. Cook the dango in batches. As the dango cook, they will sink to the bottom. Once they start to float to the surface, continue to boil them for another 2-3 minutes. This ensures they are cooked through and have achieved the perfect chewy texture. You’ll notice they puff up slightly as they cook.
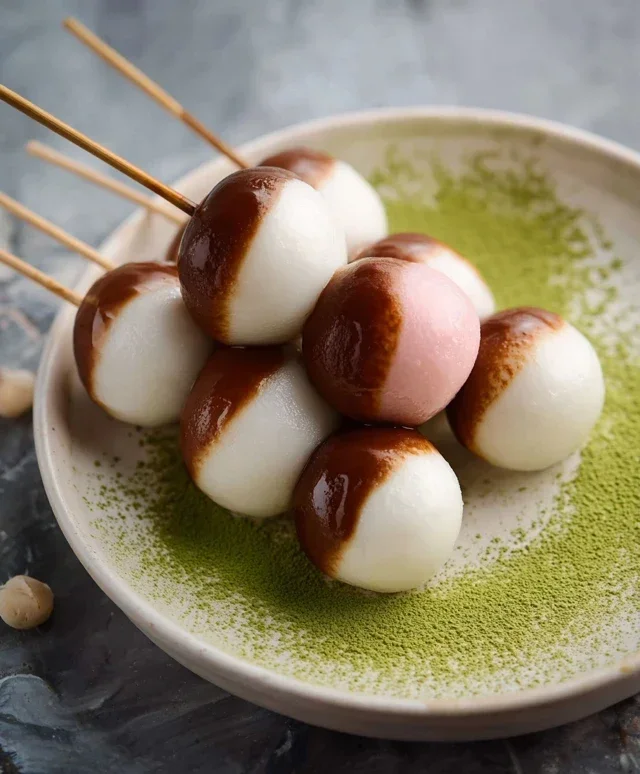
Using a slotted spoon, carefully remove the cooked dango from the boiling water. Immediately transfer the cooked dango to a bowl of ice-cold water. This shocking process stops the cooking and helps to firm up the dango, preventing them from becoming too mushy. Let them cool in the ice water for a minute or two. Once cooled, drain them thoroughly. You can then thread them onto skewers, about 3-4 dango per skewer, for serving. Your beautiful, homemade dango are now ready to be enjoyed with your favorite toppings or as is!
Conclusion:
And there you have it – your very own delicious and incredibly easy dango recipe! This recipe truly shines because it’s remarkably simple to follow, requiring minimal ingredients and very little time. You’ll be amazed at how quickly you can whip up these delightful chewy rice dumplings, perfect for a quick snack or a sweet treat. The slightly chewy texture and the subtle sweetness make them incredibly satisfying. Don’t hesitate to get creative with your toppings! While the classic mitarashi dango with its sweet soy glaze is a beloved favorite, feel free to explore other possibilities. Consider coating them in kinako (roasted soybean flour) for a nutty flavor, or even dipping them in melted chocolate for a Western twist. The possibilities are truly endless and depend only on your imagin extractation!
I really encourage you to give this easy dango recipe a try. It’s a fantastic way to experience a traditional Japanese sweet without any fuss. So gather your ingredients, get your hands a little sticky, and enjoy the wonderful process and even more wonderful outcome. Happy dango making!
Frequently Asked Questions:
What kind of flour should I use for dango?
For this easy dango recipe, the best flour to use is shiratamako (glutinous rice flour). It’s specifically designed to give dango its signature chewy and tender texture. You can usually find it in Asian grocery stores. If you can’t find shiratamako, mochiko (sweet rice flour) is a good substitute, though the texture might be slightly different.
How do I prevent my dango from sticking together?
A few drops of oil in the boiling water can help, but the most effective method is to gently toss the cooked dango balls in a little water or a light dusting of starch immediately after boiling. This prevents them from clumping. Also, serve them relatively soon after preparing for the best texture.
Can I make dango ahead of time?
While dango is best enjoyed fresh, you can prepare them a few hours in advance. Store them in an airtight container at room temperature. For longer storage, you can refrigerate them, but they will firm up. To enjoy them again, gently warm them in a microwave or briefly boil them to restore some of their softness.
Easy Dango Recipe
A simple and delicious recipe for making homemade Dango, a Japanese sweet dumpling, with customizable flavors and colors.
Ingredients
-
{‘@type’: ‘Ingredient’, ‘name’: ‘Joshinko non-glutinous rice flour’, ‘amount’: {‘@type’: ‘QuantitativeValue’, ‘value’: 1.33, ‘unitCode’: ‘cup’}, ‘quantity’: 150, ‘unitText’: ‘g’}
-
{‘@type’: ‘Ingredient’, ‘name’: ‘Shiratamako glutinous sweet rice flour’, ‘amount’: {‘@type’: ‘QuantitativeValue’, ‘value’: 1.5, ‘unitCode’: ‘cup’}, ‘quantity’: 200, ‘unitText’: ‘g’}
-
{‘@type’: ‘Ingredient’, ‘name’: ‘Powdered sugar (optional)’, ‘amount’: {‘@type’: ‘QuantitativeValue’, ‘value’: 0.75, ‘unitCode’: ‘cup’}, ‘quantity’: 75, ‘unitText’: ‘g’, ‘description’: ‘to make it sweeter’}
-
{‘@type’: ‘Ingredient’, ‘name’: ‘Hot water’, ‘amount’: {‘@type’: ‘QuantitativeValue’, ‘value’: 1.33, ‘unitCode’: ‘cup’}}
-
{‘@type’: ‘Ingredient’, ‘name’: ‘Matcha powder’, ‘amount’: {‘@type’: ‘QuantitativeValue’, ‘value’: 1, ‘unitCode’: ‘teaspoon’}, ‘additionalProperty’: {‘@type’: ‘PropertyValue’, ‘name’: ‘water’, ‘value’: ‘1 tsp’}}
-
{‘@type’: ‘Ingredient’, ‘name’: ‘Pink food coloring’}
Instructions
-
Step 1
In a large bowl, combine the Joshinko and Shiratamako flours. If using, add the powdered sugar and mix well. -
Step 2
Gradually add the hot water to the flour mixture, stirring with a spoon or spatula until a dough forms. Knead the dough until it is smooth and elastic. If the dough is too sticky, add a little more Joshinko; if too dry, add a tiny bit more hot water. -
Step 3
Divide the dough into portions. For colored dango, add matcha powder (mixed with 1 tsp water) to one portion, and 1 drop of pink food coloring to another portion. Knead each portion until the color is evenly distributed. -
Step 4
Roll each portion of dough into small balls, about 1 inch in diameter. You can also roll them into teardrop shapes. -
Step 5
Bring a pot of water to a rolling boil. Gently drop the dango balls into the boiling water. Cook for about 3-5 minutes, or until the dango float to the surface and are cooked through. -
Step 6
Remove the cooked dango from the water using a slotted spoon and place them in a bowl of ice water to stop the cooking process. Drain them well. -
Step 7
Serve the dango plain, or with your favorite toppings like sweet soy glaze (mitarashi sauce), red bean paste (anko), or kinako (roasted soybean flour).
Important Information
Nutrition Facts (Per Serving)
It is important to consider this information as approximate and not to use it as definitive health advice.
Allergy Information
Please check ingredients for potential allergens and consult a health professional if in doubt.