Mini Chicken Pot Pies-Easy Comfort Food
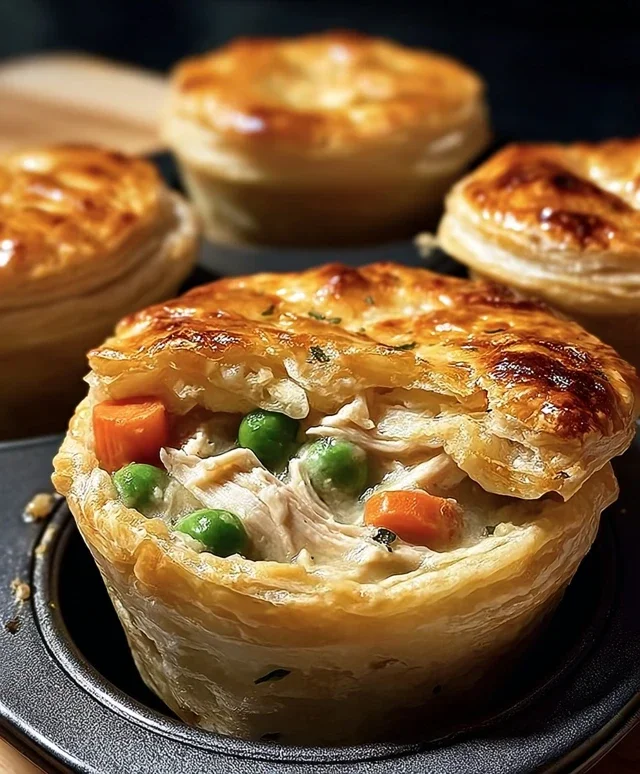
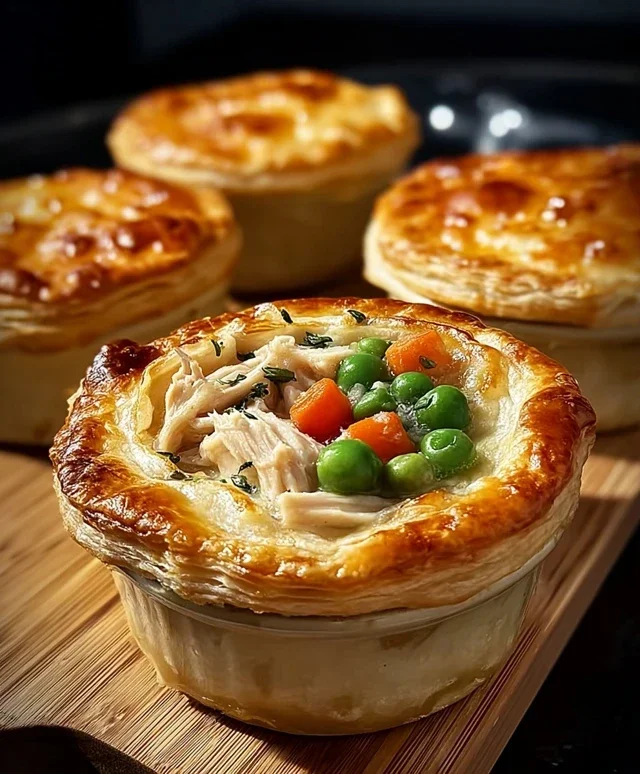
Mini Chicken Pot Pies are the ultimate comfort food, and I’m about to show you why. There’s something undeniably magical about a perfectly portioned, individual chicken pot pie. It’s that warm, flaky crust giving way to a creamy, savory filling brimming with tender chicken and vegetables. People absolutely adore chicken pot pie because it’s a hug in edible form – a taste of home, a reminder of cozy evenings, and a satisfying meal that’s both familiar and incredibly delicious. What makes these mini chicken pot pies truly special is their charming presentation. They’re perfect for parties, weeknight family dinners where everyone gets their own little masterpiece, or even a delightful solo indulgence. Forget those giant, unwieldy pies; we’re diving into the world of perfectly petite, utterly irresistible mini chicken pot pies that are surprisingly easy to create.
Mini Chicken Pot Pies
There’s something undeniably comforting about a chicken pot pie. That flaky crust, the creamy, savory filling – it’s a hug in a dish. But sometimes, a full-sized pot pie feels a little… much. That’s where these delightful mini chicken pot pies come in. They’re perfectly portioned, incredibly easy to make, and ideal for a weeknight meal or a fun appetizer. Using store-bought biscuits as the crust is a total game-changer, cutting down on prep time without sacrificing flavor or that essential golden-brown crispiness. Let’s get started!
Ingredients:
Cooking Instructions
Let’s break down how to get these adorable pot pies into your oven and onto your plates.
1. Prepare the Chicken and Baking Vessels: The first step is to get our chicken ready. If you haven’t already, dice your boneless chicken breast into small, bite-sized pieces. You want them small enough to cook through quickly and be easily distributed in each mini pie. While that’s happening, preheat your oven to 375°F (190°C). Now, grab a standard muffin tin. You’ll need to prepare this for baking. Lightly coat each cup of the muffin tin with cooking spray. This is crucial to prevent the biscuit dough from sticking and ensure those beautiful crusts release easily after baking. I like to give each cup a good spray, making sure to get all the nooks and crannies.
2. Create the Savory Filling: In a medium-sized bowl, combine all the filling ingredients. Add the diced chicken breast, the frozen peas and carrots, the can of cream of chicken soup, garlic powder, onion powder, and salt. Stir everything together thoroughly until all the components are well incorporated. You want a nice, even mixture where every spoonful of filling will have a bit of everything. The cream of chicken soup acts as a fantastic binder and provides a rich, creamy base. The frozen peas and carrots add that classic pot pie texture and sweetness, and the seasonings bring it all together with a savory depth. This filling is so simple but so satisfying.
3. Assemble the Mini Pot Pies: This is where the magic happens! Open one can of the refrigerated biscuits. You’ll notice they come pre-scored. Gently separate the biscuits. Take one biscuit and press it into the bottom of each greased muffin tin cup. Then, take another biscuit and gently press it around the sides of the muffin cup, creating a little cup or shell for your filling. You want the edges of the top biscuit to slightly overlap the bottom one, forming a sturdy base. Don’t worry if it’s not perfectly smooth; a rustic look is part of the charm! Repeat this with all 12 biscuit halves, pressing them into the muffin tin cups to form your pie crusts. Make sure there are no major gaps where the filling could leak out.
4. Fill and Bake: Once your biscuit shells are in place, it’s time to add the delicious filling. Spoon the prepared chicken and vegetable mixture evenly into each of the biscuit-lined muffin cups. Fill them generously, but be careful not to overfill to the point where the filling will bubble over and spill out during baking. You want them to be nice and full, but manageable. Place the muffin tin in your preheated oven. Bake for 18-22 minutes, or until the biscuit crusts are golden brown and cooked through, and the filling is bubbly and heated. The exact baking time can vary slightly depending on your oven, so keep an eye on them.
5. Cool and Serve: After the allotted baking time, carefully remove the muffin tin from the oven. Let the mini chicken pot pies cool in the muffin tin for about 5-10 minutes. This is an important step as it allows the filling to set slightly and makes them much easier to remove from the tin. Once slightly cooled, you can gently run a knife or offset spatula around the edges of each pot pie to loosen them, and then carefully lift them out of the muffin tin. Serve them warm and enjoy the incredibly comforting flavors of homemade chicken pot pie, but in a perfectly sized package! These are delicious on their own or with a side salad for a complete meal.
Conclusion:
I truly hope you’ve enjoyed learning how to make these delightful Mini Chicken Pot Pies! They are a fantastic way to enjoy a classic comfort food in a perfectly portioned and incredibly charming package. The flaky, golden crust combined with the rich, savory chicken and vegetable filling is pure culinary magic. Whether you’re looking for a crowd-pleasing appetizer, a delightful lunch, or a satisfying weeknight dinner, these mini pot pies are sure to impress.
For serving, these are wonderful on their own, or you can pair them with a simple green salad for a complete meal. They also make for a fantastic potluck contribution or a fun addition to a picnic. Don’t be afraid to get creative with the filling – think about adding different vegetables like peas, corn, or even some diced sweet potato. You could also swap the chicken for turkey or even a plant-based protein like chickpeas or firm tofu for a vegetarian option. I highly encourage you to give this recipe a try; I’m confident you’ll fall in love with these adorable and delicious mini chicken pot pies!
Frequently Asked Questions:
Can I make the crust ahead of time?
Yes, absolutely! You can prepare your pie crust dough and store it in the refrigerator for up to 2 days or freeze it for up to a month. Thaw frozen dough in the refrigerator overnight before using.
What if I don’t have individual ramekins?
No problem! You can use a standard muffin tin to create your mini pot pies. Lightly grease the muffin tin cups or line them with parchment paper to prevent sticking. The baking time might be slightly shorter, so keep an eye on them!
How long do these mini chicken pot pies last in the refrigerator?
Leftover mini chicken pot pies can be stored in an airtight container in the refrigerator for up to 3-4 days. Reheat them in a preheated oven at 350°F (175°C) for about 10-15 minutes, or until heated through and the crust is crisp again.
Mini Chicken Pot Pies
Individual, easy-to-make mini chicken pot pies using refrigerated biscuits and a creamy chicken filling.
Ingredients
-
2 cans refrigerated biscuits (8-count each)
-
½ lb boneless chicken breast, diced
-
1 cup frozen peas & carrots
-
1 can (10.5 oz) cream of chicken soup
-
½ tsp garlic powder
-
½ tsp onion powder
-
¼ tsp salt
-
Cooking spray
Instructions
-
Step 1
Preheat oven to 375°F (190°C). Lightly grease a 12-cup muffin tin with cooking spray. -
Step 2
In a medium bowl, combine the diced chicken breast, frozen peas & carrots, cream of chicken soup, garlic powder, onion powder, and salt. Stir until well combined. -
Step 3
Open the refrigerated biscuit cans. Flatten each biscuit slightly and press one biscuit into the bottom and up the sides of each muffin cup, forming a shell. -
Step 4
Spoon the chicken mixture evenly into the biscuit-lined muffin cups, filling them almost to the top. -
Step 5
Bake for 20-25 minutes, or until the biscuit crust is golden brown and the filling is bubbly. -
Step 6
Let the mini pot pies cool in the muffin tin for a few minutes before carefully removing them. Serve warm.
Important Information
Nutrition Facts (Per Serving)
It is important to consider this information as approximate and not to use it as definitive health advice.
Allergy Information
Please check ingredients for potential allergens and consult a health professional if in doubt.