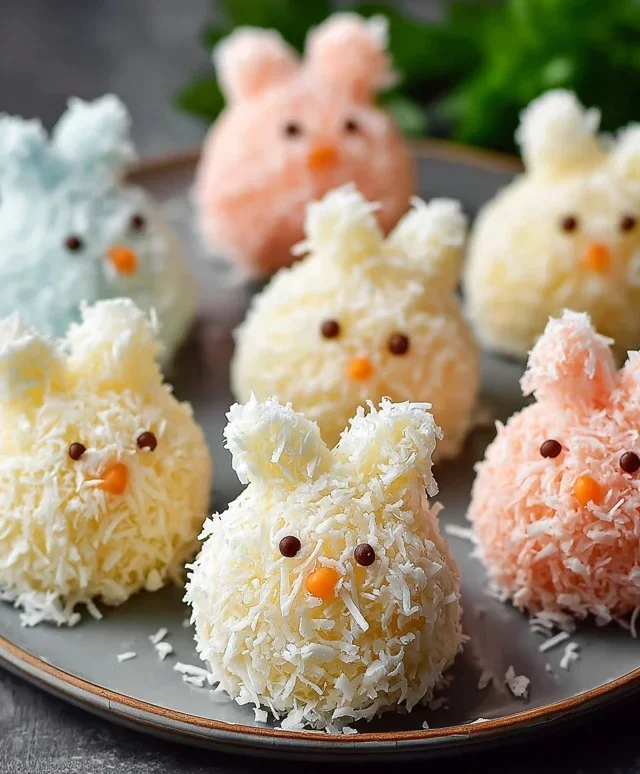
Easter Bunny Coconut Tails Recipe-Sweet Treat
Easter Bunny Coconut Tails are the absolutely adorable and utterly delicious way to hop into the spirit of spring! Who can resist these whimsical little treats? They’re a perennial favorite for a reason: their sweet, chewy coconut center enveloped in a delicate white chocolate shell, all shaped like bunny tails, is simply irresistible. These aren’t just any Easter dessert; they’re a playful nod to the season that brings smiles to faces young and old. What makes these Easter Bunny Coconut Tails so special is their charming simplicity combined with that satisfying coconut flavor we all crave. Imagin extracte them nestled amongst your Easter eggs, a delightful surprise waiting to be discovered. They’re the perfect addition to any Easter basket, brunch table, or just a sweet treat to brighten your day.
Get ready to create some Easter magic!
Easter Bunny Coconut Tails
Welcome to a truly delightful and surprisingly easy Easter treat! These Easter Bunny Coconut Tails are a whimsical and delicious way to celebrate the season. They’re perfect for Easter baskets, classroom parties, or just a fun afternoon baking with the kids. The combination of sweet, chewy coconut and creamy white chocolate is irresistible, and the cute bunny tail shape adds an extra touch of magic. You won’t believe how simple these are to whip up, making them a fantastic last-minute addition to your Easter spread. Let’s get started on creating these adorable confections!
Ingredients:
Preparing the Coconut Tails
Our first step is to create the chewy, fluffy base for our bunny tails. This part is super simple and mostly involves melting and mixing.
Step 1: Melt the Marshmallows and Butter
In a medium saucepan, combine the 1½ cups of mini marshmallows and ¼ cup of butter. Place the saucepan over low heat. You want to melt these gently, stirring constantly. This is important because if the heat is too high, the marshmallows can scorch, and that’s not a flavor we want in our bunny tails! Keep stirring until the marshmallows and butter are completely melted and you have a smooth, creamy mixture. This usually takes about 3-5 minutes. Once melted, remove the saucepan from the heat.
Step 2: Incorporate the Coconut and Vanilla
Now, it’s time to add the star of our show – the shredded coconut! Pour the 2 cups of shredded coconut into the melted marshmallow mixture. Add the 1 teaspoon of vanilla extract at this stage as well. Vanilla adds a lovely depth of flavor that complements the sweetness of the coconut and marshmallows beautifully. Stir everything together thoroughly. You want to make sure every strand of coconut is coated in the marshmallow mixture. The mixture will be quite sticky and dense, which is exactly what we’re looking for. It’s going to hold its shape when we form the tails.
Step 3: Shaping the Bunny Tails
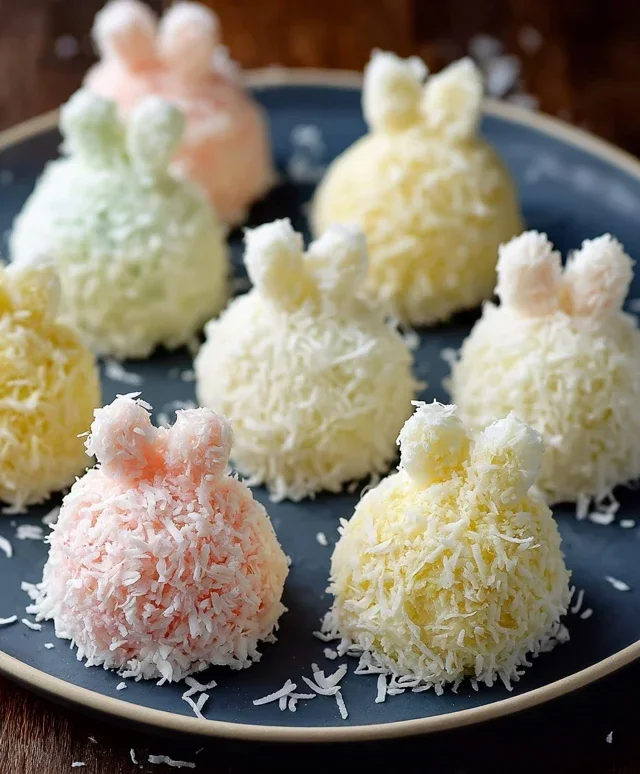
Once the coconut mixture has been thoroughly combined and has cooled slightly (enough to handle, but still warm and pliable), it’s time to shape our bunny tails. This is where the fun really begin extracts! Lightly grease your hands with a little butter or cooking spray to prevent sticking, or you can use a small cookie scoop. Take about 1 to 2 tablespoons of the mixture and roll it between your palms to form a compact ball. Then, gently flatten the ball slightly on one side to give it more of an oval or “tail” shape. Aim for a consistent size so they all look uniform. As you shape each tail, place it on a baking sheet lined with parchment paper or wax paper. Make sure they aren’t touching each other too much, as they will firm up. You should be able to get about 12-15 tails from this recipe, depending on how large you make them.
Decorating Your Adorable Tails
Now for the most exciting part – making them look like proper bunny tails! This is where you can get creative.
Step 4: Melting the White Chocolate
To coat our coconut tails, we’ll use white chocolate. Place the 1 cup of white chocolate chips in a microwave-safe bowl. Microwave them in 30-second intervals, stirring well after each interval. Be patient with white chocolate, as it can burn easily if microwaved too long. Stir until the chocolate is completely smooth and melted. Alternatively, you can melt the white chocolate chips in a double boiler over simmering water. Once melted and smooth, dip each coconut tail into the melted white chocolate, ensuring it’s fully coated. You can use a fork or a toothpick to gently dip and lift them. Place the coated tails back onto the parchment-lined baking sheet.
Step 5: Adding the Finishing Touches with Pink Candy Melts
Once the white chocolate has set slightly (you can speed this up in the refrigerator for about 10-15 minutes), it’s time for the “pink” part of our bunny tails! Melt the pink candy melts according to package directions. This usually involves microwaving in short intervals and stirring until smooth. Once melted, spoon the pink candy melts into a small piping bag or a resealable plastic bag with a tiny corner snipped off. Now, pipe little pink accents onto the white chocolate-coated tails to resemble the inner part of a bunny’s tail. You can create a small oval shape or a few little dots. This is where you can really let your artistic flair shine! Allow the pink candy melts to set completely.
Your delightful Easter Bunny Coconut Tails are now ready to be admired and enjoyed! They are best stored in an airtight container at room temperature. You can also pop them in the fridge if your environment is particularly warm. These treats are sure to bring smiles to faces of all ages this Easter. Happy baking!
Conclusion:
These Easter Bunny Coconut Tails are an absolute delight, offering a perfect balance of sweet, chewy coconut and a hint of vanilla, all wrapped up in adorable bunny ear shapes. They are wonderfully easy to make, making them a fantastic activity to enjoy with family and friends during the Easter season. The simple ingredients and straightforward process mean even novice bakers can achieve stunning results, creating a treat that’s as beautiful as it is delicious. I truly encourage you to give this recipe a try; the smiles they bring are truly worth it!
For serving, these Easter Bunny Coconut Tails are wonderful on their own as a sweet treat. They also make a charming addition to any Easter dessert table, alongside cakes, cookies, and pastel-colored candies. Consider placing them in little cellophane bags tied with ribbon for charming party favors or gifts.
If you’re looking for variations, you can easily dip half of each tail in melted dark or milk chocolate for a delightful two-toned effect. Another idea is to add a pinch of lemon zest to the coconut mixture for a brighter, fresher flavor. Feel free to get creative with your decorating! Sprinkles, edible glitter, or even a tiny bit of pink food coloring for the tips of the ears can add an extra festive touch.
Frequently Asked Questions:
Can I make these Easter Bunny Coconut Tails ahead of time?
Absolutely! These coconut tails can be made up to 3-4 days in advance and stored in an airtight container at room temperature. This makes them perfect for busy holiday preparations, allowing you to check a delicious item off your list early.
How do I store leftover Easter Bunny Coconut Tails?
Leftovers should be stored in an airtight container at room temperature. Avoid refrigerating them, as this can sometimes make the coconut texture a little too hard. They should remain fresh and delicious for several days.
Are these Easter Bunny Coconut Tails nut-free?
While the recipe itself does not contain nuts, it’s important to note that coconut is botanically a drupe, not a tree nut. However, if you have severe nut allergies, it’s always best to be cautious and check all ingredient labels to ensure they are processed in a nut-free facility.
Easter Bunny Coconut Tails
Adorable and delicious coconut tails, perfect for Easter celebrations. These sweet treats are easy to make and fun to decorate.
Ingredients
-
2 cups shredded coconut
-
1½ cups mini marshmallows
-
¼ cup butter
-
1 teaspoon vanilla extract
-
1 cup white chocolate chips
-
Pink candy melts for decoration
Instructions
-
Step 1
In a microwave-safe bowl, combine shredded coconut, mini marshmallows, and butter. Microwave on high for 1 minute, stir, then microwave in 30-second intervals, stirring after each, until marshmallows are melted and mixture is well combined. -
Step 2
Stir in the vanilla extract until fully incorporated. -
Step 3
Let the mixture cool slightly until it’s manageable to handle. Then, shape the mixture into tail shapes. -
Step 4
Melt the white chocolate chips according to package directions. Dip the shaped coconut tails into the melted white chocolate, ensuring they are fully coated. Place on parchment paper. -
Step 5
Melt the pink candy melts according to package directions. Drizzle the melted candy melts over the white chocolate-coated tails for decoration. You can also pipe small decorative elements. -
Step 6
Allow the chocolate and candy melts to set completely before serving.
Important Information
Nutrition Facts (Per Serving)
It is important to consider this information as approximate and not to use it as definitive health advice.
Allergy Information
Please check ingredients for potential allergens and consult a health professional if in doubt.