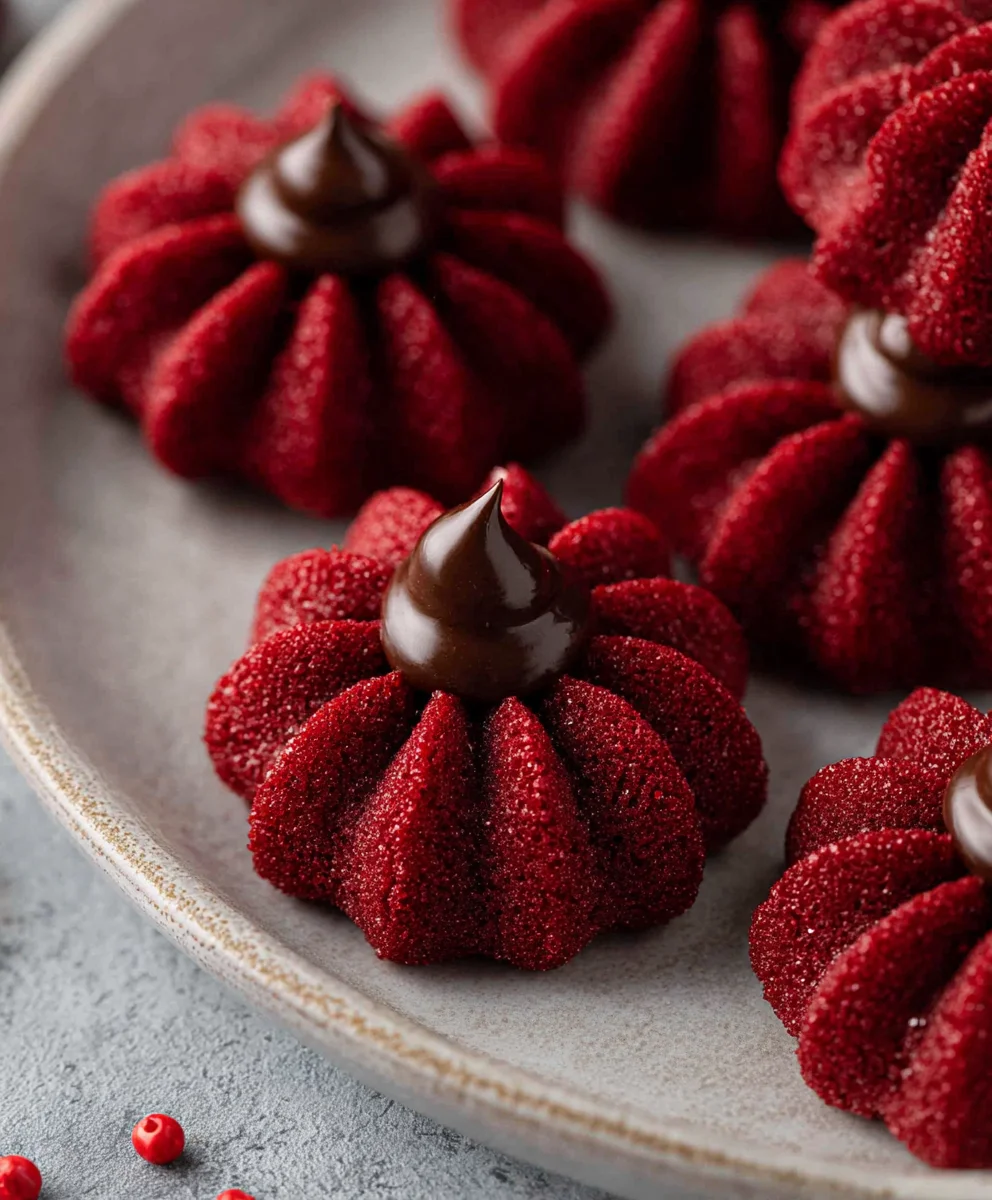
Hershey’s Red Velvet Blossom Cookies-Festive & Delicious
Hershey’s red velvet blossoms are more than just a festive cookie; they’re a burst of holiday cheer and chocolatey indulgence rolled into one delightful bite. Imagin extracte the rich, slightly tangy flavor of red velvet cake, perfectly complemented by the sweet kiss of a Hershey’s Kiss nestled right in the center. It’s this irresistible combination that makes Hershey’s red velvet blossoms a beloved tradition for so magin extract bringing smiles to tables and warmth to kitchens year after year. What truly sets these cookies apart is their stunning visual appeal – that vibrant red hue is instantly eye-catching, promising a delightful treat before you even take the first bite. They’re wonderfully tender with a slight chew, offering a satisfying texture that pairs beautifully with the smooth, melty chocolate topping. Easygin extractough for a beginner baker but impressive enough to share with a crowd, these cookies are a testament to simple ingredients creating something truly magical.
Ingredients:
- 7 tablespoons butter, softened (salted or unsalted will work, but unsalted gives you more control over the saltiness)
- 1/2 cup packed light brown sugar
- 2 tablespoons granulated sugar
- 1 teaspoon pure vanilla extract
- 1 large egg yolk
- 1/4 teaspoon red food coloring gel (gel is concentrated, so a little goes a long way and prevents a watery dough)
- 1 cup all-purpose flour
- 1 tablespoon unsweetened cocoa powder (natural or Dutch-processed is fine)
- 1/2 teaspoon baking powder
- 1/4 teaspoon salt
- 1/4 cup red sanding sugar (for that festive sparkle)
- 18 Hershey’s chocolate kisses (milk chocolate is classic, but you could experiment with other flavors!)
Preparing the Dough
-
Creaming the Butter and Sugars:
Begin extract by creaming together the softened butter and both types of sugar in a medium-sized mixing bowl. Use an electric mixer (handheld or stand mixer with a paddle attachment) on medium speed. You want to beat them until the mixture is light and fluffy, with no gritty sugar granules remaining. This process incorporates air, which will contribute to the cookie’s texture. Scrape down the sides of the bowl a couple of times to ensure everything is evenly combined. This usually takes about 2-3 minutes.
-
Adding Wet Ingredients and Color:
Once the butter and sugar are well-combined, add the vanilla extract and the single large egg yolk to the bowl. Mix on low speed until just incorporated. Now comes the fun part: add the red food coloring gel. Start with 1/4 teaspoon, mix thoroughly, and then assess the color. You’re aiming for a vibrant, true red. Add a tiny bit more gel if needed, mixing well after each addition, until you achieve your desired shade. Be careful not to overmix at this stage. The goal is to distribute the color evenly without developing the gluten in the flour too much.
-
Combining Dry Ingredients and Incorporating Them:
In a separate, smaller bowl, whisk together the all-purpose flour, unsweetened cocoa powder, baking powder, and salt. Whisking these dry ingredients together ensures that the leavening agents and salt are evenly distributed throughout the flour, preventing pockets of bitterness or a salty taste in your cookies. Gradually add this dry mixture to the wet ingredients in the larger bowl. Mix on low speed until just combined and no dry streaks of flour remain. Overmixing the dough at this stage can lead to tough cookies, so be patient and stop as soon as everything comes together. The dough will be thick and slightly sticky, which is perfectly normal.
-
Chilling the Dough and Rolling in Sanding Sugar:
Cover the bowl with plastic wrap and refrigerate the dough for at least 30 minutes. This chilling period is crucial as it firms up the butter, making the dough easier to handle and preventing the cookies from spreading too much during baking. Once chilled, unwrap the dough. Place the red sanding sugar in a shallow dish. Scoop out rounded tablespoons of the chilled dough and roll each portion into a smooth ball. Gently roll each dough ball in the red sanding sugar, ensuring an even coating all over. The sanding sugar will give the cookies their signature sparkly exterior.
-
Baking and Adding the Chocolate Kisses:
Preheat your oven to 350°F (175°C) and line baking sheets with parchment paper. Place the coated dough balls about 2 inches apart on the prepared baking sheets. Bake for 8-10 minutes, or until the edges are set and lightly golden, but the centers still look slightly soft. Immediately after taking the baking sheets out of the oven, gently press one Hershey’s chocolate kiss into the center of each warm cookie. The residual heat from the cookie will help the chocolate melt slightly and adhere beautifully. Let the cookies cool on the baking sheets for a few minutes before carefully transferring them to a wire rack to cool completely. The chocolate will continue to set as the cookies cool.

Conclusion:
And there you have it – a delightful journey into crafting the perfect Hershey’s red velvet blossoms! We hope you found this recipe guide both inspiring and easy to follow. These charming cookies, with their vibrant color and classic chocolate kiss nestled right in the center, are sure to be a hit at any gathering or simply a special treat for yourself. They embody the perfect balance of rich, slightly tangy red velvet flavor and that satisfyingly sweet Hershey’s kiss. Don’t be afraid to get creative and make them your own!
To elevate your Hershey’s red velvet blossoms, consider dusting them with a light sprinkle of powdered sugar just before serving for an extra touch of elegance, or serve them alongside a tall glass of cold milk or a rich hot chocolate. For variations, you can experiment with different flavored Hershey’s Kisses, like caramel or mint, for a fun twist on the origin extractal. You could also add a touch of espresso powder to the dough to deepen the chocolate notes.
We encourage you to dive into your kitchen and whip up a batch of these festive cookies. The process is just as rewarding as the delicious outcome. Enjoy every bite of your homemade Hershey’s red velvet blossoms!
Frequently Asked Questions:
Q: Can I make the dough for Hershey’s red velvet blossoms ahead of time?
A: Absolutely! You can prepare the dough for your Hershey’s red velvet blossoms and store it in an airtight container in the refrigerator for up to 2 days. This makes it super convenient for when you’re ready to bake. Just let it sit at room temperature for about 15-20 minutes before rolling into balls and proceeding with the recipe.
Q: My Hershey’s red velvet blossoms are spreading too much. What can I do?
A: If your Hershey’s red velvet blossoms are spreading excessively, it could be due to a few reasons. Ensure your butter and eggs are not too warm when mixing. Chilling the dough for at least 30 minutes before baking can also help prevent spreading. Additionally, make sure your oven temperature is accurate; an oven thermometer is a great tool to have!
Hershey’s Red Velvet Blossom Cookies
Festive and delicious red velvet cookies topped with Hershey’s chocolate kisses, perfect for any celebration.
Ingredients
-
7 tablespoons butter, softened
-
1/2 cup packed light brown sugar
-
2 tablespoons granulated sugar
-
1 teaspoon pure vanilla extract
-
1 large egg yolk
-
1/4 teaspoon red food coloring gel
-
1 cup all-purpose flour
-
1 tablespoon unsweetened cocoa powder
-
1/2 teaspoon baking powder
-
1/4 teaspoon salt
-
1/4 cup red sanding sugar
-
18 Hershey’s chocolate kisses
Instructions
-
Step 1
Cream together the softened butter and both sugars until light and fluffy. Scrape down the bowl as needed. -
Step 2
Add vanilla extract and egg yolk. Mix until incorporated. Add red food coloring gel, starting with 1/4 teaspoon, and mix until desired vibrant red color is achieved. Do not overmix. -
Step 3
In a separate bowl, whisk together flour, cocoa powder, baking powder, and salt. Gradually add dry ingredients to wet ingredients, mixing on low speed until just combined. Do not overmix. -
Step 4
Cover dough and refrigerate for at least 30 minutes. Place red sanding sugar in a shallow dish. Scoop dough into tablespoon-sized balls and roll each ball in sanding sugar. -
Step 5
Preheat oven to 350°F (175°C) and line baking sheets with parchment paper. Place coated dough balls on prepared sheets. Bake for 8-10 minutes until edges are set. Immediately press one Hershey’s chocolate kiss into the center of each warm cookie. -
Step 6
Let cookies cool on baking sheets for a few minutes before transferring to a wire rack to cool completely.
Important Information
Nutrition Facts (Per Serving)
It is important to consider this information as approximate and not to use it as definitive health advice.
Allergy Information
Please check ingredients for potential allergens and consult a health professional if in doubt.