Blackberry Hand Pies-Sweet & Easy Dessert Recipe
Blackberry hand pies are more than just a dessert; they’re a miniature explosion of summer joy, encased in a flaky, golden crust. Imagin extracte the first bite: a warm, slightly yielding pastry giving way to a burst of sweet and tart blackberries, their juices mingling to create a delightful, rustic filling. It’s no wonder these portable pockets of deliciousness are so beloved. They offer the comforting essence of a traditional pie without the fuss, making them perfect for picnics, potlucks, or simply an afternoon treat. What truly sets these blackberry hand pies apart is the perfect balance of flavors and textures – the tender fruit against the crisp pastry, the subtle sweetness balanced by a hint of tartness. We’re going to guide you through creating these irresistible delights, ensuring your kitchen fills with the irresistible aroma of baking berries and butter.
Ingredients:
- 21 oz. can blackberry pie filling
- Refrigerated pie crust (you’ll need enough for two crusts, typically one package contains two)
- 1/2 cup powdered sugar
- 1 teaspoon corn syrup
- 1 tablespoon water
- Vegetable oil for frying (ensure you have enough to fill your pan about 1-2 inches deep)
Preparing the Blackberry Filling
Step 1: Gently Thicken the Filling (Optional but Recommended)
Before we even think about assembling our hand pies, let’s give that store-bought blackberry pie filling a little boost to ensure it holds its shape beautifully within the crust. Open the 21 oz. can of blackberry pie filling. While it’s usually quite good as-is, sometimes a little extra thickening can prevent a messy situation once baked or fried. You can transfer the filling to a small saucepan over medium-low heat. Stir it gently for a few minutes until it just begin extracts to bubble. You’re not trying to cook it down significantly, just to help the thickener already present activate. Be careful not to scorch it, as this can impart an unpleasant flavor. If you’re short on time or prefer not to heat it, you can skip this step, but a slightly warmed and stirred filling tends to be more stable. Let it cool slightly while you prepare the dough.
Step 2: Preparing the Pie Crust
Now it’s time to get our pastry ready. Unroll your refrigerated pie crusts onto a lightly floured surface. You’ll likely have two crusts in a standard package. Gently separate them if they are still connected. We’re going to cut out circles for our hand pies. The size of your circles will determine the final size of your pies. A good starting point is to use a round cookie cutter or a small bowl with a diameter of about 4-5 inches. Press down firmly to cut through the crust. You’ll need two circles for each hand pie: one for the bottom and one for the top. Carefully gather any scraps, re-roll them gently, and cut out more circles until you’ve used up as much dough as possible. You should aim for at least 6-8 hand pies depending on your circle size. Place the cut-out circles onto a baking sheet lined with parchment paper to prevent sticking.
Assembling the Blackberry Hand Pies
Step 3: Filling and Sealing the Pies
With our crust circles ready, we can now assemble the hand pies. Take one crust circle and place it on your prepared baking sheet. Spoon a generous tablespoon or two of the prepared blackberry pie filling onto the center of this circle. Be careful not to overfill, as this can make sealing difficult and increase the chances of leakage during cooking. Leave a border of about half an inch all around the filling. Now, take a second crust circle and carefully place it directly on top of the filling. Gently press the edges together to seal. You can use your fingers to crimp the edges, or for a more decorative finish, use the tines of a fork to press down and create a pattern along the seam. This also helps ensure a good seal. Repeat this process for all your hand pies. Make sure the seals are nice and tight.
Step 4: Creating Vents and Preparing for Frying
Before we send these beauties off to be fried, we need to give them a way for steam to escape. This is crucial to prevent the pies from puffing up unevenly and potentially bursting. Using a small, sharp knife or a toothpick, carefully create a few small slits or a decorative pattern on the top crust of each assembled hand pie. These vents will allow steam to escape as they cook, ensuring a beautiful, intact pie. Once vented, place the assembled hand pies back onto the parchment-lined baking sheet. At this stage, you can also brush them lightly with a little egg wash (one egg beaten with a tablespoon of water) if you desire a golden-brown, slightly shiny finish after frying, though this is entirely optional for fried pies.
Frying and Glazing
Step 5: Frying the Blackberry Hand Pies to Golden Perfection
Now for the exciting part – frying! Pour vegetable oil into a heavy-bottomed skillet or pot to a depth of about 1 to 2 inches. Heat the oil over medium heat until it reaches approximately 350-365°F (175-185°C). You can test if the oil is ready by dropping a tiny piece of dough into it; it should sizzle immediately and float to the surface. Carefully, and in batches to avoid overcrowding the pan (which can lower the oil temperature and lead to greasy pies), place the blackberry hand pies into the hot oil. Fry for about 2-4 minutes per side, or until they are a beautiful golden brown and puffed up. Use a slotted spoon or a spider strainer to gently flip the pies and ensure even cooking. Once golden brown on both sides, remove the pies from the oil and place them on a wire rack set over a baking sheet or paper towels to drain any excess oil.
Step 6: Whipping up the Simple Glaze
While your blackberry hand pies are still warm, it’s time for the finishing touch: a simple, sweet glaze. In a small bowl, combine the 1/2 cup of powdered sugar with the 1 teaspoon of corn syrup and 1 tablespoon of water. Whisk vigorously until the mixture is smooth and lump-free. The corn syrup adds a lovely sheen and helps prevent the glaze from becoming too hard. If the glaze seems too thick, add a tiny bit more water, a drop at a time, until you reach your desired drizzling consistency. If it’s too thin, add a touch more powdered sugar.
Step 7: Glazing and Serving Your Delicious Hand Pies
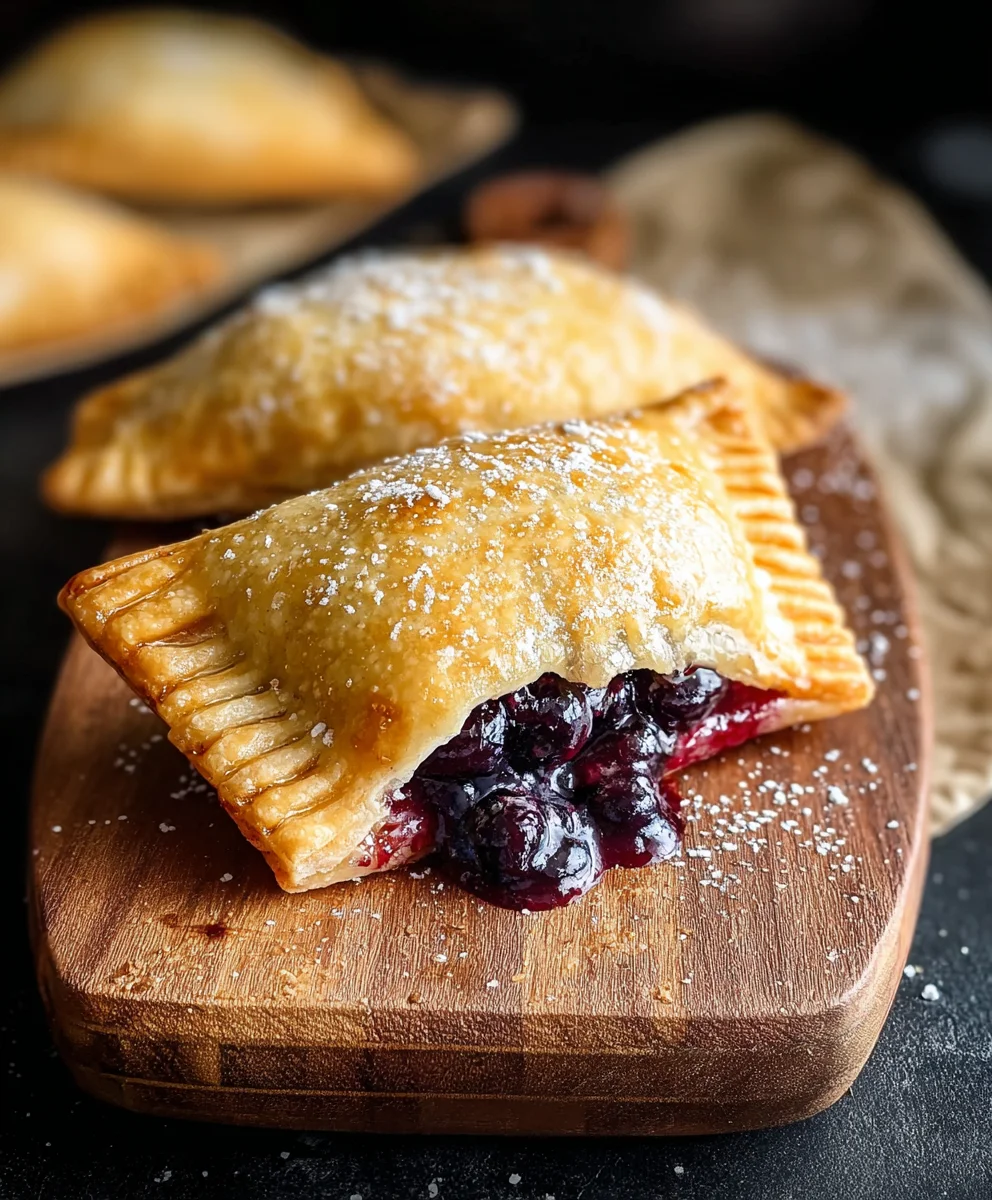
Once your blackberry hand pies have drained for a minute or two, yogin extractan begin drizzling the glaze over them. You can do this freehand for a rustic look, or use a spoon to create a more patterned effect. The glaze will start to set as it cools, creating a delightful contrast to the flaky, golden crust and the warm, fruity filling. Allow the glaze to set for a few minutes before serving. These blackberry hand pies are absolutely divine served warm, but they are also delicious at room temperature. Enjoy the sweet, tangy burst of blackberry with every bite!

Conclusion:
And there you have it – your very own batch of delicious Blackberry Hand Pies! We’ve walked through each step, from crafting the perfect flaky pastry to creating that sweet and tangy blackberry filling. These little pockets of joy are incredibly rewarding to make and even more delightful to eat. I truly hope you enjoy the process as much as I do, and that your taste buds are singin extractg with every bite.
These Blackberry Hand Pies are wonderful served warm, perhaps with a dusting of powdered sugar or a scoop of vanilla bean ice cream for an extra special treat. They’re also fantastic at room temperature, making them a portable snack or picnic delight. Feel free to experiment with different fruit combinations – perhaps a swirl of raspberry or a hint of lemon zest in your blackberry filling could be your next signature addition!
Don’t be afraid to get creative. If you don’t have fresh blackberries, frozen ones work beautifully too. Just be sure to thaw them and drain any excess liquid before adding them to your filling. The most important ingredient is your enthusiasm, so dive in and have fun!
Frequently Asked Questions about Blackberry Hand Pies:
Can I make the pastry dough ahead of time?
Absolutely! The pastry dough for your Blackberry Hand Pies can be made up to 2 days in advance and stored in the refrigerator. Just be sure to wrap it tightly in plastic wrap. You can also freeze the dough for up to 3 months; just thaw it in the refrigerator overnight before using.
How should I store leftover Blackberry Hand Pies?
Once cooled, leftover Blackberry Hand Pies can be stored in an airtight container at room temperature for up to 2 days, or in the refrigerator for up to 4 days. Reheat them gently in a low oven or toaster oven to revive their crispiness.
Blackberry Hand Pies – Sweet & Easy Dessert Recipe
A simple and delicious recipe for sweet and easy blackberry hand pies, perfect for a quick dessert.
Ingredients
-
21 oz. can blackberry pie filling
-
Refrigerated pie crust
-
1/2 cup powdered sugar
-
1 teaspoon corn syrup
-
1 tablespoon water
-
Vegetable oil for frying
Instructions
-
Step 1
Gently thicken the blackberry pie filling by transferring it to a small saucepan over medium-low heat and stirring until it just begins to bubble. Let it cool slightly. -
Step 2
Unroll refrigerated pie crusts onto a lightly floured surface. Cut out 4-5 inch circles for the hand pies. You’ll need two circles per pie. Place circles on a parchment-lined baking sheet. -
Step 3
Spoon 1-2 tablespoons of the thickened blackberry filling onto the center of one crust circle, leaving a half-inch border. Place a second crust circle on top and press to seal the edges. Crimp with fingers or a fork. -
Step 4
Create a few small slits or a decorative pattern on the top crust of each hand pie with a sharp knife or toothpick to allow steam to escape. -
Step 5
Heat vegetable oil in a skillet to 350-365°F (175-185°C). Fry the hand pies in batches for 2-4 minutes per side, until golden brown. Drain on a wire rack. -
Step 6
While pies are warm, whisk together powdered sugar, corn syrup, and water in a small bowl to create a smooth glaze. Adjust consistency as needed. -
Step 7
Drizzle the glaze over the warm hand pies and let it set for a few minutes before serving.
Important Information
Nutrition Facts (Per Serving)
It is important to consider this information as approximate and not to use it as definitive health advice.
Allergy Information
Please check ingredients for potential allergens and consult a health professional if in doubt.